


Page
23
MacroAir Technologies Inc. www.macro-air.com Toll Free: 866-668-3247 Build: January 9 2009
D)
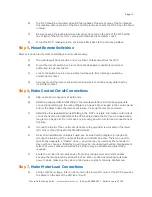
Apply one or two drops of blue medium thread sealant (not included) to each of the four
included 1/4”-28 x 1” gold grade 8 bolts.
E)
Using the supplied gold washers, insert the bolts through the four non-threaded holes in
the keyless bushing adapter into the holes in the hub center bushing and tighten them.
F)
Torque the bolts to 15 ft-lbs each. Be aware that the hub will move toward the bushing
adapter as the bolts are tightened, so be sure to set the adapter close to flush with the
end of the shaft before tightening the bolts.
G)
When finished, the top of the keyless bushing adapter should be approximately flush with
the end of the gearbox output shaft.
H)
Attach the black plastic hub cover to the hub using 3 supplied Phillips screws and star
washers.
Step 6
, Attach Fan Blades
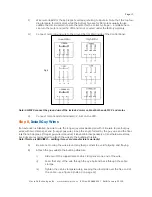
For fans without safety screens, blade safety links and safety link extenders must be installed. See step 9B
in the standard instructions (page 16) for more information on how to install these.
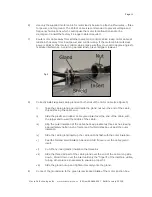
A)
Slide the blade over the hub winglet, ensuring that the hooked edge of the blade faces
out.
B)
Line up the holes in the blade with the holes in the winglet and insert the supplied bolts
from back to front (towards you). Use a washer between the bolt head and the blade.
C)
Attach the supplied nylon lock nuts to the bolts, using washers between the nut and the
blade, and tighten firmly.
Step 7
, Attach Front Safety Screen
(if ordered with safety screens)
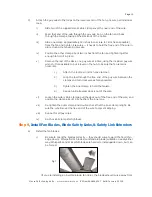
A)
Line up the struts of the front screen with the struts of the rear screen.
B)
Attach the screens together by inserting the included sheet metal screws through the
holes in the front screen struts into the holes in the ends of the rear screen struts.
C)
Completely tighten one screw at the top, bottom, and each side to hold the screens in
place, then tighten all the screws. Be careful not to strip them out.
Fig 14


