background image

Quick Start Guide   

27

Mackie Limited Warranty

Please keep your sales receipt in a safe place.

This Limited Product Warranty (“Product Warranty”) is provided by LOUD Technologies Inc. (“LOUD”) 
and is applicable to products purchased in the United States or Canada through a LOUD-authorized 
reseller or dealer. The Product Warranty will not extend to anyone other than the original purchaser of 
the product (hereinafter, “Customer,” “you” or “your”).

For products purchased outside the U.S. or Canada, please visit www.mackie.com/warranty to fi nd 
contact information for your local distributor, and information on any warranty coverage provided by the 
distributor in your local market.

LOUD warrants to Customer that the product will be free from defects in materials and workmanship 
under normal use during the Warranty Period. If the product fails to conform to the warranty then LOUD 
or its authorized service representative will at its option, either repair or replace any such nonconforming 
product, provided that Customer gives notice of the noncompliance within the Warranty Period to the 
Company at: www.mackie.com/support or by calling LOUD technical support at 1.800.898.3211 (toll-
free in the U.S. and Canada) during normal business hours Pacifi c Time, excluding weekends or LOUD 
holidays. Please retain the original dated sales receipt as evidence of the date of purchase. You will need it 
to obtain any warranty service. 

For full terms and conditions, as well as the specifi c duration of the Warranty for this product, please visit 
www.mackie.com/warranty.

The Product Warranty, together with your invoice or receipt, and the terms and conditions located 
at www.mackie.com/warranty constitutes the entire agreement, and supersedes any and all prior 
agreements between LOUD and Customer related to the subject matter hereof. No amendment, 
modifi cation or waiver of any of the provisions of this Product Warranty will be valid unless set forth in a 
written instrument signed by the party to be bound thereby.

Summary of Contents for ONYX 1640I

Page 1: ...ID FREQ LOW MID FREQ 40dB U 20dB U 20 30 40 60 L R MAX O O MAX O O MAX O O MAX O O MAX O O MAX O O SEND PRE POST OL 10 0 20 SUB ASSIGN MAIN MIX 1 2 3 4 GAIN 4 2 1 5 6 3 PAN HIGH 12kHz LOW 80Hz U 15 15...

Page 2: ...f the Canadian Department of Communications ATTENTION Le pr sent appareil num rique n met pas de bruits radio lectriques d passant las limites applicables aux appareils num riques de class A de class...

Page 3: ...he safety instructions on page 2 and this page and then have a look through some of the features and details in this quick start guide A full manual is available on www mackie com Setup Use the mixer...

Page 4: ...1 2 46 ASSIGN CONTROL ROOM SOURCE TO MAIN MIX 47 CONTROL ROOM LEVEL 48 PHONES LEVEL 49 LEFT RIGHT LEVEL METERS 50 RUDE SOLO LIGHT 51 SOLO LEVEL 52 SOLO MODE SWITCH PFL AFL 53 TAPE IN LEVEL 54 TAPE TO...

Page 5: ...O MAX O O MAX O O MAX O O MAX O O SEND PRE POST OL 10 0 20 SUB ASSIGN MAIN MIX 1 2 3 4 GAIN 4 2 1 5 6 3 PAN HIGH 12kHz LOW 80Hz U 15 15 U 15 15 U 15 15 U 15 15 8k 400 2k 2k 100 400 HIGH MID FREQ LOW M...

Page 6: ...00 HIGH MID FREQ LOW MID FREQ 40dB U 20dB U 20 30 40 60 L R MAX O O MAX O O MAX O O MAX O O MAX O O MAX O O SEND PRE POST OL 10 0 20 SUB ASSIGN MAIN MIX 1 2 3 4 GAIN 4 2 1 5 6 3 PAN HIGH 12kHz LOW 80H...

Page 7: ...B ASSIGN MAIN MIX 1 2 3 4 GAIN 4 2 1 5 6 3 PAN HIGH 12kHz LOW 80Hz U 15 15 U 15 15 U 15 15 U 15 15 8k 400 2k 2k 100 400 HIGH MID FREQ LOW MID FREQ 40dB U 20dB U 20 30 40 60 L R MAX O O MAX O O MAX O O...

Page 8: ...MIX 1 2 3 4 GAIN 4 2 1 5 6 3 PAN HIGH 12kHz LOW 80Hz U 15 15 U 15 15 U 15 15 U 15 15 8k 400 2k 2k 100 400 HIGH MID FREQ LOW MID FREQ 40dB U 20dB U 20 30 40 60 L R MAX O O MAX O O MAX O O MAX O O MAX...

Page 9: ...O 15 O O 15 O O 15 O O 10 O O 10 O O 10 O O 10 O O 10 O O 10 O O 15 O O 15 O O 15 O O MAX O O MAX O O MAX O O MAX O O MAX O O SEND PRE POST OL 10 0 20 SUB ASSIGN MAIN MIX 1 2 3 4 GAIN 4 2 1 5 6 3 PAN...

Page 10: ...15 U 15 15 U 15 15 U 15 15 8k 400 2k 2k 100 400 HIGH MID FREQ LOW MID FREQ 40dB U 20dB U 20 30 40 60 L R MAX O O MAX O O MAX O O MAX O O MAX O O MAX O O SEND PRE POST OL 10 0 20 SUB ASSIGN MAIN MIX 1...

Page 11: ...O O MAX O O MAX O O MAX O O 15 O O 15 O O 15 O O 10 O O 10 O O 10 O O 10 O O 10 O O 10 O O 15 O O 15 O O 15 O O MAX O O MAX O O MAX O O MAX O O MAX O O SEND PRE POST OL 10 0 20 SUB ASSIGN MAIN MIX 1...

Page 12: ...15 15 U 15 15 U 15 15 8k 400 2k 2k 100 400 HIGH MID FREQ LOW MID FREQ 40dB U 20dB U 20 30 40 60 L R MAX O O MAX O O MAX O O MAX O O MAX O O MAX O O SEND PRE POST OL 10 0 20 SUB ASSIGN MAIN MIX 1 2 3 4...

Page 13: ...e subs 1 2 3 4 button does absolutely nothing Let s now assume it is pushed in Aux return 3 s stereo signal will not be sent to the main mix but to the subgroup faders 1 and 2 subs 1 2 3 4 button up o...

Page 14: ...15 U 15 15 U 15 15 U 15 15 8k 400 2k 2k 100 400 HIGH MID FREQ LOW MID FREQ 40dB U 20dB U 20 30 40 60 L R MAX O O MAX O O MAX O O MAX O O MAX O O MAX O O SEND PRE POST OL 10 0 20 SUB ASSIGN MAIN MIX 1...

Page 15: ...O O MAX O O MAX O O SEND PRE POST OL 10 0 20 SUB ASSIGN MAIN MIX 1 2 3 4 GAIN 4 2 1 5 6 3 PAN HIGH 12kHz LOW 80Hz U 15 15 U 15 15 U 15 15 U 15 15 8k 400 2k 2k 100 400 HIGH MID FREQ LOW MID FREQ 40dB...

Page 16: ...0 30 40 60 L R MAX O O MAX O O MAX O O MAX O O MAX O O MAX O O SEND PRE POST OL 10 0 20 SUBS 1 4 TO FW 5 8 SOLO LEVEL PFL AFL TAPE TO MAIN MIX TAPE IN MAX O O MAX O O SOLO MODE L R 0dB 0dBu POWER SUB...

Page 17: ...EVEL PFL AFL TAPE TO MAIN MIX TAPE IN MAX O O MAX O O SOLO MODE L R 0dB 0dBu POWER SUB ASSIGN MAIN MIX 1 2 3 4 GAIN 4 2 1 5 6 3 PAN HIGH 12kHz LOW 80Hz U 15 15 U 15 15 U 15 15 U 15 15 8k 400 2k 2k 100...

Page 18: ...15 15 U 15 15 U 15 15 8k 400 2k 2k 100 400 HIGH MID FREQ LOW MID FREQ 40dB U 20dB U 20 30 40 60 L R MAX O O MAX O O MAX O O MAX O O MAX O O MAX O O SEND PRE POST OL 10 0 20 SUB ASSIGN MAIN MIX 1 2 3...

Page 19: ...t and activate the inputs from the mixer and outputs to the mixer FIREWIRE CONNECTIONS Two FireWire connectors allow the transfer of digital audio to and from your computer or digital audio workstatio...

Page 20: ...MAX O O MAX O O MAX O O MAX O O 15 O O 15 O O 15 O O 10 O O 10 O O 10 O O 10 O O 10 O O 10 O O 15 O O 15 O O 15 O O MAX O O MAX O O MAX O O MAX O O MAX O O SEND PRE POST OL 10 0 20 SUB ASSIGN MAIN MI...

Page 21: ...R SUB ASSIGN MAIN MIX 1 2 3 4 GAIN 4 2 1 5 6 3 PAN HIGH 12kHz LOW 80Hz U 15 15 U 15 15 U 15 15 U 15 15 8k 400 2k 2k 100 400 HIGH MID FREQ LOW MID FREQ 40dB U 20dB U 20 30 40 60 L R MAX O O MAX O O MAX...

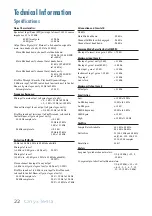
Page 22: ...t insert 4 dBu in 0 dB gain 4 dBu out 0 005 Mic input at insert 10 dBu in 20 dB gain 20 Hz to 20 kHz bandwidth 0 0007 Stereo channel line input to any output 4 dBu in all gain stages at unity 4 dBu ou...

Page 23: ...s Day without wearing one stitch of green so there Please check our website for any updates to this manual or updates to the PC drivers www mackie com 2010 LOUD Technologies Inc All Rights Reserved D...

Page 24: ...15 U 15 15 U 15 15 8k 400 2k 2k 100 400 HIGH MID FREQ LOW MID FREQ 40dB U 20dB U 20 30 40 60 L R MAX O O MAX O O MAX O O MAX O O MAX O O MAX O O SEND PRE POST OL 10 0 20 SUB ASSIGN MAIN MIX 1 2 3 4 GA...

Page 25: ...O MON RUDE SOLO 20 15 10 6 3 0 2 4 7 10 20 30 SUB 3 4 FW 1 2 SUB 1 2 TAPE ASSIGN TO MAIN MIX MAIN MIX LEVEL SET CLIP MAIN MIX SUB1 SUB4 SUB3 SUB2 SUB1 SUB4 SUB3 SUB2 4 3 2 2 1 1 6 12V 0 5A LAMP CTRL R...

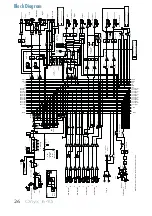
Page 26: ...R R L aux 6 pre aux 5 pre pfl logic Main 4 3 Sub aux 6 post aux 5 post aux 4 pre aux 3 pre aux 4 post aux 3 post afl R afl L 2 1 aux 2 pre aux 1 pre aux 2 post aux 1 post CR in L CR in R L R Aux Retu...

Page 27: ...presentative will at its option either repair or replace any such nonconforming product provided that Customer gives notice of the noncompliance within the Warranty Period to the Company at www mackie...

Page 28: ...Road NE Woodinville WA 98072 USA United States and Canada 800 898 3211 Europe Asia Central and South America 425 487 4333 Middle East and Africa 31 20 654 4000 Fax 425 487 4337 www mackie com E mail s...

Reviews: