background image

8

HR624 MK2

HR6

24 MK2

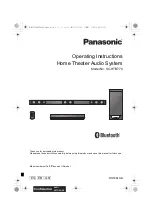
REAR PANEL DESCRIPTION 

2. INPUT SENSITIVITY

INPUT 

SENSITIVITY

–10dB

NORMAL

OFF

ACOUSTIC

SPACE

LOW

FREQ FILTER

POWER

MODE

0

(NORMAL)

AUTO

ON

–2dB

+2dB STANDBY

ON

HIGH

FREQ FILTER

HALF

WHOLE (NORMAL)

QUARTER

80Hz

LOW CUT

49Hz

(NORMAL)

B

A

C

THX = NORMAL

The HR624 MK2 expects a line-level signal at its input 

connectors. 

•  The reference sensitivity is –7.5 dBu=100 dB SPL at 

one meter (39 inches) with the INPUT SENSITIVITY 
control set to its NORMAL position (in other words, 
wide open). 

•  The HR624 MK2 is designed to operate with a +4 dBu 

signal when the INPUT SENSITIVITY control is in the 
NORMAL position.

•  Refer to the QUICK START section on page 4 for the 

level-setting procedure.
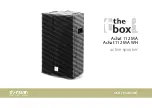
3. ACOUSTIC SPACE

INPUT 

SENSITIVITY

–10dB

NORMAL

OFF

ACOUSTIC

SPACE

LOW

FREQ FILTER

POWER

MODE

0

(NORMAL)

AUTO

ON

–2dB

+2dB STANDBY

ON

HIGH

FREQ FILTER

HALF

WHOLE (NORMAL)

QUARTER

80Hz

LOW CUT

49Hz

(NORMAL)

B

A

C

THX = WHOLE (NORMAL)

This is a three-way switch that  adjusts the low-frequency 

response of the monitors to compensate for their  
placement in the room. See page 5 for an overview of 
the rear panel. 

•  If you place the HR624 MK2 monitors against a wall 

(half space [3B]), set the ACOUSTIC SPACE switch 
to the “B” position. This activates a shelving filter to 
reduce the low-frequency output by 2 dB to compensate 
for the half-space placement.

•  If you place the monitors into the corners of your 

room (quarter space [3A]), the low-frequency output 
approximately doubles from what it is in half space. 
Set the ACOUSTIC SPACE switch to the “A” position to 
reduce the low-frequency output by 4 dB to compensate 
for the quarter-space placement.

•  If you use the HR624 MK2s free-standing, away from 

walls and corners (whole space [3C]), set the  
ACOUSTIC SPACE switch to the “C” position  
(NORMAL).

This is where you connect your signal to the monitor, 

and make adjustments to the frequency response of 
the speakers to match the monitor’s location and your 
room’s environment.

For THX applications, the rear panel 
switches and controls should be set 
to the THX positions as indicated in 
this section.

1. SIGNAL INPUTS

The location of the signal input jacks makes the   

connectors exit down and not straight out the back of 
the enclosure. This flush-mount design allows you to 
place the monitor right up against the wall if desired.

•  The XLR female, TRS female (balanced), and RCA 

female (unbalanced) input connectors are provided for 
user convenience.

•  Don’t connect more than one source to the jacks.
•  Unbalanced TS (tip-sleeve) lines can be accommodated 

via the TRS jack. Make sure the cable terminates with 
a TS plug (like a guitar plug), or if it’s a TRS plug (such 
as a headphone plug), make sure the ring is tied to the 
sleeve and that the plug is fully inserted into the jack.

•  The XLR and TRS input connectors accept balanced or 

unbalanced signals. The connectors are wired as follows 
(per the AES/IEC standard): 


XLR 

TRS 

RCA

Hot (+)    

Pin 2 

Tip 

Tip 

Cold (–)   

Pin 3 

Ring 

— 

Shield (Ground) 

Pin 1 

Shield  Shield

•  The HR624 MK2s can be used with a home receiver 

even if the receiver lacks a preamp output by using a 
speaker-level to line-level signal attenuator. (See page 
13 for more information.)

Summary of Contents for HR624 MK2

Page 1: ...OWNER S MANUAL HR624 MK2 High Resolution Active Studio Monitor...

Page 2: ...s sure levels use hearing protectors while the equipment is in operation Ear plugs or protectors in the ear canals or over the ears must be worn when operating the equipment in order to prevent perman...

Page 3: ...s The HR624 MK2s have been redesigned with modern components for improved accuracy and an extended low frequency response InvestmentsinExcellence When we decided it was time to update the HR624s we tu...

Page 4: ...ttings ACOUSTIC SPACE WHOLE LOW FREQ 49Hz HIGH FREQ 0 except for the POWER MODE 6 switch Be sure it is set to the STANDBY position 1 Connect the line level monitor signal from your mixer preamp or oth...

Page 5: ...MODE 0 NORMAL AUTO ON 2dB 2dB STANDBY ON HIGH FREQ FILTER HALF WHOLE NORMAL QUARTER 80Hz LOW CUT 49Hz NORMAL B A C MAINS INPUT SIGNAL INPUTS BAL UNBAL XLR PHONE RCA C B A RISK OF ELECTRIC SHOCK DO NO...

Page 6: ...for another one Save your sales receipt in a safe place Also record all HR624 MK2 serial numbers in the space provided on the next page alongwithwhereandwhen youboughtthem Placement The HR624 MK2s we...

Page 7: ...es whose need for differentiation expert technical and marketing support and a true multi channel standard is becoming a competitive fact of life Again THX has a singular solution and this time it s c...

Page 8: ...the A position to reduce the low frequency output by 4 dB to compensate for the quarter space placement If you use the HR624 MK2s free standing away from walls and corners whole space 3C set the ACOU...

Page 9: ...W CUT 49Hz NORMAL B A C THX 80Hz The LOW FREQ FILTER switch inserts a low frequency rolloff into the response curve For some applications the low frequency output of the HR624 MK2 may impair your abil...

Page 10: ...ets them to automatic mode Use this switch to set the HR624 MK2s to your preferred mode of operation and use the front panel power 9 switch for convenience In the STANDBY position the power amplifiers...

Page 11: ...ncy the frequency response falls at 24 dB octave or more The HR624 MK2 is a bass reflex 6th order system Rather than use ports the vent takes the form of a passive radiator a mass loaded flat piston c...

Page 12: ...wer switch turns the HR624 MK2 on even when there is no signal present If there is no signal after about two minutes the auto off function is activated and the amplifiers go into Standby mode indicate...

Page 13: ...y induced noise like EMI and RFI Route the cable away from AC power cords and outlets These are common sources for hum in an audio signal Wall warts and line lumps are especially insidious hum inducer...

Page 14: ...onnector plugged completely into the jack If using a 1 4 TS or TRS plug make sure it is plugged all the way in Is it loud and distorted Reduce the signal level at the mixer If possible listen to the s...

Page 15: ...Tech Support department at 1 800 898 3211 normal business hours Pacific Time to explain the problem They will tell you where the nearest factory authorized service center is located in your area Serv...

Page 16: ...Auto Reset Muting 5 seconds at turn on Signal Sense Threshold 74 dBu 0 155 mV Driver Protection Independent LF and HF Detection Overall Compression HR624 MK2 Specifications Enclosure Materials and Con...

Page 17: ...V 50 60 Hz Rated Power For UL 6500 CSA E65 94 EN 60065 130 watts Physical Properties Height 13 1 in 33 3 cm Width 8 6 in 21 9 cm Depth Enclosure 10 3 in 26 2 cm Depth Overall 12 6 in 31 9 cm Internal...

Page 18: ...FF CONTROL MUTE THERMAL SWITCH LOW AC VOLTS SENSE POWER SWITCH FRONT PANEL POWER MODE SWITCH HIGH MUTE OFF LOW MUTE ON MACKIE HR624 MK2 BLOCK DIAGRAM 030507 OUTER SPACE 120V 240V FUSE POWER RING POWER...

Page 19: ...ice representative will at its option either repair or replace any such nonconforming product provided that Customer gives notice of the noncompliance within the Warranty Period to the Company at www...

Page 20: ...Road NE Woodinville WA 98072 USA United States and Canada 800 898 3211 Europe Asia Central and South America 425 487 4333 Middle East and Africa 31 20 654 4000 Fax 425 487 4337 www mackie com E mail s...

Reviews: