background image


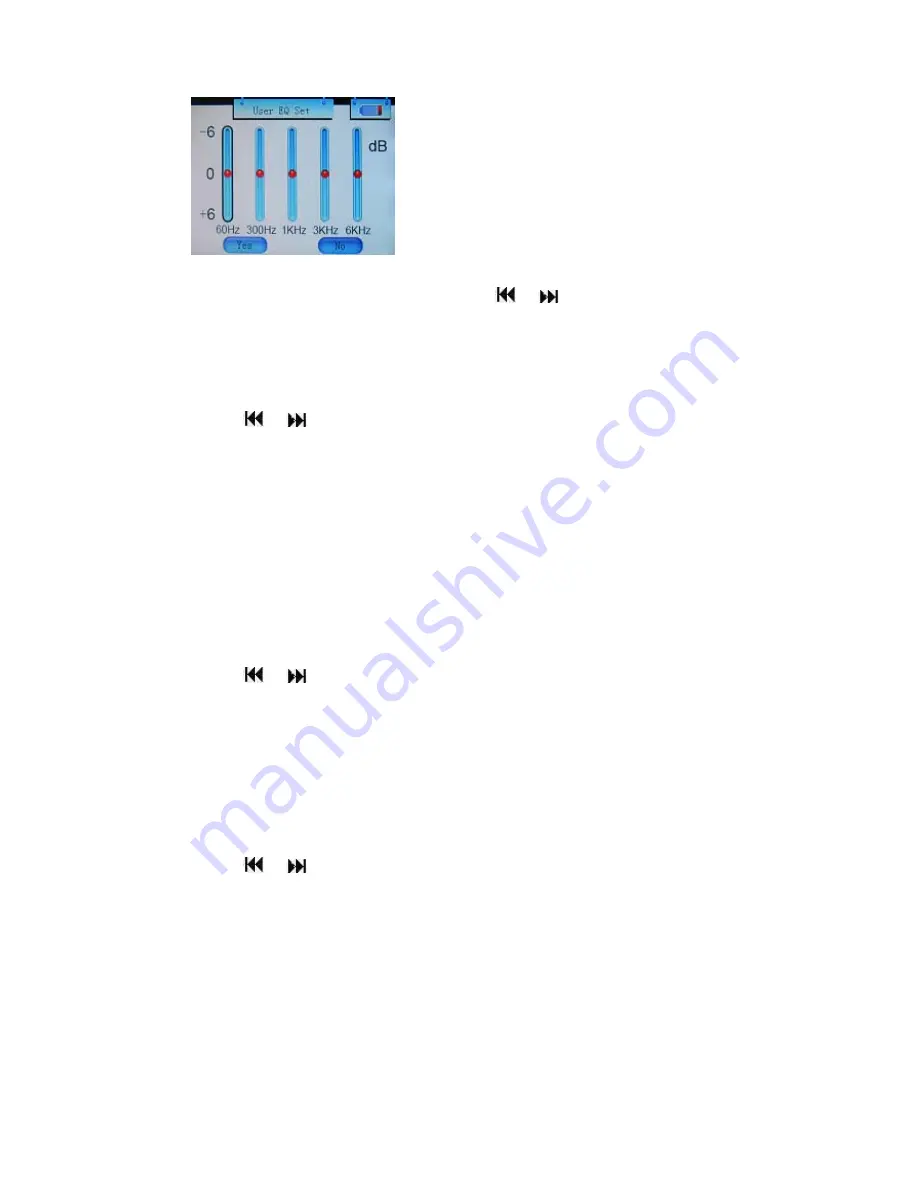
In the user EQ adjustment screen, quickly pressing the VOL key will shift which the band to be adjusted. 
Once you have a band selected quickly press the 

or


keys to modify the band. After you have 

finished setting the equalizer, quickly press the VOL key until you select yes, and quickly press the 
MODE key to confirm the setting. 

Radio 

Use the 

or


keys to select Music, and press the MODE key to enter. 

A. 

Stereo Switch


ON… 


Turns on stereo radio if available 


OFF… 

  Disables 

stereo 

radio 

FM Region


China…   


Select if you are in china 


Europe…  


Select if you are in Europe 


Japan…   


Select if you are in Japan 


USA…   


Select if you are in North America 

Record


Use the 

or


keys to select Music, and press the MODE key to enter. 

A. 

REC Quality


High Quality… 

Higher quality recordings, but uses more power and larger files 


Normal Quality…  Default recording quality 

B. 

REC volume


Increase the recording volume by up to 5 levels     

Display


Use the 

or


keys to select Music, and press the MODE key to enter   

A. 

BLight Time


Set the time the backlight stays lit after making a selection. 


Options are 5sec, 10sec, 15sec, 20sec, 30sec, and always on. 

B. 

Lum


Set the luminescence (brightness) of the screen from 1 (dimmest) to 5 (brightest) 

C. 

BLight Mode


Normal… 


Default backlight mode 


Power Save…  

Power saving backlight     

20 

Summary of Contents for Zodiac 2GB

Page 1: ...ion Key Actions Basic Operation Touchpad lock ON OFF Main Menu Music Lyrics Song selection Volume adjustment Fast Forward Rewind A B Repeat mode Video Video file selection Volume adjustment Fast Forwa...

Page 2: ...ng to a Bookmark Record Explorer File selection Deleting Files Settings Music Radio Record Display Auto Play Set slideshow System Power Off Restore Defaults System Expansion USB Connection Charging Vi...

Page 3: ...3 Selecting a file to convert Set the location to save the converted file Video Conversion Computer Communication Technical Specifications...

Page 4: ...itch it to OFF Avoid using your Zodiac under extremely hot cold dusty or wet environments Striking dropping or severe jolts to your Zodiac may cause physical damage battery loosening or other hardware...

Page 5: ...as adjustable lighting and automatic power off Multiple repeat modes and multiple sound effect modes are available Support A B repeat function Intuitive file navigation and management Full Speed USB2...

Page 6: ...PHONE input jack of earphone wire 6 PRE Key selects the next track or menu file Also used to fast forward and increase volume 7 VOL Key Volume and back 8 MICRO SD CARD expansion 9 USB Interface 10 Pow...

Page 7: ...ger is lit The red LED is the power indication LED and the green is the charging indication LED When the battery is full and the display prompts battery full the green LED on the charger will turn off...

Page 8: ...on please switch it to the ON position 2 Press and hold the Power button to power the unit on A welcome screen will display 3 To power the unit off press and hold the power button until the goodbye sc...

Page 9: ...Main Menu Music Video FM Radio Picture Browsing Text Record Explorer System Setting Use to select an item in the main menu screen and press the MODE key to enter 9...

Page 10: ...In order to display lyrics with your music you must have a lyric file lrc corresponding to the song if you have good mp3 you will also have to have good lrc Both files have to be saved in the same di...

Page 11: ...wind the current song A B Repeat mode In the music mode quickly press the VOL key The volume value at the bottom right corner of the display will begin to flash Quickly press the MODE key and an A wil...

Page 12: ...low You can return to the previous screen by quickly pressing the VOL key or return to the main screen by pressing and holding the MODE key Video file selection In the video mode quickly press the key...

Page 13: ...s the MODE key to open the function menu on the left side of the screen The options will be Manual Preset Mem Del and Auto Channel search Press and hold the or keys and the player will begin to scan a...

Page 14: ...once more to save the channel Deleting Channels Quickly press the MODE key to open the function menu Use the and keys to select Del to open the delete submenu Next select a preset channel using the an...

Page 15: ...to enter the picture selection screen Quickly press the VOL key to return to the previous screen and press and hold the MODE button to return to the main menu Deleting Pictures In the picture selectio...

Page 16: ...E key to stop viewing the file and return to the main menu Note To adjust the automatic page turner time refer to automatic page turner setting in the system settings Setting Bookmarks You can set up...

Page 17: ...Quickly press the key to start recording Quickly press the key again to pause the recording While paused quickly press the MODE key to save the current recording and prepare the next recording Press...

Page 18: ...ded radio files will play in music mode Video files will play in video mode Pictures will play in picture mode Text files will play in text mode When in a folder you can quickly press the VOL key to r...

Page 19: ...r again Folder Once Plays each song in a folder once then stops Folder repeat Plays each song in a folder over and over again All Once Plays each song once then stops All Repeat Plays each song over a...

Page 20: ...elect if you are in Europe Japan Select if you are in Japan USA Select if you are in North America Record Use the or keys to select Music and press the MODE key to enter A REC Quality High Quality Hig...

Page 21: ...Danish Polish Russian Turkish Hebrew and Thailand B About The production information in this menu includes Storage capacity of this player remaining capacity and system software version which is read...

Page 22: ...ur computer the Player acts as a USB disk drive and will not function as a Media player To continue using it as a media player please disconnect from your computer 3 This player has a high speed USB2...

Page 23: ...th different models of players After the player has been connected for several seconds it will enter the charging state battery icon that is continually changing Shown as the figures below 23 While ch...

Page 24: ...tion requirements for AVIConverter software CPU Intel or AMD inner core At least Intel Pentium 3 or above that includes Intel Celeron series and Intel Pentium 4 Memory 128M or above Installation of th...

Page 25: ...add file button an Open dialog box will be opened Click the button at the right side of file type in the dialog box to select a proper file type After correctly selecting a video file click the Open...

Page 26: ...se button after making your selections Then click Convert Now to start file conversion Shown as the figure below Video Conversion The file can be loaded to the player and played after the conversion i...

Page 27: ...y remove hardware 3 Go to the My Computer section of your computer In there you will find a section called devices with removable storage 4 Locate the drive created by the unit generally just called R...

Page 28: ...c stored on your computer Generally this is stored in the My Music folder of your computer NOTE if you are unable to locate the music on your computer click on start search files and folders then sear...

Page 29: ...e located the song files you can right click on the song itself and select copy Open the removable disk drive right click on in the empty space and select Paste This will transfer the song on to your...

Page 30: ...8 Repeat step 7 for as many songs as you want to copy on to the unit 30...

Page 31: ...cording format WAV 32K bps Recording Recording time 7 hours 30 minutes 128M Flash Playing format MP1 MP2 MP3 WMA WAV Max earphone output L 5mW R 5mW 32Ohm Supported MP3 Bit rate 8K bps 320K bps Suppor...

Page 32: ...pacity as the maximum Working temperature 5 40 Language Simplified Chinese Traditional Chinese English Korean Japan Spanish French German Italian Portuguese Russian Swedish Thailand Dutch Greek Czech...

Reviews: