215593
68
Revision A
4.9
Conditioner Operation
Intermeshing steel rolls condition the crop by crimping and crushing the stem for quick drying.
WARNING
Keep hands and feet away from discharge opening. Keep everyone at least 100 meters (330 ft.) away from your
operation. Never direct the discharge toward anyone. Stones or other foreign objects can be ejected with force.
WARNING
To avoid bodily injury or death from unexpected start-up of machine, stop engine and remove key before
adjusting rolls.
4.9.1
Roll and Feed Draper Speed
The roll and feed draper speeds change whenever the header knife speed is changed since the drives use the same
hydraulic circuit. They cannot be independently adjusted.
4.9.2
Adjusting Roll Gap
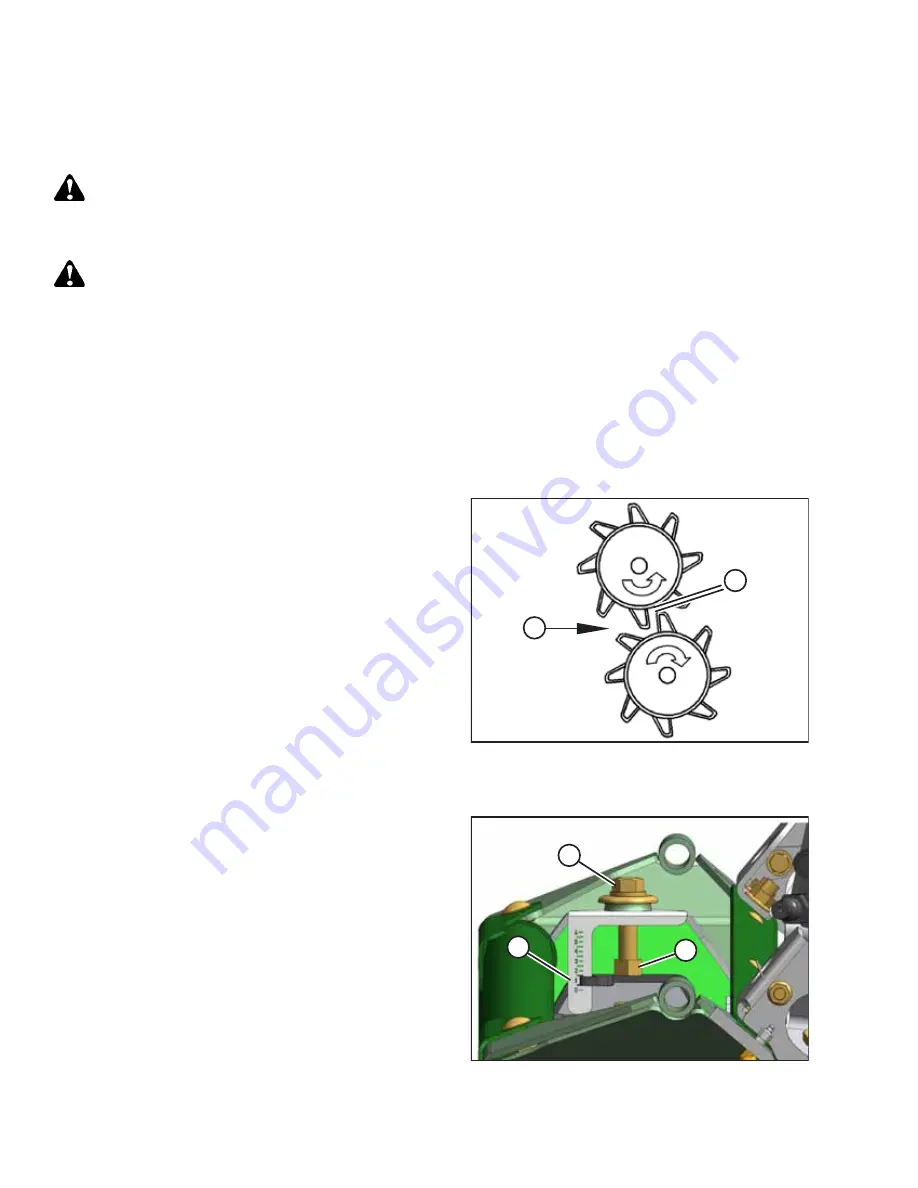
The degree to which the crop is conditioned as it passes through the rolls is controlled by roll gap.
$
%
Figure 4.31: Roll Gap
A - Crop Direction
B - Roll Gap
Intermeshing steel rolls condition the crop by crimping and
crushing the stem in several places. This allows moisture release
for quicker drying. The degree to which the crop is conditioned
as it passes through the rolls is controlled by roll gap (refer to
illustration at right). The gap is factory set at 20 mm (3/4 in.) or
at the 1.5 line on the roll gap gauge as shown in Figure
. Gauge readings should be the same at both ends of
the roll.
Correct conditioning of alfalfa, clover, and other legumes is
usually indicated when 90% of the stems show cracking, but no
more than 5% of the leaves are damaged. Use only enough roll
gap to achieve this result.
Grass type crops may require a tighter gap for proper feeding
and conditioning. A larger gap (up to 25 mm [1 in.]) may be
desirable in thick-stemmed cane-type crops; however, too large
a gap may cause feeding problems.
$
%
&
Figure 4.32: Roll Gap Gauge
If required, you can adjust the roll gap by loosening nut (A) and
turning adjuster (B). Retighten nut (A) after adjustment.
IMPORTANT:
To achieve consistent intermesh across the rolls, be sure that roll
gap gauge (C) reading is the same on both sides of the
conditioner roll.
Summary of Contents for HC10
Page 10: ...215593 viii Revision A Index 167 Predelivery Checklist 173 TABLE OF CONTENTS...
Page 18: ......
Page 84: ......
Page 100: ......
Page 103: ......
Page 104: ...215593 94 Revision A 6 3 Lower Roll and Frame Assembly...
Page 106: ...215593 96 Revision A 6 4 Upper Roll Assembly 0...
Page 108: ...215593 98 Revision A 6 5 Cover and Supports 0 0 0 0 0 0...
Page 110: ...215593 100 Revision A 0 0 0 0 0 0 REPAIR PARTS...
Page 112: ...215593 102 Revision A 6 6 Hydraulic Motor Mounts and Tensioner Motor MD 159661...
Page 114: ...215593 104 Revision A REPAIR PARTS...
Page 116: ...215593 106 Revision A 6 7 Hydraulic Motor Mounts and Tensioner Motor MD 159648...
Page 118: ...215593 108 Revision A REPAIR PARTS...
Page 120: ...215593 110 Revision A 6 8 Belt Drive and Shield Motor MD 159661...
Page 122: ...215593 112 Revision A 6 9 Belt Drive and Shield Motor MD 159648...
Page 124: ...215593 114 Revision A 6 10 Hydraulic Completion Package Motor MD 159661...
Page 126: ...215593 116 Revision A REPAIR PARTS...
Page 128: ...215593 118 Revision A 6 11 Hydraulic Completion Package Motor MD 159648...
Page 130: ...215593 120 Revision A REPAIR PARTS...
Page 132: ...215593 122 Revision A 6 12 Gears and Roll Coupling Assembly New With Washer MD 30441...
Page 134: ...215593 124 Revision A 6 13 Gears and Roll Coupling Assembly Old With Washer MD 130688...
Page 136: ...215593 126 Revision A 6 14 Forming Shields...
Page 138: ...215593 128 Revision A 6 15 Feed Deck and Pan 0 1...
Page 140: ...215593 130 Revision A 0 1 REPAIR PARTS...
Page 142: ...215593 132 Revision A 6 16 Mounting Brackets...
Page 144: ......
Page 156: ......
Page 158: ......
Page 168: ......
Page 184: ......
Page 185: ......


