background image

3


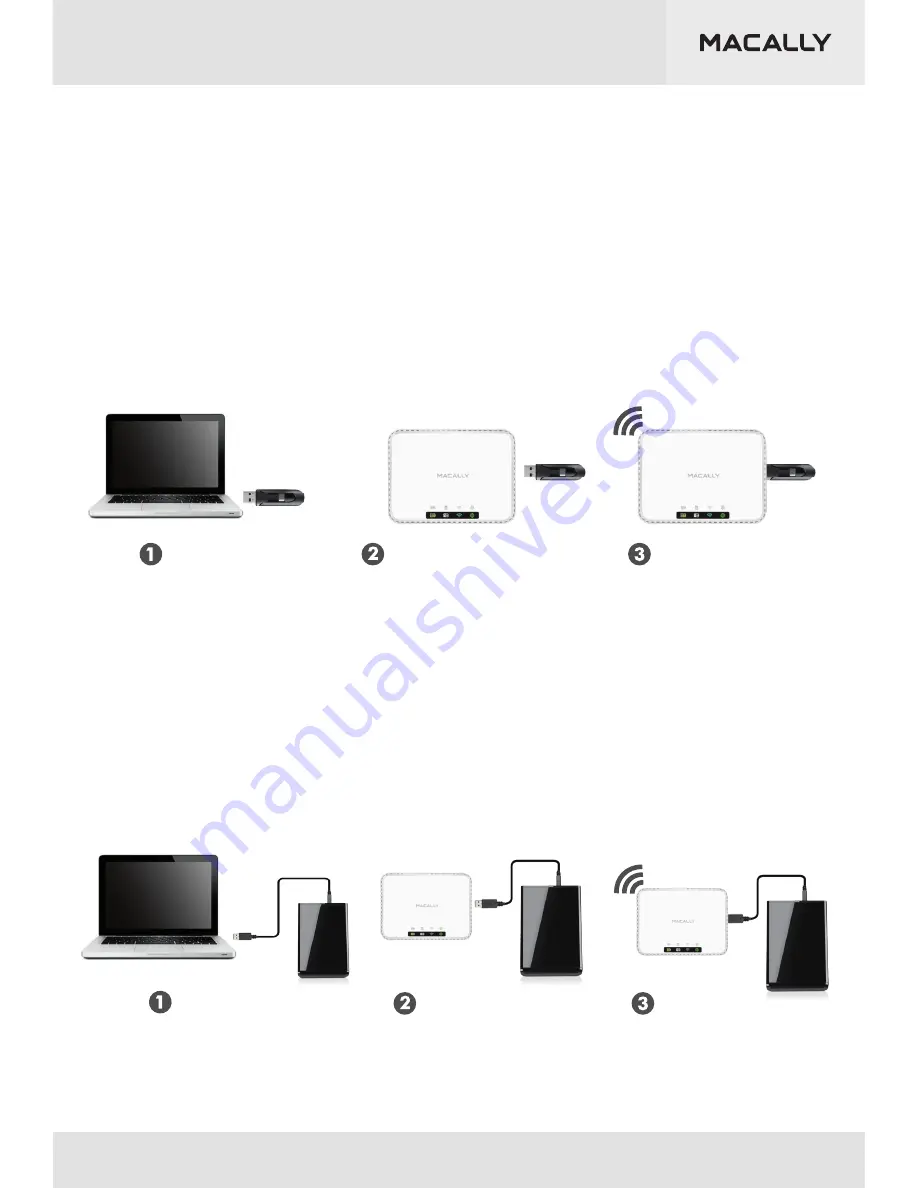
1.2 Flash Drive 
Before a USB flash drive is used in the WIFISD2, please plug your flash drive into
any USB port on your computer. Your computer will detect it as a USB removable
drive. In the “Share” Folder that was created on initial boot up, you can copy all
of your media to the corresponding folders. Once the files have been copied to the
appropriate location, you can access each type of media (Documents, Photos,
Music, Video) by pressing on the tiles on the home page of the App. Unmount and
remove the flash drive from your computer and plug it into the USB port on the
WIFISD2. Press down the power button for 2 seconds to put it in Wi-Fi mode and
use it as a Wi-Fi media hub and travel router.

1.3 External Hard Drive 
To use a USB external drive, please plug your external drive into any USB port on
your computer. Your computer will detect it as a USB removable drive. In the “Share”
Folder created on initial boot up, you can copy all of your media to the corresponding
folders. Once the files have been copied to the appropriate location, you can access
each type of media (Documents, Photos, Music, Video) by pressing on the tiles on
the home page of the App. Unmount and remove the external drive from your
computer and plug it into the USB port on the WIFISD2. Press down the power button
for 2 seconds to put it in Wi-Fi mode and use it as a Wi-Fi media hub and travel router.
      

Copy files

Flash Drive

Flash Drive

Insert Flash Drive

Wi-Fi pocket drive

Flash Drive

Power on

Copy files

USB Drive

Insert USB Drive

Wi-Fi pocket drive

USB Drive

USB Drive

Power on

*Note: A 3.5” USB external hard drive must be powered by its own AC adaptor.
             A 2.5” USB hard drive might be powered by the WIFISD2, however it will
             drain the internal battery of the WIFISD2 much quicker than an SD card.

Summary of Contents for WIFISD2

Page 1: ...www macally com MEDIA HUB AND TRAVEL ROUTER Quick Start Guide...

Page 2: ...to constitute a warranty This warranty is offered by TNS Distribution Australia Pty Ltd Unit 1 16 Aquatic Drive Frenchs Forest NSW 2086 Australia 02 9975 0900 support TNSdistribution com au Subject to...

Page 3: ...t macally com Package Contents WIFISD2 Media Hub and Travel Router Micro USB Cable Quick Start Guide Hardware Basics Internet Green LED Connected to internet Battery Green LED Red Low battery Flashing...

Page 4: ...click If you have a microSD card please use an SD card adaptor then insert it into the SD slot of the WIFISD2 First turn off the WIFISD2 then connect it into any USB port on your computer with the in...

Page 5: ...any USB port on your computer Your computer will detect it as a USB removable drive In the Share Folder created on initial boot up you can copy all of your media to the corresponding folders Once the...

Page 6: ...unplug it from the USB charger and take it on the go Step 2 Charging the Internal Battery USB Charger or Computer Micro USB Cable included 3 1 For iOS Users Please go to the App Store and search for S...

Page 7: ...tor N Go app onto your Android devices 4 1 For iOS Users Open Settings and choose Wi Fi option in your device Choose WIFISD2 XXXX from the available network list and input the default password 1234567...

Page 8: ...ype of media Documents Photos Music Video by pressing on the tiles on the home page of the App Please note that if files are not placed in this Share folder they will not appear if you click the media...

Page 9: ...on the WIFISD2 to stream If files have been copied to the appropriate subfolder in the Share Folder you can access each type of media Documents Photos Music Video by pressing on the tiles on the home...

Page 10: ...WIFISD2 Click Login or My Storage and enter admin as the default username and leave the password field blank 4 3 For Mac OS X user Click the Wi Fi icon at the upper right corner of your screen and sel...

Page 11: ...h function in WIFISD2 allows your mobile devices to have an active internet connection while accessing your media and files Assuming your network has a router or Wi Fi access point which you already u...

Page 12: ...t says Wireless Access Select your desired network and input the password to connect your WIFISD2 to your router 6 1 Backup Contacts When you launch Stor N Go on the bottom left there is an icon that...

Page 13: ...Select Contacts Backup on the left menu Select Start Backup Once the backup is complete the following screen will appear 11...

Page 14: ...re Backup from the same menu It will ask you to select a file Choose the file you already backed up or whichever contacts backup you prefer It will take some time to complete Once it is complete all c...

Page 15: ...and videos from your mobile device and save them to your SD card flash drive or external hard drive Stor N Go will automatically create folders for each device that you choose to backup and put all th...

Page 16: ...n the WIFISD2 is connected to the Internet Before setting this up the WIFISD2 must be connected to the Internet either wired or wireless It is highly recommended to use a wired connection because sync...

Page 17: ...Click on Dropbox 11...

Page 18: ...Click on the Dropbox icon here to get the following login screen 12...

Page 19: ...s to a folder called Dropbox in your main Wi Fi Disk section After linking your Dropbox account you can manage it in the following screen Please note that any files deleted from the Dropbox folder on...

Page 20: ...www macally com 10...

Reviews: