


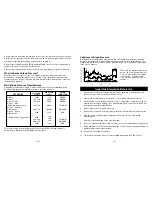


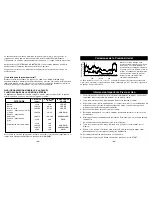


Before applying your blood pressure cuff, be sure you have selected the appropriate cuff:
Small Adult Cuff
fits arm circumference 8-5/8” - 11-3/4” (22-30 cm)
Adult Cuff
fits arm circumference 11-3/4” - 16-1/2” (30-42 cm)
Large Adult Cuff
fits arm circumference 16-1/2” - 18-7/8” (42-48 cm)
NOTE:
If for any reason you are unable to or should not use your left arm, please modify
the following instructions and apply the cuff to your right arm.
Your physician can tell you which arm is best for you to use.
1. Remove any constrictive clothing or jewelry that may
interfere with the cuff placement.
2. Be seated with your feet flat on the floor.
3. Position the cuff on a solid surface with the tubing facing
UP and AWAY from you,
Fig. 1
. The metal bar on the cuff
should be to the left of the tubing.
4. Widen or open the cuff by pulling or rolling the
bottom of the cuff towards the right,
Fig. 2
.
This should open the cuff, creating a cylinder.
Do not extend the cuff beyond the metal bar.
5. Insert your arm into the cuff (cylinder).
Position the ( ) mark over the main artery
(on the inside of your arm),
Fig. 3
.
6. The bottom edge of the cuff should be
positioned approximately one inch ABOVE
the elbow joint,
Fig. 4
.
7. Reaching underneath your left arm with your
right hand, pull the end of the cuff towards
your body to tighten the cuff,
Fig. 5
. Wrap and
secure the cuff making sure that the ( ) mark
remains as shown,
Fig. 3
.
8. The cuff should fit comfortably, yet snugly around your arm.
You should be able to insert two fingers between your arm
and the cuff.
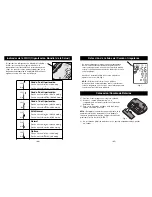
NOTE:
The cuff size is suitable for use when the vertical “Index” mark is within the
horizontal “OK” range. A different sized cuff is needed if the “Index” mark is outside of the
“OK” range.
– 13 –
– 12 –
Applying Your Blood Pressure Cuff
Fig. 1
Fig. 4
1”
Fig. 5
Fig. 3
Fig. 2
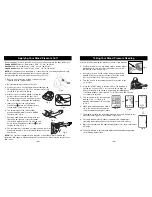
Taking Your Blood Pressure Reading
Proceed only after reading the previous sections of this manual.
1.
Position the monitor on a flat, stable surface with the digital
display panel in view. Insert the cuff tubing connector into
the left side of the monitor,
Fig. 1
.
2.
Rest your elbow on a solid surface with your palm facing
upward. Elevate your arm so that the cuff is at the same
level as your heart,
Fig. 2
. Relax your left hand.
3.
Turn the monitor on by sliding the switch on the side to the
‘on’ position.
4.
Press the ‘START’ button to turn the unit on. The display will
light up run a self-test,
Fig. 3
. Select the memory bank you
want your reading to be stored in by pressing the ‘MEM’ button
to alternate between, memory bank 1 or 2. Press the ‘START’ button
to confirm your selection.
5.
This unit will show the last measured
reading,
Fig. 4
, or if there is no
previous measurement, “0” as shown
in
Fig. 5
.
6.
When the display appears as shown,
Fig. 6
, the monitor is ready and the
cuff will automatically begin to inflate.
7.
The display will show the increasing pressure in the cuff. Along with the
measurement progress on the left side of the screen.
8.
The cuff will automatically inflate to approximately 190 mmHg or
40 mmHg higher than the last systolic pressure stored in memory.
9.
Once the cuff inflates to the appropriate pressure level, the measurement
will begin.
10. The unit will begin to automatically deflate and the numbers appearing
on the display will decrease.
Fig. 3
Fig. 6
Fig. 5
Fig. 4
Fig. 1
Fig. 2