


Service Engineering
- 23 -
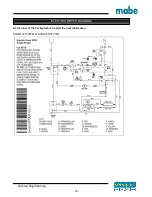
Air flow and seals.
For the correct development of temperature control and safety systems is necessary a good air flow through the
dryer. The air is pulled from the inner front part of the box and it is heated through the resistances at the hot cover
situated behind the drum. The hot air is pulled through the load in the drum, then pass through the lint filter and
trap duct in the blower. After pass the blower the air is pushed out to the exhaust system. Any air leak at the
entrance, the blower, the drum, the front sealing or trap duct will mean an unappropriated temperature. The pulled
air from the trap duct to the outside thermostat will be cooler than the usual and detecting a false measure that
will delay the process or a no triggered signal from the thermostat. The front blower leaks will reduce the volume
of air through the heater resistances that will have hot spots that reduce the life of the dryer.
The air access to the dryer cabinet, going through the heating components and inside the drum. The warm air
takes from the wet load the humidity on a steam form. Then the air and the steam is vent through the exhaust
dryer system. The general temperature of the heater is regulated for temperature sensor, on at the entrance
located near the heater elements, and the other at the exhaust duct vent. An additional safety thermostat is
located near to the heating resistances that will shut down the system if exist an overheating.
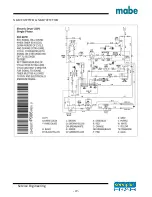
Duct Sealing.
To verify the trap duct has an appropriated sealing remove the lint
filter and look down in the duct. With a light evaluated the trap
duct in all sides that joint with the front of the dryer.
Transmission belt.
The drum rotates by effect of the transmission belt at a speed of
47 to 51 RPM. The tensile of the belt is due a spring loaded
pulley that is activated by the rear motor shaft.
Common dryer cycle.
1.
Select a cycle and push start button.
2. The motor is activated
3. The heating resistances are energized
4. When the temperature reach the set point selected, the heating resistances starts switching “ON” or
“OFF” to remain on the selected temperature.
5. The heating resistances will remain switching ON or OFF until the temperature of the load reach the
selected temperature or during the time selected on the timer.
6. The motor continues working until the temperature of the load is under the selected set point. (Cool down)
7. End of Cycle
Safety
Thermostat
Entry
temperature
sensor
Exit
temperature
sensor
Exit Backup
Trap duct
sealing
Air
entrance
Air
exhaust
Drum
sealing
Summary of Contents for MKR62GWTWB
Page 10: ...Service Engineering 10...