background image

23


User Manual 


M3 Orange


Keyboard

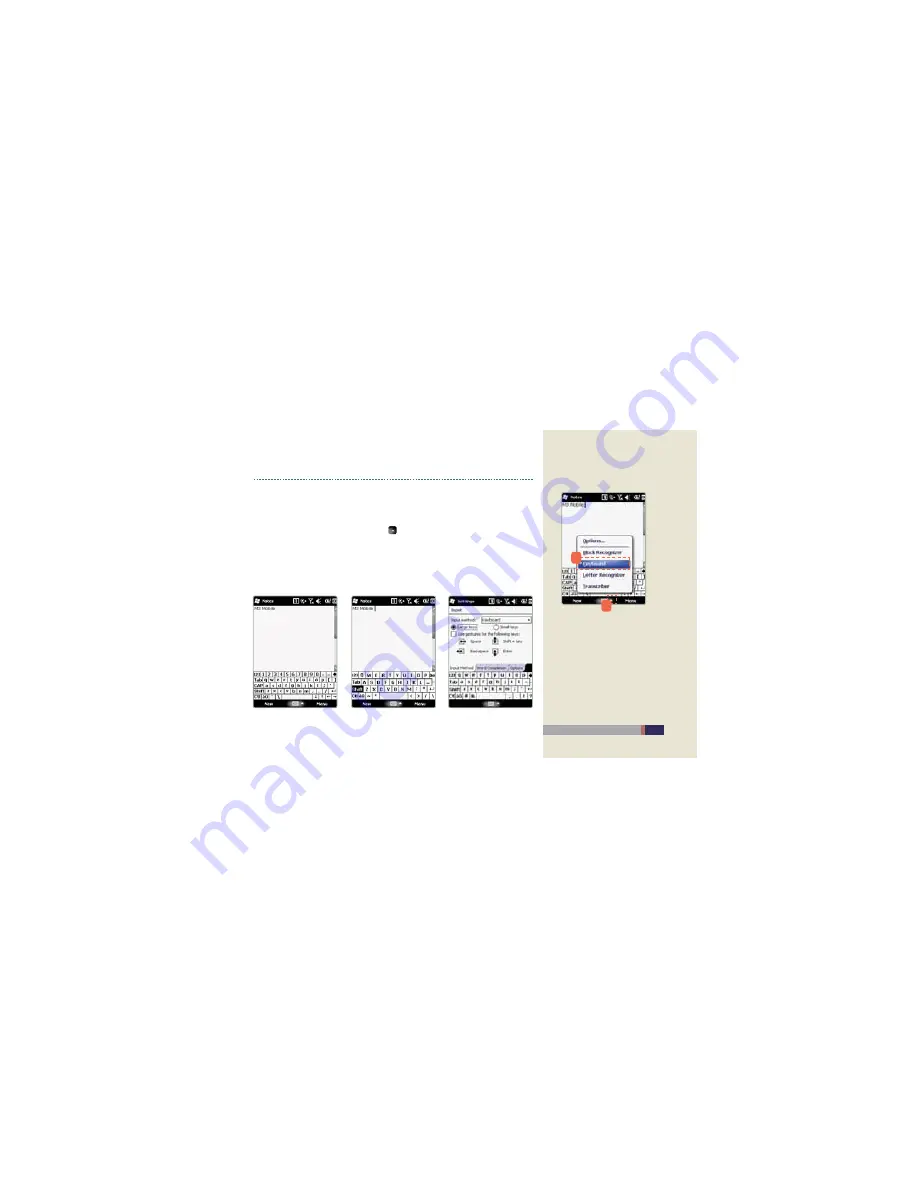
 The keyboard input is the way of entering the text using the stylus pen by touching the 

s

virtual keyboard which is the same shape as the actual keyboard on the screen.

You choose the input method by clicking 

s

 icon at the bottom of screen.

You can enter the text by touching the keyboard directly.

s

Transcriber / Keyboard

Screen for selecting Keyboard

Small Keybard

Big Keyboard

Options

1

2

Summary of Contents for Orange

Page 1: ...ailable to download contents of this user manual and programs provided by software CD from M3 Mobile homepage ORANGE Please be sure to read the Warnings and Safety Precautions in order to use the prod...

Page 2: ...not provide any guarantee including the implied guarantee on the product s s characteristics in this user manual and suitability for special purposes and any other guarantees not limitedtothem Micros...

Page 3: ...Mobile does not guarantee the quality of the programs produced by third party s software companies installed after the release from the factory of M3 mobile M3 Mobile may request programs from the pr...

Page 4: ...ly contact the corresponding program manufacturers Do not use any battery adapter or accessories other than the designated ones provided s with the product Free warranty service may not be allowed if...

Page 5: ...le checking call history inspecting the pirate cell phone A phone cloner or copied phone s user will be sentenced to 3 years imprisonment or s imposed a ne of 20 million won by Radio regulation law An...

Page 6: ...ery 13 Charging 14 LED Information 15 Inserting and Removing USIM CARD 16 Basic Instructions 17 Button Information 18 Soft Reset 19 Main Window 20 Using the Stylus 21 Transcriber Keyboard 22 ActiveSyn...

Page 7: ...Speci cation and Characteristics Product Con guration Name and Function of Each Part Inserting and Removing the Battery Charging LED Information Inserting and Removing USIM CARD M3 Orange Introduction...

Page 8: ...hz OS Windows Mobile 6 5 ROM NAND 128 256MB 1G RAM 256MB Display 240 x 320 3 5 Color TFT LCD 260 000Color Backlight LED Type Commnication Function WWAN The Americas EGSM 850 GSM 1900 Europe EGSM 900 G...

Page 9: ...Power Input Method Touch Screen PEN Stylus Pen I O USB Host USB Client External Serial Port Micro phone Speaker Receiver Stereo Ear mic jack Operating Temperature Main Unit Adapter 10 C 50 C Adapter P...

Page 10: ...M3 Orange Main Unit Craddle Two Standard Batteries USB Cable Portable Adapter Earphone Stylus Pens Manual CD www m3mobile net ORANGE Manual Not all items above may be included according to the shipme...

Page 11: ...Button Reset button Battery cover Barcode Scanner Window External memory card cover Volume Microphone M3 Orange Main Unit LCD Touch Screen Keypad Power Supply Scanner Button Camera Flash Antenna Camer...

Page 12: ...y USB Client PC Connection Active Sync USB Host For USB host use keyboard memory etc USB to Serial USB to Serial function External serial connection etc Cradle Ethernet Enables use of Ethernet functio...

Page 13: ...the battery pack position and then cover the ribbon After putting the battery cover tighten a screw in a s counterclockwise direction Removing Battery Loosen a screw in a clockwise direction and remo...

Page 14: ...apter Power port 8BSOJOH Do not use any other adapters except for the power supply device 5 2V 5A that comes with s the product Do not use excessive force to plug in the Main Unit or battery Otherwise...

Page 15: ...the Scanner succeed in reading the Bar code 8BSOJOH When you insert or remove the battery during operating the program errors can be occured s Scanner LED Charging LED GSM WCDMA LED The charging statu...

Page 16: ...d by the membership mobile center s Remove the battery on the back of the lower part of the Main Unit s Insert USIM CARD with the terminals facing downward s Insert the battery and cover the Ribbon ti...

Page 17: ...Button Information Soft Reset Main Window Using the Stylus Transcriber Keyboard ActiveSync Inserting and Removing Micro SD Card Basic Instructions...

Page 18: ...d Button Short Press End the call Long Press Phone On Off Function mode Enter Button Operation Button BackSpace Delete the letter Button Name Function Start Button Open the main menu Function Reset Bu...

Page 19: ...e picture s Click the Reset Button when one of installed software programs causes unexpected problems while you use the device All currently running software will be terminated upon software reset and...

Page 20: ...information Date Time Show the current date and time Wireless information Show the wireless power and its status User information Show the personal information Message information Show the received me...

Page 21: ...PC Drag the cursor to the desired position while pressing the touch screen In case of excuting the scroll bar drag function will not be excuted Long Press Press the stylus pen without releasing and s...

Page 22: ...ttings Select the input method by clicking s icon at the bottom of screen Block Letter Recognizer In the input mode screen you can enter the text in abc section and enter the number in 123 section on...

Page 23: ...uching the s virtual keyboard which is the same shape as the actual keyboard on the screen You choose the input method by clicking s icon at the bottom of screen You can enter the text by touching the...

Page 24: ...on the option setting for Microsoft s ActiveSync You can connect the PDA and computer to synchronize the data between them or s install work programs copy move or delete the les The ActiveSync progra...

Page 25: ...tton When you see the Set Up a Partnership screen make the Partnership and then continue by selecting the Next button s Select the Finish button from the Setup Complete screen to complete the installa...

Page 26: ...Sync mode Continue while the device is connected ActiveSync starts the synchronization and whenever modi ed items will be synchronized when are entered in the PC or PDA Only when connected After the r...

Page 27: ...he reset Double click the Device Manger button in the Hardware tab from Start Setting Control Panel System menu of PC Check whether there is a yellow exclamation mark on any of the items below General...

Page 28: ...f the main unit s After inserting Micro SD Card as shown in the picture cover it s Micro SD Card Usage Once inserting Micro SD Card s Storage Card icon appears in Start File Explorer Show as below Cli...

Page 29: ...Using Mobile phone Using Internet Using Scanner Using Camera Bluetooth communication Usage for various functions...

Page 30: ...the initialization sound Turning off s Press the end button for 5 sec when the phone is on Answering the phone Select Answering phone in the screen of incoming calls s and make calls Select ear microp...

Page 31: ...number in the Contact list receiver caller list SMS list s When the phone number is registered as the shortcut key you can make a call with the shortcut key by pressing long the s corresponding number...

Page 32: ...ge section Sending SMS When you send SMS tap into Message and enter the text and then enter or search s the phone number and press Send button When the content of message exceeds over 80 bite seperate...

Page 33: ...Execute s Menu Options at the bottom of phone Phone You can chage the setting of ring tone or keypad Security You can set up security service Services You can change the setting of mobile service Netw...

Page 34: ...ConnectingWireless LAN Turn on AP device that supports IEEE 802 11 a b g s Select s Wireless Manager in Today screen After choosing AP device that you want to connect in the Wireless connection progr...

Page 35: ...eless LAN connection you can use the Internet s via Web Browser Web Site Browsing Execute s Start Internet Explorer You can seach the Internet on the main site or move to the other site by entering th...

Page 36: ...y pressing Camera button on the right side of s mobile Still Camera mode s Video Video mode s Select Menu Video Still and it converts video camera mode mutually My Pictures Check the photograph video...

Page 37: ...g Resolution s Zoom in Zoom out Press Zoom in or Zoom out to adjust the size of the image s Adjust the up down direction key White Balance You can adjust White Balance by selecting Auto Bright Cloudy...

Page 38: ...Scanner Usage for laser scanner 8BSOJOH Scanner is Option item When Scanner is not set up in your product you cannot use Scanner function s Correct method for scanning Incorrect method for scanning B...

Page 39: ...ine of scanning turns Green s If you put Mid guideline too closely to Barcode or it is dislocated it cannot be read s Usage for image scanner Correct method for scanning Correct method for scanning In...

Page 40: ...Turning Bluetooth On Off Turn on the mobile and BT device that will be conncted s Select s Wireless Manager in Today screen Connect it after choosing the BT device in the BT connection program s Ente...

Page 41: ...Breakdown Diagnosis Breakdown Diagnosis...

Page 42: ...low it is limited to s operate some functions to protect system Cannot boot up Long press the power button Short press Sleep Wake up Long press Power on off s Try Soft reset s Reset button can be mal...

Page 43: ...Customer Support A S Product Warranty Customer Support A S...

Page 44: ...the product box or s program and you will get quick service Customer center Representative 02 574 0037 FAX 02 574 0292 Head of ce 135 080 725 30 Dong Won B D 1st oor Yoek Sam dong Gang Nam gu Seoul Pr...

Page 45: ...ccur in a particular installation If this equipment does cause harmful interference or television reception which can be determined by turning the equipment off and on the user is encouraged to try to...

Page 46: ...irs within the warranty period Exchange Exchange after reducing a price Not equipped with components for repairs within the warranty period Exchange Exchange after adding 10 of a reduction price Model...

Page 47: ......

Reviews: