

Mounting the Communicator
This communicator comes fully assembled, except for the antenna.
The communicator must be installed within M2M FC08 Enclosure for Cellular
Alarm Communicators, Altronix BC300R, or any other UL Listed (UOXX, NITW
or CYIV) metal enclosure. All the wiring must be routed through a conduit.
For UL installations, the communicator must be mechanically secured to a UL
Listed enclosure such as a UL Listed junction box.
For detailed mounting and installation instructions refer to the extended
manual located at https://www.m2mservices.com/support/
Connecting the device via LAN
If the device is connected to a local area network with DHCP enabled, it will
automatically get a dynamic IP address. External IP address or router port
redirections are NOT needed. If required, static IP can be configured from
M2M portal >> Device Dashboard >> LAN Settings.
Programming
Out of the box the communicator is ready to use and does not require
additional programming. You need to program the control panel to work with
the MQ03-LTE-M-FIRE-AV-V2.
Programming the Control Panel
For information about how to program the control panel, please refer to the
corresponding control panel guide. Ensure that the following programming
is done:
• Enable the PSTN dialer of the FACP.
• Select DTMF mode.
• Select Contact ID, SIA or Pulse* 4/2 communication format.
• Enter a telephone number for dialing (you can use any number, e.g.,
999999)
• Enter a 4-digit account number
*
Pulse 4/2 reporting requires additional configuration in the
M2M portal >> Device Dashboard >> Dial Capture
Troubleshooting
If you have issues receiving the events:
1. Verify the RING/TIP connection
• Make sure the RING and TIP terminals are connected to a TELCO ring and
tip, not R-1/T-1 terminals.
v.03-2022-04-05_15000
IMPORTANT NOTE:
Do not power the device before registering it in the M2M Dealers Portal
because the cellular service will be deactivated.
Serial Number and Config Key:
Device Registration
in M2M Dealer Portal
(Continued from the front side.)
Connection LED indicator
RJ45 LED Indicators
Yellow LED RJ45 Indicator
Indication
Action
The LED is Off
The LAN cable is not plugged 1. Verify the wiring
2. Measure the AUX output of
the panel
3. Replace the unit
The LED is Constantly On
Connection established
Green LED RJ45 Indicator
Indication
Action
The LED is Off
1. The router is not providing
an IP via DHCP.
2. The device is configured
with wrong/used static IP
3. There is no internet access.
1. Check your DHCP server
settings.
2. Make sure that the IP is not
in use.
3. Check the access to the
internet using another device
in the same network or check
your router settings.
The LED is Blinking
Transferring data
The LED is Constantly On
Communication is OK
LED Status
Indication
Action
The LED is Off
1.The unit is not connected
to the panel.
2.The power from the panel
is out.
3.The unit is damaged
1.Verify the wiring, refer to the
wiring diagram.
2.Measure the AUX output of
the panel.
3.Replace the unit
Slow flashing
Establishing connection
or no signal available
Reposition the antenna
Constantly On, blinking
every 5 secs
Connection established at
low signal level
Reposition the antenna
Constantly On
Connection established at
good signal level
Fast flashing
Transferring data
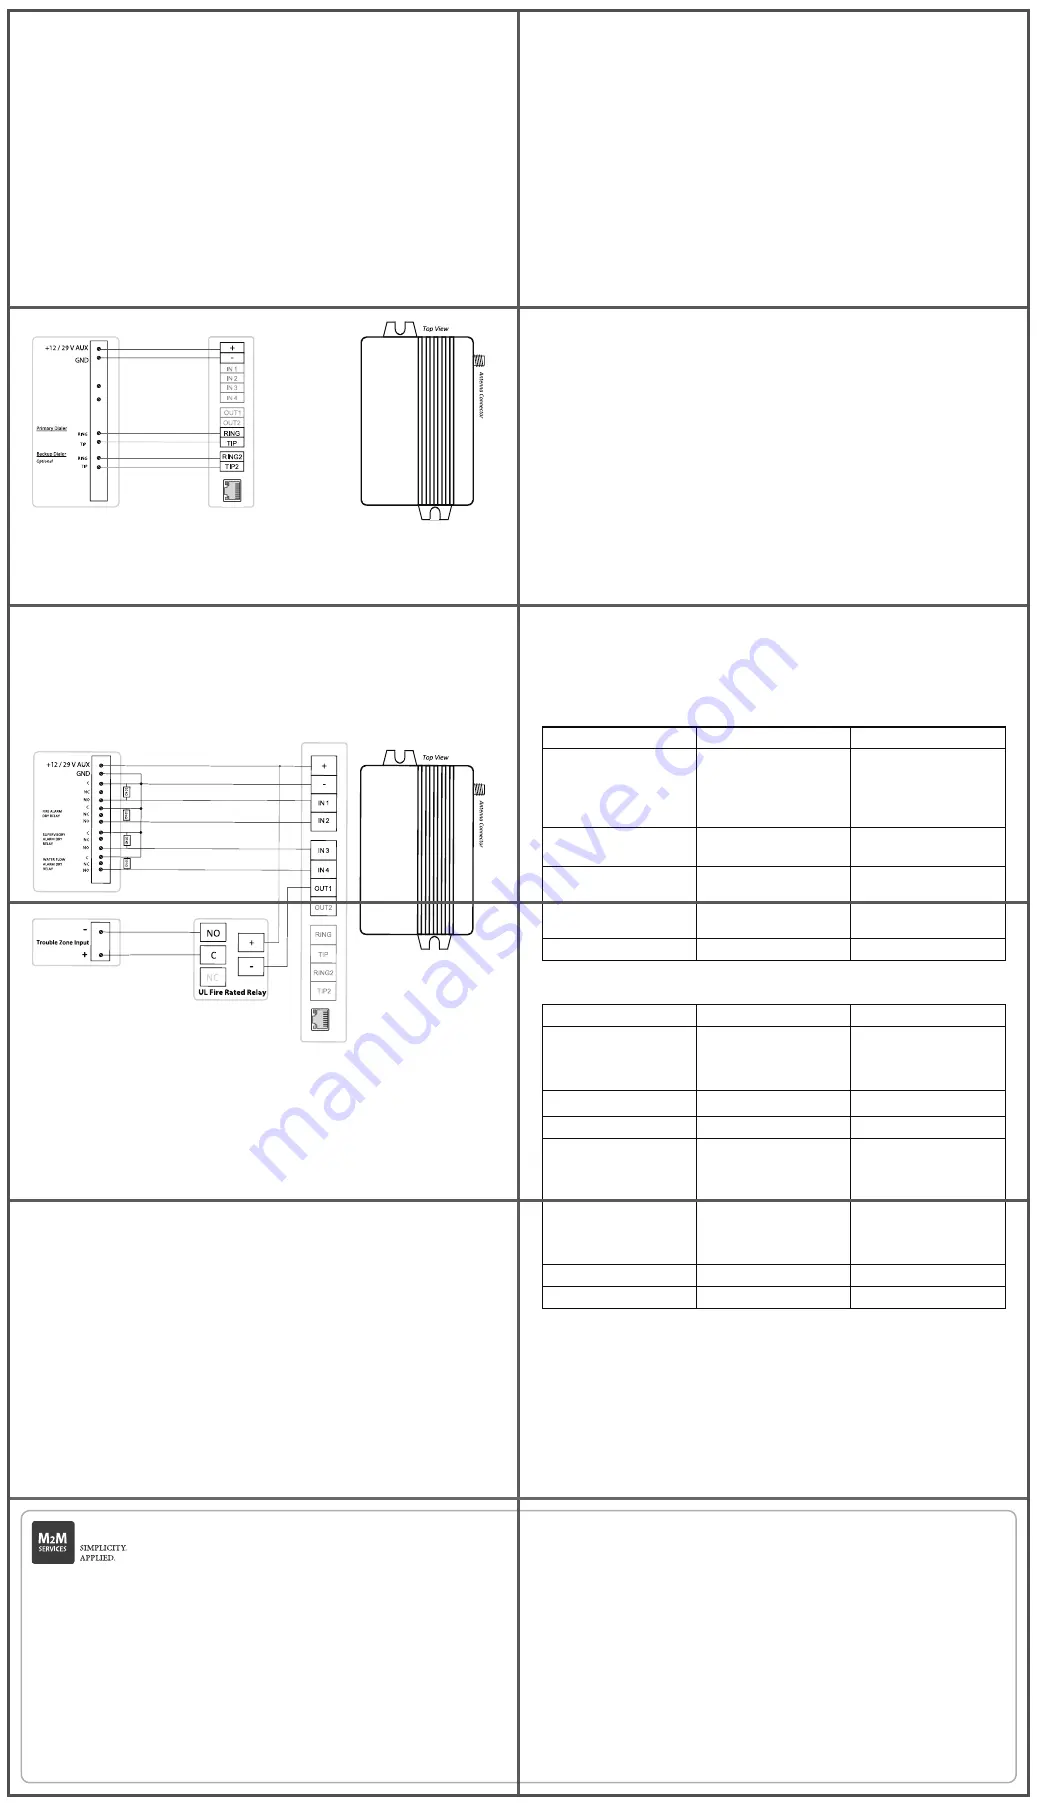
Figure 1: Wiring Diagram
(+)
Connect to AUX + of the panel.
(-)
Connect to AUX – (GND) of the panel.
RING
Connect to RING of the primary dialer of the panel.
TIP
Connect to TIP of the primary dialer of the panel.
RING2 Connect to RING of the backup dialer of the panel.
TIP2
Connect to TIP of the backup dialer of the panel.
Note: IN1, IN2, IN3, IN4, OUT1, OUT2 – Not required for reporting via the PSTN
dialers
Figure 2: Wiring Diagram
(+)
Connect to AUX + of the panel.
(-)
Connect to the AUX – (GND) of the panel.
IN1
Connect to a Trouble Relay Output.
IN2
Connect to a Fire Alarm Relay Output.
IN3
Connect to a Waterflow Alarm Relay Output.
IN4
Connect to a Supervision Alarm Relay Output.
OUT1* Connect to a Trouble Zone Input
Note: OUT1 indicates loss of both cellular and LAN connections. OUT1 is an
open collector output, maximum load 50 mA. A relay may not be required,
refer to your FACP panel installation manual.
To remove the supervision of the inputs, refer to the extended manual located
at https://www.m2mservices.com/support/
RING, TIP, RING2, TIP2, OUT2 – not required when using the FACP relays
Wiring for FACP Relay Trigger Input Reporting
(supervised inputs with 10kΩ resistor)
M2M Communicator
M2M Communicator
Control Panel
Control Panel
Wiring the Communicator
The terminal strips can accommodate solid or stranded wire sizes from 14 to
22 AWG.
Mounting and Wiring
• Recommended location and wiring methods must be in accordance
with the National Electrical code, ANSI/NFPA 72.
• Installation must be in accordance with the National Fire Alarm and
Signaling Code, NFPA 72.
• The communicator must be connected to a UL Listed compatible
panel with power limited circuits.
• The communicator must be powered by a regulated UL Listed UOJZ,
UTOU, NBSX control panel or power supply.
• The wiring should be done only when the panel is powered down.
• For Dry/Indoor use only.
FIRE TROUBLE
DRY RELAY


