16
Premier U50C Diesel Engine Operating Instructions
Self-Charging Battery Back-Up
The special NiCad 7-cell 8.4v self-charging battery in this engine improves
performance at any speed. It ensures that power to the sound system will
remain on during directional changes, or when travelling over dirty track or
switches. The self-charging battery system is automatically turned on or off
whenever track power is turned on or off.
Track power (when applied) recharges the battery, which should last for up to
five years, and the special NiCad battery is a dry battery that should not leak
or cause any damage to your engine. However, even this special battery will
eventually wear down and need to be replaced. When you notice that your
engine sounds seem distorted or garbled at low voltages or become silent
when power from the transformer is turned off, test the battery to determine
whether it should be recharged or replaced.
• Put the engine in neutral and leave the track voltage at 12 volts for 15
minutes
• If the garbled or distorted sounds are reduced, the battery charge has run
down and can be recharged. Do this by leaving the engine in neutral with
track voltage at 12 volts for 6-7 hours so the battery can fully recharge (if your
engine has a smoke unit, be sure it is turned off). Or you can remove the
battery (as described below)
and charge it in any standard slow charge battery
recharger, following the recharger’s directions.
• If the sounds are not improved at the end of the 15 minute test charge, it is
time to replace the battery (see directions below). Contact the M.T.H. Parts
Department (phone: 410-381-2580; e-mail: [email protected]; mail:
7020 Columbia Gateway Drive, Columbia MD 21046-1532) for a replacement
battery. A standard 9v alkaline battery can be substituted until your
replacement arrives, but since alkaline batteries cannot be recharged, it will
eventually wear down. Do NOT use a 6-cell 7.2v battery like those found in
most convenience stores.
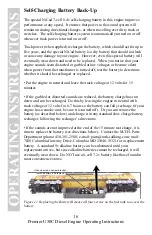
Unhook wires, unscrew bracket,
remove battery, and replace
Figure 11. Replacing the Battery (Remove all four screws on the fuel tank to access the
battery.

