background image

M-B Multi-Service Vehicle 

• 13 • Operation

©2014 M-B Companies Inc.  

All Rights Reserved

INTRODUCTION

This section of the manual describes the function of the 

controls typically provided with the MSV. Because of 

the unique and complex nature of this equipment, this 

document may not be an exact representation of the 

controls on your equipment.

Controls which are not part of the standard or optional 

M-B controls package, but which are unique to an 

individual attachment may not be listed. Separate 

manuals are created for attachments.

M-B Companies Inc. reserves the right to modify the 

function or location of the operator controls. Please call 

our Customer Service Department before operating 

the machinery if you have any questions regarding the 

controls on your MSV.

OPERATOR CAB CONTROLS

The operator cab has several controls that are used to 

operate the M-B MSV. This section details the controls 

that the operator uses to provide comfort and safety. 

The joystick and the Plus+1

®

 interface are described in 

another section.

Operator Seat

The seat is cushioned by an airbag that absorbs bumps 

and vibration. The firmness of the cushion is adjusted 

using a knob located at the front of the seat and below 

the operators legs (Figure 4).

Adjust Seat 

Air Cushion

Seat Back

Forward/Back

Figure 4 

With the engine running, the firmness is adjusted by 

rotating the knob up for firmer or down for less firm. 

When the engine is off rotating the knob down releases 

air.

Two levers on the side of the seat control forward/back 

and seat back position.
Move the front lever to release the seat and move the 

seat to the new position. Release the lever to lock.

Lift the rear lever to release the seat back. Reposition 

the seat back and release the lever to lock.
The cab also has a cup holder, document storage 

compartments and a flip down armrest (Figure 5).

Document 

Storage

Cup Holder

Flip Down 

Armrest

Figure 5 

Air Vents

There are several air vents throughout the cab. The 

vents can be rotated and the blades move to direct 

airflow (Figure 6).

Rotating 

Ring

Figure 6 

Operation

Summary of Contents for MSV3

Page 1: ...0714A Operation Manual Multi Service Vehicle MSV M B MSV3 PN 904 183260 MSV Division M B Companies Incorporated 1615 Wisconsin Avenue New Holstein Wisconsin 53061 800 558 5800 www m bco com MSV ...

Page 2: ... Introduction 9 Operation 10 Introduction 10 Operator Cab Controls 10 Steering Column 12 Radio Console 13 Circuit Breakers 13 Heater Bypass 13 Monitor Diagnose Control Plus 1 14 Main Menu 16 Joystick Diagnostics 17 Lighting Electrical 18 Attachment Selection 19 System Hydraulics 22 Vehicle Diagnostics 23 Input Output Diagnostics 23 Vehicle Display 23 Engine Diagnostics 24 Advanced Engine Diagnosti...

Page 3: ... off hydraulics Turn key to OFF and release seatbelt to exit tractor PARKING BRAKE Engages Disengages automatically when pressing and releasing accelerator pedal FORWARD REVERSE Using the joystick push the 3rd toggle switch from the left UP for forward or DOWN for reverse THROTTLE Work Mode Use the 2nd toggle switch from the left on joystick to throttle UP push upward or to throttle DOWN pull down...

Page 4: ...M B Multi Service Vehicle 4 Reference Guide 2014 M B Companies Inc All Rights Reserved Notes ...

Page 5: ...N SHUTDOWN Turn off PTO Turn off hydraulics Turn key to OFF and release seatbelt to exit tractor PARKING BRAKE Engages Disengages automatically when pressing and releasing accelerator pedal FORWARD REVERSE Using the joystick push the 3rd toggle switch from the left UP for forward or DOWN for reverse THROTTLE Work Mode Use the 2nd toggle switch from the left on joystick to throttle UP push upward o...

Page 6: ...M B Multi Service Vehicle 6 Reference Guide 2014 M B Companies Inc All Rights Reserved Notes ...

Page 7: ... are a permanent part of the equipment If they become separated from the product or illegible contact M B Companies Inc for replacements Understand the information the labels are communicating before operating or maintaining the equipment Avoid Abrupt Maneuvers and Excessive Speed Travel at Low Speed When Turning Always Wear Safety Belt 390 172409 WARNING HIGHER ROLLOVER RISK DANGER HOT FLUID UNDE...

Page 8: ...ted movement of the articulation joint WARNING Batteries give off flammable fumes that can explode resulting in personal injury Electrolyte is an acid and can cause personal injury if it contacts skin or eyes PRE START UP SAFETY Install any covers or guards which may have been removed for shipping purposes or maintenance Before starting equipment walk around equipment making a visual inspection th...

Page 9: ...oving parts during operation Moving parts can cause serious injury or death Be aware of the surroundings Look for blind spots from which pedestrians or vehicles may suddenly appear Locate the emergency stop on the vehicle Do not operate in crowded pedestrian areas This equipment may cause serious injury or death if safety rules are not followed The M B Multiple Service Vehicle M B MSV uses a level...

Page 10: ...5801 or 1 800 558 5800 Fax 920 898 4588 MACHINE IDENTIFICATION Each machine manufactured by M B Companies Inc has an identification plate mounted to it as shown in Figure 3 This plate contains the serial number of your M B equipment Copy the information from the plate on your equipment into the appropriate space in Figure 3 This information is important to have available when communicating with M ...

Page 11: ...le weights when using a dump body Ballast Types include Fluid filled tires wheel weights or another attachment NOTE All weights in pounds all dimensions in inches CW Curb Weight for MSV 100501 6620 lbs Front 2140 lbs Rear 4480 lbs TW FA RA including attachments and or ballast WB Wheel Base 81in for MSV TFA Total Front Axle Weight TRA Total Rear Axle Weight CgF Weight at the center of gravity of fr...

Page 12: ...rved INTRODUCTION This section provides information that is specific to the M B MSV Each sub section describes a component or system to give the reader a reasonable understanding of the topic If a more in depth knowledge is needed contact M B Companies Customer Support Vehicle Information ...

Page 13: ...rovide comfort and safety The joystick and the Plus 1 interface are described in another section Operator Seat The seat is cushioned by an airbag that absorbs bumps and vibration The firmness of the cushion is adjusted using a knob located at the front of the seat and below the operators legs Figure 4 Adjust Seat Air Cushion Seat Back Forward Back Figure 4 With the engine running the firmness is a...

Page 14: ...pull free from the connection leaving the post Figure 9 Figure 9 Remove the window and store in a safe place To replace the window position it on top of the opening seal CAUTION The seal must be in proper location or it will leak Move the latches into position Secure the front two by snapping the levers into the hinge point The rear latch should be positioned so the open clip is over the post Then...

Page 15: ...st be showing the main operating screen Windshield Squirter The ring at the end of the lever activates the windshield squirter Press in on the ring Washer fluid will be pumped as long as the ring is pressed The wipers will start moving then stop when the ring is pressed See Figure 11 Horn The horn will work regardless of the key switch position Press in on the button at the end of the lever See Fi...

Page 16: ...adlights When the switch is moved to a position it will stay until it is pushed again RADIO CONSOLE The radio is on the right side of the steering column Another feature is a 12 volt 10 amp power point socket It is similar to an automotive outlet where accessories can be plugged in See Figure 12 Accessory Plug in 12 volt 10 amp Figure 12 CIRCUIT BREAKERS Located under the right armrest are push to...

Page 17: ...M B Multi Service Vehicle 17 Operation 2014 M B Companies Inc All Rights Reserved Open Screen Operation Plus 1 Controls ...

Page 18: ...tus Screens Use Up and Down arrows to access each section Refer to Pages 24 26 Access Calibration Screen Refer to Page 27 Access Attachment Selection Screen Refer to Pages 28 29 Access Password Screen If showing PW OK Password access has be granted Refer to Page 30 Access Rear Inputs Outputs and MVEC Status Screens Use Up and Down arrows to access each section Refer to Page 31 33 Up and Down arrow...

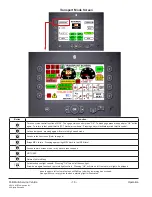
Page 19: ...sing again will return to high speed mode Access to faults screens Refer to page Brings MSV to idle Pressing again brings MSV back to last RPM level Access to work screen mode may have to reduce speed NOT USED Returns to Main Menu Activates beacon light controls Pressing OK turn on off beacon light Arrow down again to access rear work light controls Pressing OK will turn on off the rear work light...

Page 20: ... System receiving signal from engine ECM Fuel Gauge Engine Coolant Guage Engine Oil Gauge Low Battery Gauge Hydraulic Oil Current horsepower load being used by engine Right Signal Indicator Vehicle Drive Status Headlight High Beam Indicator Hour Meter Alarms Display Engine RPM Vehicle Speed Glow Plugs Main Menu Cruise Foot Pedal Throttle Hi Low Range Selection Lights select to turn on Indicates wh...

Page 21: ...engage Energizes PTO icon Press OK to activate PTO icon MSV must be under 1200 RPM to activate Access to faults screens Refer to pages 35 36 Brings MSV to idle Turns off any attachment Pressing again will return MSV to previous RPM and turn back on the attachments that were previously on Access to transportation screen mode Access to weight transfer setup screen Must have weight transfer function ...

Page 22: ...ock engaged green Main Menu Pressure level to ground drive Cruise engaged green Foot Pedal Throttle active green PTO RPM PTO engaged green Amount of weight on front hitch Lights select to turn on green Weight Transfer engaged green Adjustment for Weight Transfer Function being operated by joystick Current front and rear attachment selection Quick Stop Quick Idle Vehicle Ground Drive Spray Spreader...

Page 23: ...ss up down again to place the position of the function Function must not be active on other selections Place NA on the functions you do not want to use Functions 3 4 5 and 6 cannot be moved 8 The numbers on the left side of each function are the default numbers Place the number in the right to set back factory default Functions 19 20 and 21 are bonus functions that must be assigned an unused numbe...

Page 24: ... Companies Inc All Rights Reserved Front Input Screen Button Function Returns to Main Menu Press to highlight Front Inputs Cycle through Front Inputs Outputs and MVEC Press to access highlighted option 8 Displays the status of the front inputs OK 4 ...

Page 25: ...ts Reserved Front Output Screen Displays the status of the front ouptuts and what voltage or current it is modulating Button Function Returns to Main Menu Press to highlight Front Inputs Cycle through Front Inputs Outputs and MVEC Press to access highlighted option 8 OK 4 ...

Page 26: ... B Companies Inc All Rights Reserved Front MVEC Screen Displays the status of the front MVEC Button Function Returns to Main Menu Press to highlight Front Inputs Cycle through Front Inputs Outputs and MVEC Press to access highlighted option 8 OK 4 ...

Page 27: ...dal settings Allows you to recalibrate foot pedal Resets hydraulic filter notice Cycles between slow medium and high ground drive ramping Cycles between slow medium and high ground drive ramping Resets steering cylinders Returns to Main Menu Change screen brightness Change tire size 2 3 4 5 8 1 Calibration Screen ...

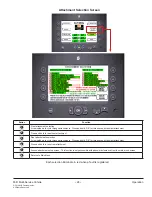
Page 28: ...d hold to reset front attachment Rear attachments selection Arrow up down to cycle through attachments Press and hold OK for three seconds to select attachment Press and hold to reset rear attachment Access attachment setup screen This function is only accessible with password clearance from the main menu screen Returns to Main Menu 2 5 6 7 8 1 Each selection illuminate in red when a fault is regi...

Page 29: ...014 M B Companies Inc All Rights Reserved Once you have your attachment selected on the attachment selection screen you can access the attachment setup screen only with password clearance from the main menu screen Attachment Selection Screen ...

Page 30: ...ehicle 30 Operation 2014 M B Companies Inc All Rights Reserved Button Function 1 2 3 4 5 6 9 0 Submit Password Returns to Main Menu 2 3 6 7 8 OK esc 1 Only accessible when password has been provided by M B Password Screen ...

Page 31: ...panies Inc All Rights Reserved Displays the status of the rear input and frequency Button Function Returns to Main Menu Press to highlight Rear Inputs Cycle through Rear Inputs Outputs and MVEC Press to access highlighted option 8 OK 4 Rear Input Screen ...

Page 32: ...anies Inc All Rights Reserved Displays the status of the rear output and frequency Button Function Returns to Main Menu Press to highlight Rear Inputs Cycle through Rear Inputs Outputs and MVEC Press to access highlighted option 8 OK 4 Rear Output Screen ...

Page 33: ... M B Companies Inc All Rights Reserved Displays the status of the rear MVEC Button Function Returns to Main Menu Press to highlight Rear Inputs Cycle through Rear Inputs Outputs and MVEC Press to access highlighted option 8 OK 4 Rear MVEC Screen ...

Page 34: ...2014 M B Companies Inc All Rights Reserved Button Function Reset weight transfer configuration by holding for two seconds Save settings Return to work mode screen Decrease weight transfer Increase weight transfer 2 3 1 Weight Transfer Screen ...

Page 35: ...B Companies Inc All Rights Reserved Button Function Access to Engine Faults Access to Front MVEC Faults Access to Front Control Faults Access to Rear MVEC Faults Access to Rear Control Faults Access to Return to Main Menu 2 3 6 7 8 1 Faults Screen ...

Page 36: ...rol Faults Screen When highlighted in RED shows an active fault Front Control Faults Screen When highlighted in RED shows an active fault Front MVEC Faults Screen When highlighted in RED shows an active fault Rear MVEC Faults Screen When highlighted in RED shows an active fault Faults Screens ...

Page 37: ...levels Selecting the Ribbon Snow Blower Attachment Connect the Ribbon Snow Blower and the hydraulic hoses to the desired auxiliary hydraulics Operation Attachment Selection Examples Button Function Attachment Selection screen 6 Button Function Press and hold for two seconds to reset front attachment Front attachment selection Press two times to highlight MSV PTO Ribbon Blower Press and hold for th...

Page 38: ...k Mode 2 Button Function Select PTO Engine RPM must be below 1200 RPM to activate PTO Press OK to use PTO engages Impeller PTO RPM shows above PTO icon Increase PTO RPM s by increasing engine RPM s User Defined Press user defined button on joystick to turn on Aux 3A function to engage ribbon 3 OK Increase engine RPM to desired speeds and begin using attachments ...

Page 39: ...ing outputs to the optimum levels Selecting the Rear Spreader Attachment Connect the Rear Spreader and the hydraulic hoses Operation Attachment Selection Examples Button Function Attachment Selection screen 6 Button Function Press and hold for two seconds to reset rear attachment Rear attachment selection Press three times to highlight MSV Spreader Press and hold for three seconds to set attachmen...

Page 40: ...ll Rights Reserved Selecting the Rear Spreader Attachment continued Button Function Enter Work Mode Button Function User Defined Press user defined button to engage Aux 4A to turn on rear spreader 2 Increase engine RPM to desired speeds and begin using attachments ...

Page 41: ...setup includes adjusting outputs to the optimum levels Initial set up of the Weight Transfer feature After your attachments are connected and set up follow these steps Steps need to be done when switching between attachments Operation Weight Transfer Example Button Function Work mode screen 2 Button Function Arrow down three times Press OK to turn on Weight Transfer Access Weight Transfer setup sc...

Page 42: ...ansfer increases weight on front wheels Increase engine RPM to desired speeds and begin using attachments Button Function Hold for two seconds to reset weight transfer Joystick Forward Push joystick forward to activate weight transfer Press multiple times until attachment begins to raise Press until attachment stops rising This sets 100 of the attachment weight on the hitch Press to save settings ...

Page 43: ...n port is located below the right side arm rest Figure 35 Diagnostic Port Figure 35 JOYSTICK LAYOUT The Joystick Layout screen is used to display all current joystick functions Some functions will change depending on the Attachments selected The layout shown results when None is selected in the Attachment Selection screen Up Aux 4A Down Aux 4B Shift Forward Reverse Throttle Up Down Float mode On O...

Page 44: ... After an M B splash screen the start up screen will appear Turn the key to start the engine IMPORTANT The engine will not start unless Plus 1 is ready Turn the key to ON and wait for Plus 1 to start up approximately 15 seconds If the key is turned to START before Plus 1 is ready the key must be reset Turn the key to OFF and back to ON When Plus 1 is ready the engine preheater will be ready The en...

Page 45: ...l minutes To reduce the total warm up time start exercising the entire machine before you complete the hydraulic warm up time Operate under light load until the systems reach normal operating temperatures If the engine temperature is not high enough enclose the engine and block the radiator A thermostat that opens at a higher temperature will not increase the engine temperature if the engine is no...

Page 46: ...e MSV in Creep Mode will assist in this 4 The hooks should fit into the arms of the attachment Lift the hitch in position so the hooks engage and lift the attachment 5 Push the clamp locks back completely 6 Insert the safety pins Most attachments will have a top link as a third connecting point This link is normally used to level the attachment Some attachments may be different Review the instruct...

Page 47: ...Manual for proper connections Also refer to Plus 1 Controls section in this manual Aux 1B Quick Disconnect Aux 1A Quick Disconnect Aux 2B Quick Disconnect Aux 2A Quick Disconnect Aux 3A Quick Disconnect Case Drain Quick Disconnect Electrical Plug Aux 3B Quick Disconnect Figure 44 Rear Hydraulic Connections Optional The rear of the MSV may have two pair of optional hydraulic connections Figure 45 E...

Page 48: ...fluid as necessary X Visually inspect that all access doors and panels are secured in place X Visually inspect for leaks under the vehicle X Check Plus 1 for any active alarms before operating vehicle Service or repair as needed X Frequency Engine As Required Before Each Use Daily Monthly Annually Clean cooler intake X Inspect fuel filters replace as necessary X Drain moisture from fuel water sepa...

Page 49: ...t restart the warranty period If requested by M B products or parts for which a warranty claim is made are to be returned transportation prepaid to M B s factory Any improper use operation beyond capacity or substitution of parts not approved by M B or alteration or repair by others in such a manner as in M B s judgement materially and or adversely affects the product shall void this warranty This...

Reviews: