M-Audio Rack-mountable 8 x 8 USB 2.0 Interface with MX Core DSP Technology... User Manual Download Page 19

User Guide

18

Fast Track Ultra 8R

10 About Overdub Recording and Monitor Mixing

Much of the popular music that you hear today is created using a method called “overdub” recording.  Overdub recording 

allows artists to record their music while listening to previously recorded parts of the song.  For example, a vocalist may 
record his or her parts while listening to the previously recorded guitar, bass, and drum parts in his/her headphones.  This 
method is popular because each recorded part is completely separate from the other parts and can be more easily edited 

and mixed into a “polished” song.  For example, if the guitarist is not happy with the solo, it is possible to edit problematic 
notes, re-record the entire solo, or even “splice” together the best parts of multiple takes to create one seamless 
performance.  This kind of detailed editing is generally not possible with “live” recording situations in which all sounds are 

captured at once.

To record overdubs, each artist must have a monitor or “cue” mix sent to his/her headphones.  This mix contains the 
previously recorded tracks combined with the “live” signal that is being recorded.  For example, the vocalist would need to 

hear the guitar, bass, and drum tracks along with his/her own vocal performance as it is being recorded into the computer.  

Fast Track Ultra 8R allows you to create up to four stereo monitor mixes using the first four tabs of the Control Panel.  

Each tab controls a stereo mixer with 16 inputs (eight hardware inputs plus eight outputs from your audio software).  The 
“Software Output Signal Routing” section of this User Guide covers this topic in greater detail. 

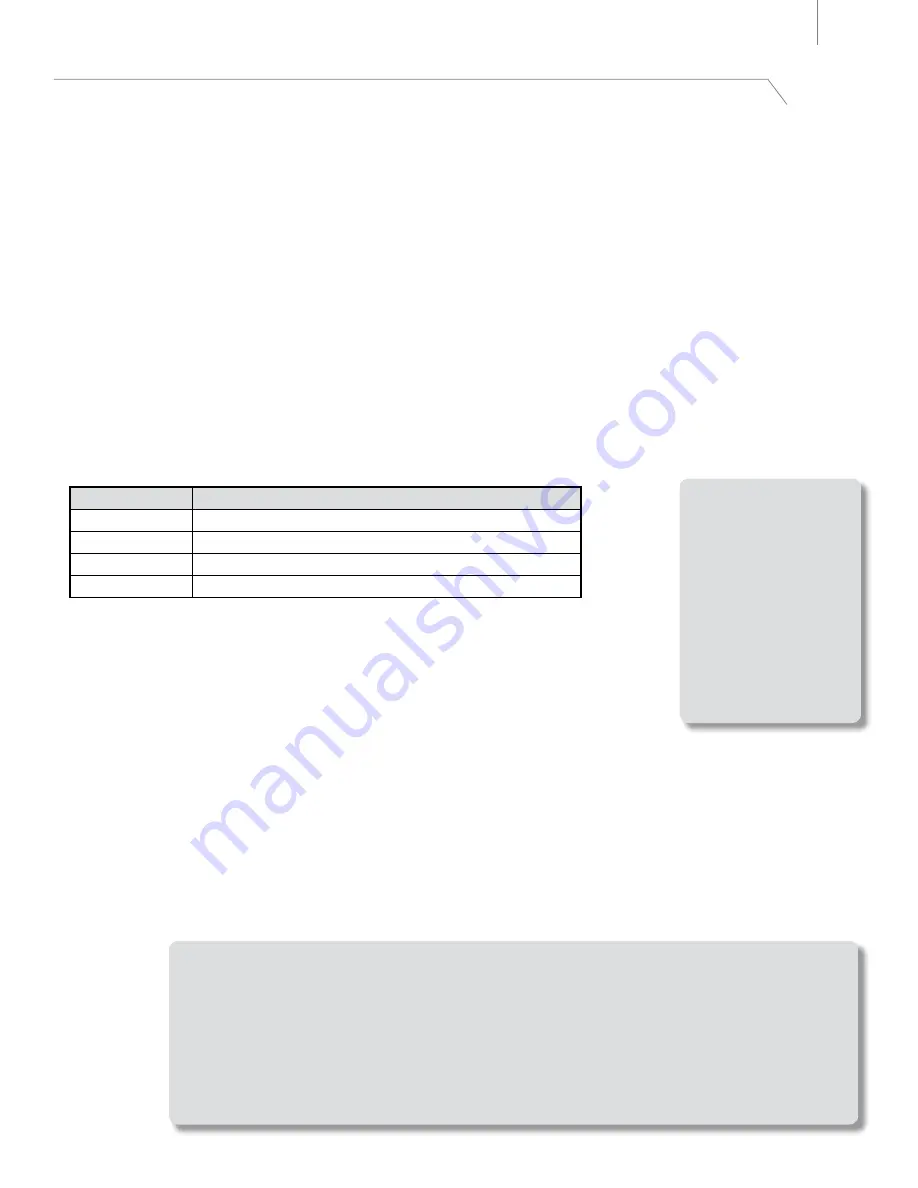
Each tab routes signals to a separate pair of outputs as shown in the following table:

Tab Name:

The output of this tab is routed to:

Monitor 1/2

Hardware Output 1/2 and Headphone Output 1

Monitor 3/4

Hardware Output 3/4 and Headphone Output 2

Monitor 5/6

Hardware Output 5/6

Monitor 7/8

Hardware Output 7/8 and S/PDIF Output

Using the Monitor Mixer

To use the Fast Track Ultra 8R Monitor Mixer:


1. 

 Select the tab that corresponds to the hardware outputs to which you would 

like to send your monitor mix.  For example, if you wish to create a mix that 

routes to analog outputs 7/8, select the “Monitor 7/8” tab.


2. 

 Adjust the level faders for the hardware input and software return channels to 
create a comfortable monitor mix for the listener.  


 •   The eight channels on the left side of the mixer represent the “live” hardware inputs.  For example if you 

have connected a microphone and guitar to the first two inputs, signals from these devices will appear on 
channels one and two of the mixer.


 •    The eight “Software Return” channels correspond to the outputs of your audio application.


 •    The last two channels on the right side represent the monitor mixer’s master outputs that are sent to the 

mixer’s associated hardware output pair (on the rear-panel of Fast Track Ultra 8R).


Keep in mind that this mixer is for monitoring purposes only. All signals received at the hardware 
inputs are also sent directly to the recording application without being altered. The Monitor Mixer 
receives duplicates of these input signals to allow you to create a near-zero latency monitor mix. 
Changes made to the monitor mixer do not affect your recordings (or your audio software), since the 
Monitor Mixer’s output is not actually being recorded. 

For example, if the singer would prefer to not hear guitars while recording, the guitar channel of the 
singer’s monitor mixer can simply be muted without affecting the recording application in any way.


TIP

:  Keep in mind that 

the first and second 

headphone outputs are 

hardwired to analog 

outputs 1/2 and 3/4.  If 

you would like to route 

your monitor mixes 

to the first or second 

headphone outputs, 

select the “Monitor 

1/2” or “Monitor 3/4” 

tabs, respectively.

Summary of Contents for Rack-mountable 8 x 8 USB 2.0 Interface with MX Core DSP Technology...

Page 1: ...Fast Track Ultra 8R User Guide Rack mountable 8 x 8 USB 2 0 Interface with MX Core DSP Technology English...

Page 2: ...ne levels with phantom power switchable in groups of four and individual 20dB pads Channels one and two also provide insert points and are switchable to accommodate instrument level input The rear pan...

Page 3: ...on coaxial jacks Two stereo headphone jacks with individual level controls MIDI Input and Output with front panel MIDI I O indicators Output Level control for main output pair 1 2 Powerful onboard DSP...

Page 4: ...G4 1GHz CPU G4 accelerator cards not supported Intel Mac OS X 10 4 11 10 5 2 native USB 2 0 port 512 MB RAM Intel CPU M Audio suggests that you also check the minimum system requirements for your audi...

Page 5: ...ese switches activates the phantom power circuitry for the corresponding group of four mic inputs 1 through 4 or 5 through 8 illuminating the Phantom Power LED 7 and sending 48V power to the four asso...

Page 6: ...ated at the S PDIF outputs 20 Mic Line Inputs These eight combo jacks provide eight analog inputs and can accommodate microphone or line level sources via XLR or 1 4 TRS or TS connectors The microphon...

Page 7: ...individual instrument level sources simultaneously connected to input channels 1 and 2 via the two front panel Instrument inputs 1 The Mic Line Instrument selector switches 2 must be set to the Instr...

Page 8: ...your external audio device to the S PDIF Input located on the rear panel breakout cable 18 The signal level you receive at the S PDIF In will be the signal level that you record Any adjustments to th...

Page 9: ...ing application all hardware inputs and all signals output by your recording software can be mixed with virtually no latency and sent to the hardware outputs Software Output Signal Routing When select...

Page 10: ...DPHONE UT AND HEADPHONE UT AND 3 0 UT NPUTS ONITOR IXER ONITOR IXER ONITOR IXER ONITOR IXER TO ONITOR IX 3OFTWARE 2ETURN NALOG N 2ECORD UNALTERED UT N NPUTS 7 ONITOR IXER TO ONITOR IX 3OFTWARE 2ETURN...

Page 11: ...tor signals from your DAW and from Fast Track Ultra 8R s inputs and outputs To open the Control Panel In Windows open the Fast Track Ultra 8R Control Panel by double clicking on the M Audio icon in th...

Page 12: ...parate monitor mixes from the eight hardware inputs and eight software returns from your audio application Each tab controls a separate pair of outputs Monitor 1 2 Hardware Outputs 1 2 and Headphone O...

Page 13: ...t the adjacent linked channel as well Level fader controls the level of that channel s signal sent to the output channels Send control controls the level of that channel s signal sent to the internal...

Page 14: ...ings tab while your DAW application is running as this can cause some applications to exhibit unexpected behavior If the status in the Settings tab see the Clock section below is set to external and a...

Page 15: ...a 8R Control Panel Fast Track Ultra 8R now runs in sync to the digital S PDIF signal generated by the other device Note that Fast Track Ultra 8R can only receive input signal from its S PDIF input whe...

Page 16: ...Fast Track Ultra 8R Control Panel can be adjusted by using up down left right or both up down and left right mouse movements Selecting Vertical allows you to turn a knob clockwise by clicking and dra...

Page 17: ...This tab features 16 meters that display levels of your eight hardware inputs and eight hardware outputs This is useful in setting up levels for live tracking or mixdown Flow Tab This tab displays a g...

Page 18: ...information may be helpful should you ever have the occasion to call for technical support Clicking the buttons in the lower right will take you to useful pages on the M Audio website If your computer...

Page 19: ...nd Headphone Output 1 Monitor 3 4 Hardware Output 3 4 and Headphone Output 2 Monitor 5 6 Hardware Output 5 6 Monitor 7 8 Hardware Output 7 8 and S PDIF Output Using the Monitor Mixer To use the Fast T...

Page 20: ...configured properly NOTE When using the Fast Track Ultra 8R Monitor Mixer to create monitor mixes be sure to mute your DAW application s active recording channels or if possible turn off the applicati...

Page 21: ...les that have been written about this subject and are available online or through your local music retailer The diagram below demonstrates a scenario in which a controller keyboard and a sound module...

Page 22: ...If you re certain Fast Track Ultra 8R is correctly installed and configured for your audio software check your signal path Make sure your inputs are routed correctly by verifying that your applicatio...

Page 23: ...te SNR and Dynamic Range 96 dB A weighted THD N 0 065 at maximum volume Working Range 24 to 600 ohms Maximum Output Level 0dbv into 32ohms Crosstalk 65 dB 1 kHz Microphone Input Pre amp Gain 0dB to 60...

Page 24: ...able Register online at www m audio com register to receive FREE product updates and for the chance to win M Audio giveaways Fast Track Ultra 8R Tested to comply with FCC standards FOR HOME OR STUDIO...

Page 25: ...ique PC 0 820 000 731 Mac 0 820 391 191 e mail PC support m audio fr email Mac mac m audio fr fax 33 0 1 72 72 90 52 Web www m audio com M Audio Germany Kuhallmand 34 D 74613 Ohringen Germany Technica...

Reviews: