background image


Features 


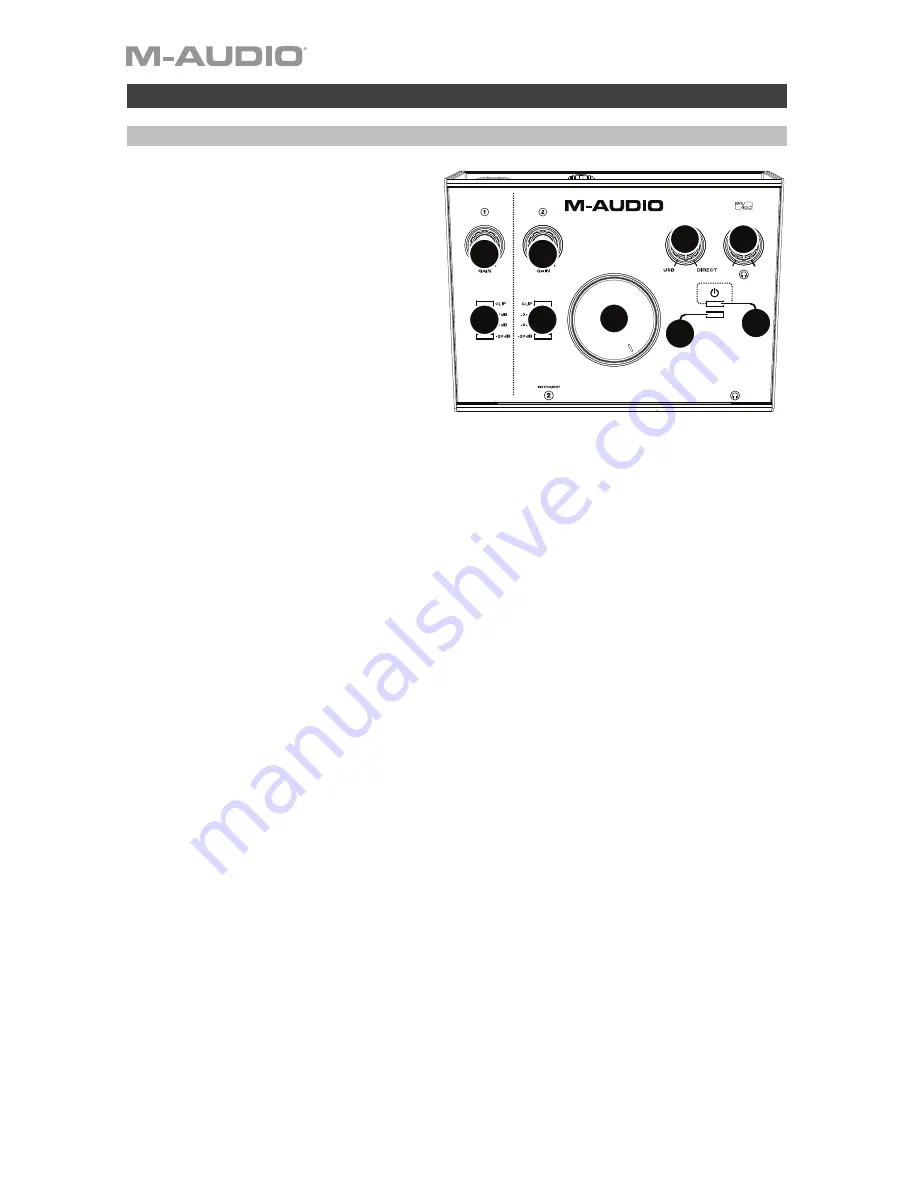
Top Panel 

 
1.


Input Gain:

 Adjusts the input's gain 

level. Set this knob so the 
corresponding 

LED Meter 

(located 

below the knob) displays a "healthy" 
level during performance—but not so 
high that the meter "clips" or peaks, 
causing distortion in the audio. 

2.


LED Meters: 

Indicates the input 

signal level from the 

Combo Input

 or 

Instrument Input

3.


USB / Direct Blend: 

Adjusts the mix 

of the audio signal from your inputs 
(

Direct

) and the audio output of your 

computer (

USB

) that will be sent to 

the 

Main Outputs

 and 

Headphone Output

This knob is useful for dealing with “latency” when you are recording in your DAW. 
Latency is a delay in sound that may occur between the incoming sound (playing your 
instrument, singing, etc.) and outgoing sound (when you hear it in the DAW). 

Latency is often the result of the “buffer size” setting, which is usually located in your 
DAW’s Preferences, Options, or Device Setup menu. Higher buffer sizes generally result 
in higher latency. In some cases, lower buffer size settings can consume a lot of your 
computer’s CPU and cause audio glitches. To prevent these audio glitches, you will need 
to use a higher buffer setting, and this may result in latency. 

If you are experiencing latency when recording, adjust the knob towards the 

Direct 

position to increase the blend of unprocessed audio from your inputs directly to your 

Main Outputs 

and 

Headphone Output

. This will let you hear the incoming audio from 

your inputs without latency while still being able to hear the audio from your DAW. When 
listening to the playback, adjust the knob all the way to the 

USB

 position. 

If your computer is powerful enough, you may be able to set the buffer size setting in 
your DAW low enough such that you may never need to listen to the direct audio signal 
from your inputs. In this case, set the 

USB / Direct Blend

 knob all the way to the 

USB


position to monitor only the audio output of your DAW. 

4.


Headphone Level: 

Adjusts the output volume of the 

Headphone Output

5.


Monitor Level:

 Adjusts the output volume of 

Main Outputs

, which should be connected 

to your powered monitors or amplifier system. 

6.


Power LED:

 Lights up when a valid USB connection has been established between your 

computer and M-Track 2X2. Use this light to verify that M-Track 2X2 is receiving power 
and is ready to use. 

7.


+48V (Phantom Power) LED: 

Lights up when phantom power is engaged. 


M-TRACK 2X2

C -SERIES

+48V

+48V

INPUT

INPUT

1

3

1

2

4

5

2

7

6

Summary of Contents for M-TRACK 2X2

Page 1: ...User Guide English 3 5 Gu a del usuario Espa ol 6 8 Guide d utilisation Fran ais 9 11 Guida per l uso Italiano 12 14 Benutzerhandbuch Deutsch 15 17 Appendix English 18 M TRACK 2X2 C SERIES...

Page 2: ......

Page 3: ...operating system 2 Open the file you downloaded and double click the driver installer file 3 Follow the on screen instructions to install the drivers Note Remember to select M Track 2X2 as your interf...

Page 4: ...ed to use a higher buffer setting and this may result in latency If you are experiencing latency when recording adjust the knob towards the Direct position to increase the blend of unprocessed audio f...

Page 5: ...ect Blend knob The level of these outputs is controlled by the Monitor Level knob 4 Kensington Lock Slot You can use this Kensington lock slot to secure M Track 2X2 to a table or other surface Front P...

Page 6: ...ivo 2 Abra el archivo que descarg y haga doble clic en el archivo instalador del driver 3 Siga las instrucciones de la pantalla para instalar los drivers Nota Recuerde seleccionar M Track 2X2 como su...

Page 7: ...a prevenir estos defectos deber utilizar un ajuste mayor del b fer y esto podr a crear latencia como resultado Si est experimentando latencia al grabar ajuste la perilla hacia la posici n Direct para...

Page 8: ...e utilizar esta ranura de bloqueo Kensington a fin de sujetar el M Track 2X2 a una mesa u otra superficie Panel frontal 1 Salida para auriculares Conecte auriculares est reo de 1 4 pulg 6 35 mm a esta...

Page 9: ...tation 2 Ouvrez le fichier t l charg puis double cliquez sur le fichier d installation du pilote 3 Suivez les instructions l cran pour installer les pilotes Important N oubliez pas de s lectionner M T...

Page 10: ...l mes audio Pour viter ces probl mes audio vous devrez utiliser une taille de m moire tampon plus lev e et cela pourrait produire de la latence Si vous prouvez des d lais de latence lors de l enregist...

Page 11: ...Cet emplacement permet d utiliser un verrou Kinsington pour s curiser le M Track 2X2 sur une table ou autre surface Panneau avant 1 Sortie casque Cette sortie permet de brancher un casque d coute TRS...

Page 12: ...tivo 2 Aprire il file scaricato e fare doppio clic sul file di installazione dei driver 3 Seguire le istruzioni su schermo per installare i driver Importante Ricordarsi di selezionare l M Track 2X2 co...

Page 13: ...questi problemi audio bisogna utilizzare un impostazione pi elevata del buffer e questo pu portare a una latenza In caso di latenza durante la registrazione regolare la manopola verso la posizione di...

Page 14: ...di questa apertura per lucchetto Kensington per fissare l M Track 2X2 a un tavolo o ad altre superfici Pannello anteriore 1 Uscita cuffie collegare cuffie TRS da 1 4 6 35 mm a questa uscita Il mix ch...

Page 15: ...r 2 ffnen Sie die heruntergeladene Datei und doppelklicken Sie auf die Treiber Installationsdatei 3 Befolgen Sie die Anweisungen am Bildschirm um die Treiber zu installieren Wichtig Denken Sie daran M...

Page 16: ...ungen verursachen Um diese Tonst rungen zu vermeiden m ssen Sie eine h here Puffereinstellung verwenden Diese kann zu Latenz f hren Wenn es beim Aufnehmen zu Latenzzeiten kommt drehen Sie den Regler i...

Page 17: ...erwenden um das M Track 2X2 an einem Tisch oder einer anderen Oberfl che zu befestigen Vorderseite 1 Kopfh rerausgang Verbinden Sie 1 4 6 35 mm TRS Kopfh rer mit diesem Ausgang Der Mix den Sie aus die...

Page 18: ...20 kHz 0 05 dB Signal to Noise Ratio 101 dB 1 kHz 4 dBu A weighted THD N 0 003 Max Input Level 16 dBu Gain Range 55 dB Inst Input 2 unbalanced 1 4 6 35 mm TS Frequency Response 20 Hz 20 kHz 0 05 dB D...

Page 19: ...registered in the U S and other countries Mac and OS X are trademarks of Apple Inc registered in the U S and other countries Windows is a registered trademark of Microsoft Corporation in the United S...

Page 20: ...m audio com Manual Version 1 0...

Reviews: