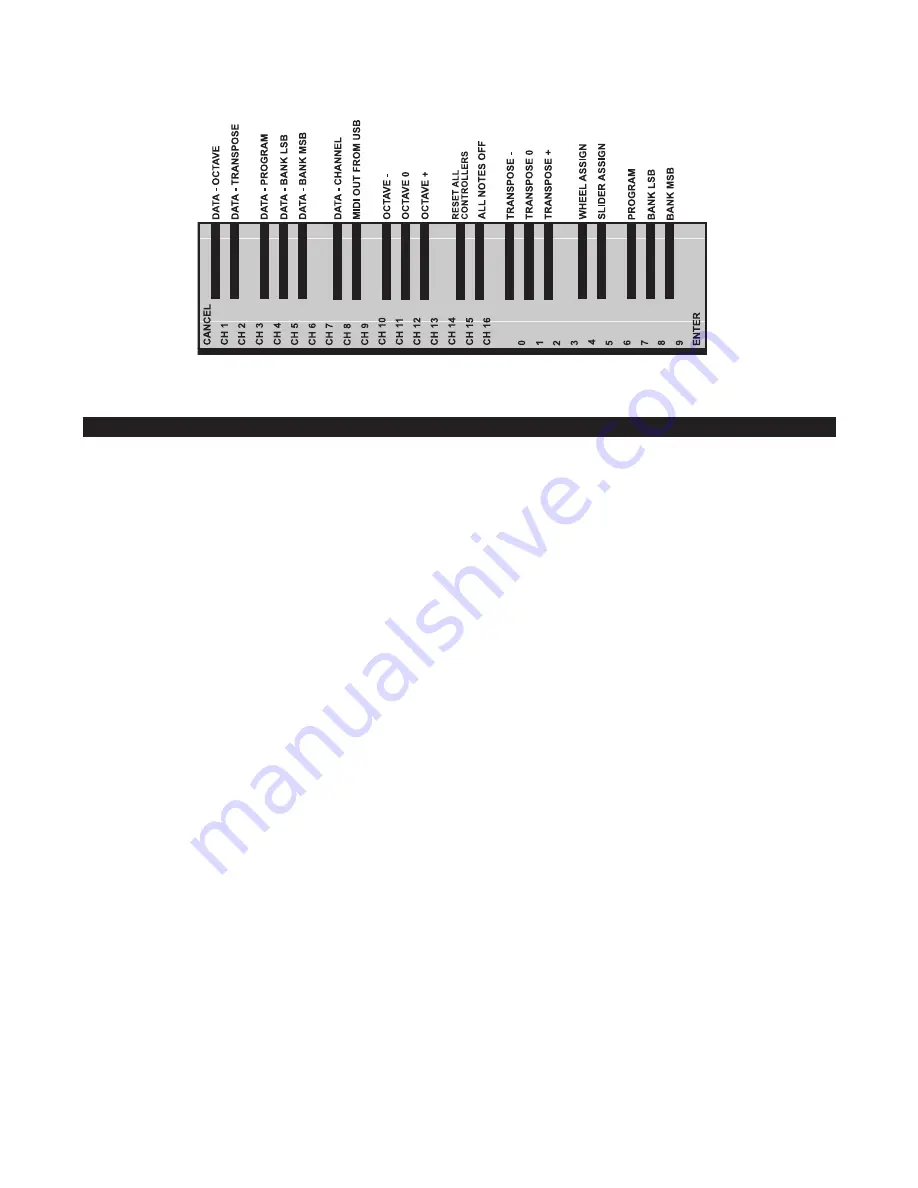
background image

7

Advanced functions

In addition to setting an octave shift, the two octave “+” and ’“-“ buttons discussed earlier in the manual under the section “Octave

Buttons” can also be used to control one of five MIDI functions.
In the diagram above, you will see that the first 6 black keys are labeled “DATA = ________.” These keys are used to select the function

of the octave buttons. Some of the functions that these keys can be used for cannot send out a value less than 0. When used to control

these functions, both lights above the buttons will remain on, regardless of the current setting of that function.
To select an alternate function:

<

Press the Advanced Functions button, putting the keyboard into Edit Mode.

<

Press the black key that represents the function you want. Edit Mode will finish as soon as you have selected the function and you will

be able to play notes again.

The five available alternate functions of the octave buttons are described next:

Octave Shift

The Octave “+” And “-” Keys

Another method of shifting the Keystation 49e’s octaves is with the use of the keys labeled octave “+” and “-“. After the Advanced Function

button has been pressed, placing the keyboard is in Edit Mode, pressing these keys will shift the keyboards pitch up or down one or

more octaves (one for time each pressed). The default octave shift designation is “0” and will be the octave setting each time you power

up the keyboard. The lights above the octave buttons indicate that 0 octave shift is set when both are on.
To assign the “+” and “-” keys to control the octave:

<

Press the Advanced Functions button to get the keyboard into Edit Mode.

<

Press the black key above C1 (named C# 1), representing DATA = OCTAVE. Edit Mode will finish as soon as C# 1 has been pressed.

There is also a method of performing a ‘quick’ octave change, which can be useful when using the octave buttons to control another

MIDI function and is accompplished as follows:

<

Press the Advanced Functions button to put the keyboard in Edit Mode.

<

Press the black key below B2 (Bb2)—in Edit Mode, this key functions as “”, increasing the octave by 1 (you may press it again

to increase the octave by 2, and so on),

<

Press the black key above F2 (F# 2)—in Edit Mode, this key functions as “OCTAVE -”, decreasing the octave by 1 (you may press it again

to decrease the octave by 2, and so on),  

OR

, press the black key above G2 (named G# 2)—in Edit Mode, this key functions as “OCTAVE

0” to reset the octave shift to 0).

<

When you have chosen your octave shift press C5, representing “ENTER,” to leave Edit Mode.

Summary of Contents for Keystation 61es

Page 1: ......

Page 2: ...out The Manual 3 Connecting Your Keyboard 3 Windows XP and Mac OS X 4 Other Operating Systems 4 Getting Started 5 Advanced functions 7 MIDI If All Goes Wrong 10 Trouble Shooting 11 Contact M Audio 11...

Page 3: ...This Page Blank Intentionally...

Page 4: ...board Pitch Bend Wheel Modulation Wheel Volume Control slider Sustain foot pedal input Octave buttons Advanced Functions button What s in the Box Your M Audio Keystation 61es package should contain th...

Page 5: ...n 61es drivers for Macintosh or Windows operating systems Installation in Mac OS9 If you do not have OMS installed please run the OMS installer first Otherwise start by Installing the OMS Driver Insta...

Page 6: ...tinue Installation 9 Select the drive once more 10 Click OK 11 In the event that Windows asks you to restart your computer click Restart Getting Started Once you have finished installation you will ne...

Page 7: ...acoustic instruments do Just like the Pitch Bend Wheel the Modulation Wheel is fully MIDI assignable The Volume Slider The Volume Slider sends a MIDI message that controls the volume of the notes you...

Page 8: ...board is in Edit Mode pressing these keys will shift the keyboards pitch up or down one or more octaves one for time each pressed The default octave shift designation is 0 and will be the octave setti...

Page 9: ...buttons Once assigned pressing or will increase or decrease the channel incrementally When Channel 16 is reached and is pressed Channel 1 will be selected If the Octave and keys are selected to vary t...

Page 10: ...Modulation 07 Volume 10 Pan balance 05 Portamento There are 131 effects in total However for these effects to have any affect on the sound the receiving MIDI device has to be able to read and respond...

Page 11: ...at fault the problem lies with the receiving device To counter this there are two useful MIDI functions All Notes Off If you find there are hanging notes that you cannot stop playing send an All Note...

Page 12: ...drivers Contact M Audio 11 M AUDIO U S 5795 Martin Road Irwindale CA 91706 6211 U S A Sales Information 626 633 9050 Sales Information email info m audio com Tech Support 626 633 9055 Tech Support ema...

Page 13: ...of the claim M AUDIO specifically disclaims all other warranties expressed or implied Specifically M AUDIO makes no warranty that the product is fit for any particular purpose This warranty shall be...

Page 14: ...ir Aahs 53 Voice Oohs 54 Syn Choir 55 Orchestral Hit Brass 56 Trumpet 57 Trombone 58 Tuba 59 Muted Trumpet 60 French Horn 61 Brass Section 62 Syn Brass 1 63 Syn Brass 2 Reed 64 Soprano Sax 65 Alto Sax...

Page 15: ...61 Controller 61 62 Controller 62 63 Controller 63 64 Sustain Pedal 65 Portamento 66 Sostenuto 67 Soft Pedal 68 Legato Pedal 69 Hold 2 70 Sound Variation 71 Resonance 72 Release Time 73 Attack Time 7...

Reviews: