


Track one
--
Left PCM In 1/2 Delta-1010
Track two
--
Right PCM In 1/2 Delta-1010
Track three
--
Left PCM In 3/4 Delta-1010
Track four
--
Right PCM In 3/4 Delta-1010
Track five
--
Left PCM In 5/6 Delta-1010
Track six
--
Right PCM In 5/6 Delta-1010
Track seven
--
Left PCM In 7/8 Delta-1010
Track eight
--
Right PCM In 7/8 Delta-1010
8. Now we want to set up the output ports for the eight tracks.
Track one
--
WavOut 1/2 Delta-1010, panned hard left.
Track two
--
WavOut 1/2 Delta-1010, panned hard right.
Track three
--
WavOut 3/4 Delta-1010, panned hard left.
Track four
--
WavOut 3/4 Delta-1010, panned hard right.
Track five
--
WavOut 5/6 Delta-1010, panned hard left.
Track six
--
WavOut 5/6 Delta-1010, panned hard right.
Track seven
--
WavOut 7/8 Delta-1010, panned hard left.
Track eight
--
WavOut 7/8 Delta-1010, panned hard right.
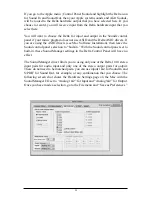
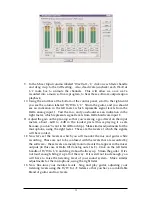
9. Bring up the meter view in your music software, and let’s start to get some
levels here. Let’s say that your hardware input 1 is the kick drum mic. Have
the drummer play the kick drum and raise the input gain on your pre-amp
channel 1 until you see a level of –6dB or so. This is your recording level. At
the same time you can begin to raise the faders on your mixer until you hear
the kick drum at a comfortable volume. This is your monitor level. Do the
same for each instrument.
NOTE: You could view the record levels from the Monitor Mixer
page also. The levels appearing in H/W In 1/2 through H/W In 7/8
will represent the signal appearing at the hardware inputs. We are
not monitoring via the Monitor Mixer, however, so no fader levels in
this page will apply or are needed in this example.
37
Summary of Contents for Delta 1010
Page 51: ...51 Notes...
Page 52: ...52 D1010 111700...


