background image

2.4.3. Placing a new roll with labels


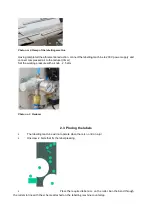
In order to place a new roll, one must


Loosen two  screws fixing the label pressing


Remove the label press


Place a roll with labels and screw the press


Run a band with labels through the label guides


Lift the grip fixing the band (2)


Wrap the beginning of the band around the guide with the grip (3) and place the band fixing grip  

back


1


2


3


Photo no  7. Placing the roll with labels


3. Description of  Mitsubishi GOT1000 controller


An overview of the product features

:


Full graphical operator’s panel


Data insertion through a touch screen and/or  conventional keyboard


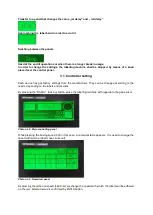
BUTTON DESCRIPTION


START button starts operations of the labelling machine, label protrusion


set a label with regards to a gap sensor to stop the label at a proper moment before its adhesion 
to a jar


Summary of Contents for W4086

Page 1: ...Electrical safety 1 2 Operational safety 2 Characteristics of the jar labelling machine 2 1 Technical data of the labelling machine 2 2 Connecting the labelling machine to honey bottling line 2 3 Plac...

Page 2: ...ed or unfamiliar with that type of equipment unless the usage occurs under supervision or in line with the equipment operating manual provided by safety supervising persons Make sure children do not p...

Page 3: ...the rolls Power supply 230V 50 Hz Recommended oil compressor with the capacity of 50 l and the maximum pressure of 8 bars 2 2 Connecting the labelling machine to a honey bottling line After preparati...

Page 4: ...the reducer timer Set the working pressure with a knob 2 5 atm Photo no 3 Reducer 2 3 Placing the labels The labelling machine will not operate when there is no lid on a jar Unscrew 2 bolts that fix...

Page 5: ...ans of PMMA spacer plates Regulate the induction sensor responsible for detecting a jar with metal lid The height from the detector to a lid shall be set within the range 1 5 mm erroneous set up of th...

Page 6: ...around the guide with the grip 3 and place the band fixing grip back 1 2 3 Photo no 7 Placing the roll with labels 3 Description of Mitsubishi GOT1000 controller An overview of the product features F...

Page 7: ...got factory settings from the manufacturer They can be changed according to the needs depending on the labels and jar sizes By pressing the BAZUJ basing button place the labelling machine with regard...

Page 8: ...g 6 press Enter to confirm Place a metal lid or a metal item under the induction sensor for 1 second Observe whether a label protrudes entirely or several millimetres are missing for a full protrusion...

Page 9: ...tuator delay we select the required value and press ENTER Photo no 13 Numerical panel Once ENTER has been pressed the panel returns to the main panel option Pressing the STOP button causes the device...

Page 10: ...the plug must be taken out Prior to the first usage device must be cleaned and dried thoroughly 6 Recycling Worn out product must be removed as waste only within selective waste collection organised...

Reviews: