


FinishLynx G
OLD
P
ACKAGE
Quick Start Guide – for Vision cameras
Page 6
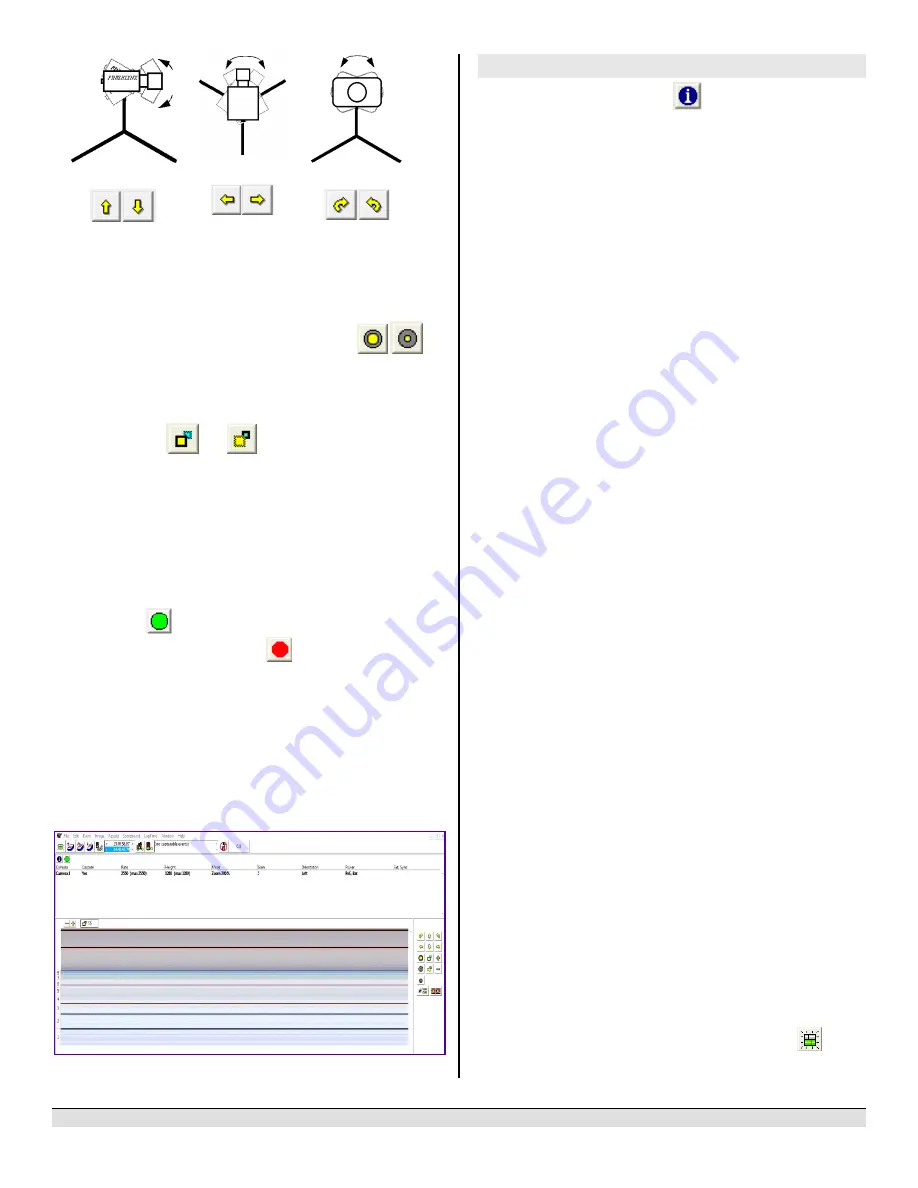
Tilt
Pan
Swivel
Have your assistant run through the finish line and watch
where he/she appears on the computer monitor. The
goal is
for the runner’s torso to be fully visible in both the inside and
outside lanes. Once the camera' position is correct, you can
then optimize the remote lens settings.
Remote Iris (adjusts amount of light in lens)
Open or Close the remote iris to bring the ACM value as close
to 1 as you can by clicking and holding the remote Iris buttons.
Remote Focus (adjusts near/far image focus)
Click and hold the
and
buttons on the keypad on
the right of the FinishLynx screen until the image becomes
crisp. Start by focusing on the far lane and adjust until all lanes
are in focus. Ensure that athletes in all lanes (near and far) are
in focus.
Note: If you are having a hard time getting crisp focus, try
opening your lens iris and allowing the AGC to drop closer to
zero.
3.
Once the camera appears to be aligned,
Click
, the green
alignment
icon to close 2D alignment and then click
on the red 1-D alignment icon
You will know when your camera is aligned on the finish
line because the 1-D image will be primarily white. See
image below for proper 1-D alignment.
If you followed the steps closely in 2-D align, the camera
should already be aligned in 1-D mode as well. The 1-D
image should look similar to the following screen capture:
Step 10:
Adjust FinishLynx camera settings
1.
Click
Camera Settings Icon
to open the Camera
Settings dialog.
2.
Click to select the
Setup
tab:
a.
Name
: enter a name to identify the camera(s)
b.
Image
Orientation
: select the correct orientation for
finish (infield would be Left orientation)
c.
Identify
By
: select Lane for track
competition
d.
Lanes
: enter the number of lanes on the track; the
remaining should be left as default.
3.
Click to select the
Parameters
tab
a.
Rate
: type a value in the field between 800-1000 for
sprints (400m and under) or type 600-800 for
distance events. Change this value when moving
between sprints and distance races, or else the
competitors in your FinishLynx image appear
distorted.
Note: Image distortion does not affect timing
accuracy.
b.
Frame
Height
: will
vary
by camera models, 640 is
recommended for most track competitions;
c.
Gain
Method
: set to
AGC
for outdoor light and set to
Manual
during the alignment process and for artificial
light. Adjust the value based on quality of image in
alignment mode.
4.
Click to select the
Inputs
tab:
a.
Start
Sensor
: is defaulted to
Closed
for the wired gun
start. If
using
the Radiolynx then set
Start
Sensor
to
None
to turn off the wired start (they are
independent of each other.
b.
Photo
Eye
: if
using
ACM to stop the scoreboard
display, set it to
Internal
.
5.
Click to select the
RadioLynx
tab:
a.
Port
: select the appropriate port where the Radiolynx
receiver
is plugged into (camera back is common for
newer model cameras)
b.
Setup
ID
:
should
be 000 and select Start Sensor on
the next line,
Name
: will fill in automatically with
Start 000.
6.
Click to select the
Capture
tab:
a.
Capture
Method
: select
Manual
if using the Capture
Button or
Automatic
if using ACM plug-in (both
methods
can be active at the same time by selecting
both).
7.
Click
OK
to close the
Camera
Settings
and it is advised to
restart the FinishLynx software.
8.
Set White Balance
a.
Open a
new
event in FinishLynx by clicking
in the
top left corner of the screen.


