background image

*     


*


TABLE OF CONTENTS


11 

2)


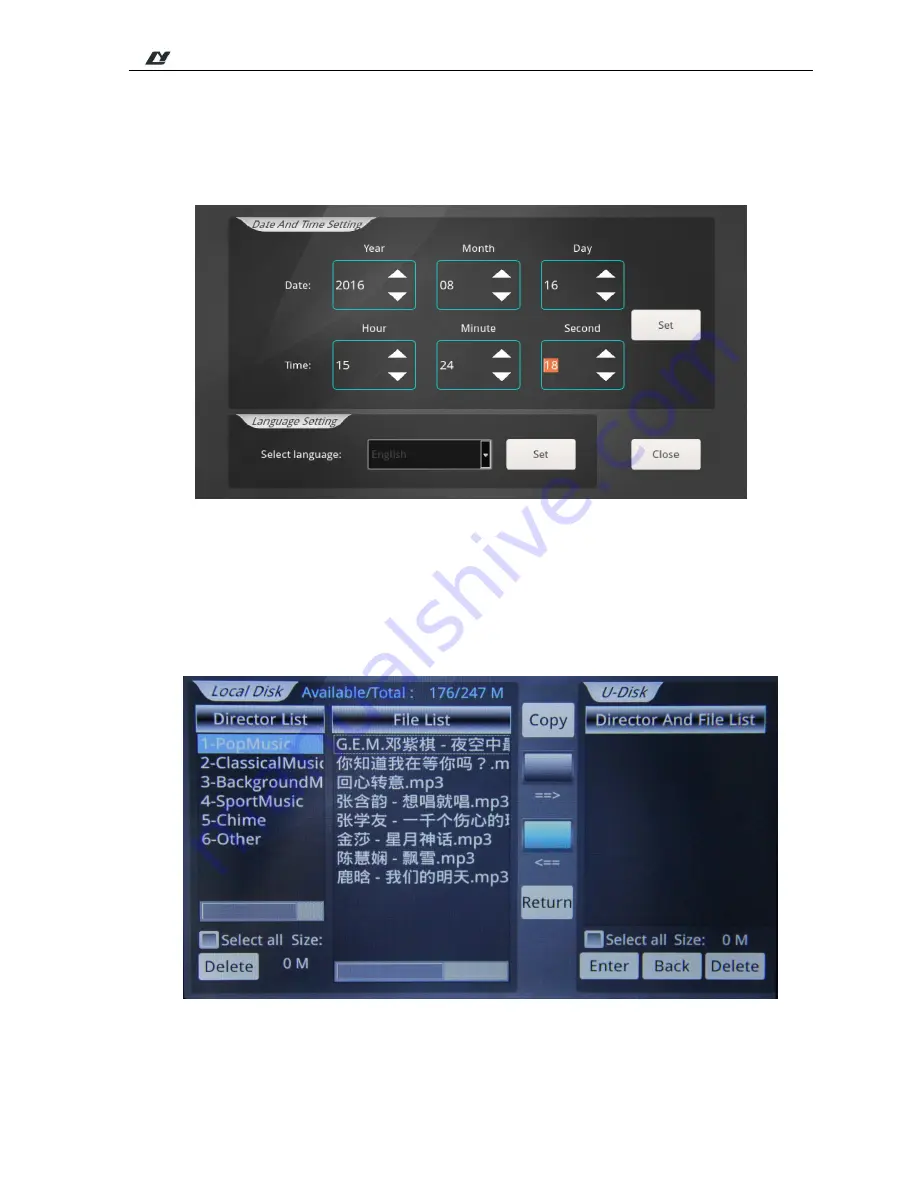
Date and Time Setting   

Please align the current clock when setting the system time, which relates to the implementation punctuality 

of timing point. The timing point can be accurate to seconds. So, when re-setting the system time, please pay 

attention to the setting of seconds.       


Interface of Date and Time Setting   


3)


File Management   

In this setting, you can copy the sound source of this machine to U disk or copy it from U disk to this 

machine. During the operation, you shall select the sound source and direction to be copied,(or selected all) and 

then click the button “Copy”.   


Interface of File Management   


Summary of Contents for M-808

Page 1: ...ystem Digital Audio Matrix M 808 User s Manual Welcome choosing our Public Address System Please read the Instructions carefully before operating this device LY International Electronics Co Ltd http www lyintlcorp com ...

Page 2: ...t instructions and other contents of the digital audio matrix M 808 device The user shall read the Instructions carefully and operate the device following the indications in the Instructions before the installation and operation of the device Any symbol marked on the rear panel of this machine must be noted The operations must be performed according to the instructions of these symbols Please keep...

Page 3: ...n the device Do not impose an excessive force when operating the switch buttons or connecting the external audio equipment Avoid any foreign matter paper metal etc from entering the device through gap or opening In such a case please power off this device immediately Do not attempt to detach the internal parts of this device or remold it by any way Please unplug the power plug immediately to avoid...

Page 4: ...N OF REAR PANEL 3 C INSTALLATION INSTRUCTION 5 3 1 INSTALLATION IN PHONE 5 3 2 INSTALLATION IN PC 5 D OPERATING GUIDE 5 4 1 LINKAGE INSTRUCTION 5 4 1 1 PHONE 5 4 1 2 PC 6 4 2 INTERFACE INSTRUCTION 7 4 2 1 DESCRIPTION OF MAIN INTERFACE 7 4 2 2 DESCRIPTION OF PHONE INTERFACE 14 4 2 3 DESCRIPTION OF PC INTERFACE 19 PACKING LIST 26 SPECIFICATION 26 ...

Page 5: ...P3 display built in program or extrapolated U disk with individual icon equalizer and individual volume control 1 channel DM with individual icon equalizer and individual volume control 1 channel fixed telephone input with authority management only one line can be operated in the whole area and with individual volume control 1 channel chime with individual volume control 1 channel voice alarm a ke...

Page 6: ...ing signals to all zones simultaneously by pressing the full warning button of the system and meanwhile the indicator light is ON 6 Chime and indicator 7 Power 8 USB Use to connect the U disk with MPS programs mobile hard disk and other memory devices It can directly play the songs of the U disk and copy the programs for built in MP3 player 9 All page close and indicator 10 All page open and indic...

Page 7: ...MC_IN RES ERV E 230 12 13 14 15 16 17 18 1 2 3 4 5 6 7 8 9 10 11 AC 110V 220V Selector Switch Use to select the operating voltage AC Power Input Socket Plug the AC power cord into this socket DC 24V connection terminal Externally connect with DC 24V power supply DC 24V Fuse Use for the fixed DC power supply If it is fused please replace it with the fuse of the same specification A continuous fusin...

Page 8: ...IC1 MIC2 MIC1 and MIC2 are individually controlled Turn left the switch to open this power source when the 48V phantom power supply microphone is used Volume Control Knob Line Input Interface As shown below WP1 WP2 WP3 WP4 WP5 WP6 WP7 WP8 PAGE1 PAGE2 PAGE3 PAGE4 2 1 3 TEST Control panel interface Connect 8 sets M 808C M 808S control panels Extension interface Connect 4 M 808R paging microphones ...

Page 9: ...ost device 2 Connect the host device to LAN 3 Connect the desired Android phone to the WIFI in the LAN where the host device is connected and set the static IP address of the phone The static IP address should be in the same network segment with the IP address of the host device e g the host device IP is 192 168 8 220 the static IP address of the phone should be 192 168 8 100 As shown below 4 Ente...

Page 10: ...t device and PC to LAN 3 Set the IP address of PC and host device in the same network segment e g the host device IP is 192 168 0 220 the PC IP should be 192 168 0 10 As shown below 4 Enter the software connection interface and input the host s IP address and port number As shown below ...

Page 11: ...ight of the interface it is the audio interface It can achieve the multi channel operations of automatically searching and playing the channel playing the previous channel next channel playing the specified channel collecting the channels etc Zone switch Slide the scroll bar to control the volume You can click this option to control the volume Each click will increase the volume of five numbers Au...

Page 12: ...of Zone Settings 3 Sound Source Settings As shown below each sound source can be equalized and the volume can be set During the operation it is necessary to open the switch of equalizer to adjust the equilibrium Playback Modes 1 Sequence 2 Loop 3 Shuffle 4 Single Loop FM setting area List 1 Pop Music 2 Classical Music 3 Background Music 4 Sport Music 5 Chime 6 Other Play status Play tentative stat...

Page 13: ...is zone will not be monitored it can be canceled by clicking the key Cancel on the right of this interface The volume size of the monitoring object can also be controlled Monitoring Interface 5 Setting Interface You can set up all information of the entire system in this interface You can set up all items in this interface before you perform the operations like Play in the main interface and vario...

Page 14: ...g to enter the IP address setting interface As shown below there are ID address setting and the current IP address information of this machine in this interface After the IP address is set up click the button OK The newly configured IP address cannot be effective unless the device is re started Interface of Network Setting ...

Page 15: ...conds So when re setting the system time please pay attention to the setting of seconds Interface of Date and Time Setting 3 File Management In this setting you can copy the sound source of this machine to U disk or copy it from U disk to this machine During the operation you shall select the sound source and direction to be copied or selected all and then click the button Copy Interface of File M...

Page 16: ...s setting ring and other operations As shown below Interface of Timing Setting 5 Password Setting The password setting is mainly for the phone calls When there is a phone call access it can be answered only by entering the password The password can only be set up to four numbers Timing point list Start and Stop Time Date Only can select the first and tail timing point Create timing point Delete se...

Page 17: ... four setting items namely input for BGM background music input for PAGE ALL other input volume set and priority Interface of Other Settings 7 Control Terminal In this interface you can view the ID number IP address and controlled zones and other information of the control terminal in the system ...

Page 18: ...rt Main interface Paging switch Zones sound source setting Zones volume control Full partition sound source setting Full partition switch After the area operation on the screen click the button to restore the partition state to the state before the previous operation Note The volume control area does not follow the previous operation state Volume input area Full partition volume control Auto timer...

Page 19: ...ry to open the switch of equalizer to adjust the equilibrium Interface of Zone Setting 3 Sound Source Settings As shown below each sound source of control panel device can be equalized and the volume can be set During the operation it is necessary to open the switch of equalizer to adjust the equilibrium Player interface List 1 Pop Music 2 Classical Music 3 Background Music 4 Sport Music 5 Chime 6...

Page 20: ...ckground color of zone button becomes blue it indicates this zone is monitored When this zone will not be monitored it can be canceled by clicking the key Cancel on the right of this interface The volume size of the monitoring object can also be controlled Monitoring Interface Control panel device select Equalizer switch Volume control by sliding ...

Page 21: ... Timing Point Setting As shown below can create timing point and the created timing point can be deleted edit zones setting ring and other operations Timing point setting Interface Set timing point list Date Create point Delete selected point Delete all points Copy points Time setting Zone setting Media point ring setting Return upper level ...

Page 22: ...ll access it can be answered only by entering the password The password can only be set up to four numbers Interface of Code Setting 3 Other Setting As shown below you can set up four setting items namely input for BGM background music input for PAGE ALL other input volume set and priority Interface of Other Setting ...

Page 23: ...ti channel operations of automatically searching the frequency playing the audio playing the previous channel next channel playing the specified channel collecting the channels etc Main interface Paging switch Zone sound source setting Zone volume control Full partition sound source setting Full zone switch After the area operation on the screen click the button to restore the partition state to t...

Page 24: ...one Setting Player interface Media play interface List 1 Pop Music 2 Classical Music 3 Background Music 4 Sport Music 5 Chime 6 Other Can sort music Previous piece Play Stop Next piece Current mode Sequence Playback Modes 1 Sequence 2 Loop 3 Shuffle 4 Single Loop File List FM setting area Store Cancel store Store list Search FM reception program FM0 1 Hz Previous Next program Zone select Equalizer...

Page 25: ...und Source Setting 4 Monitoring Interface As shown below only one zone can be monitored each time When the background color of zone button becomes blue it indicates this zone is monitored When this zone will not be monitored it can be canceled by clicking the key Cancel on the right of this interface The volume size of the monitoring object can also be controlled Monitoring Interface Control panel...

Page 26: ...of the system in this interface Setting Interface 1 Network Setting Click the Network setting button to enter the IP address setting interface which is shown as below and set the IP address as the current PC IP address After setting the IP address click SET button Network setting interface ...

Page 27: ...sword Setting The password setting is mainly for the phone calls When there is a phone call access it can be answered only by entering the password The password can only be set up to four numbers Interface of Code Setting Set timing point list Date Auto display Create points Delete selected points Delete all points Copy points Time setting Zone setting Media point ring setting Exit and return to u...

Page 28: ... TABLE OF CONTENTS 24 4 Password Setting As shown below you can set up four setting items namely input for BGM background music input for PAGE ALL other input volume set and priority ...

Page 29: ...the case to repair the device without authorization in case of any fault in order to avoid the accident or aggravate the damage of the device Do not put any corrosive chemicals on or near the device 2 Precautions for After Sale Services The Company will provide the free warranty services of three years including replacement of parts free of charge for any quality problem occurred since the date of...

Page 30: ...7 FM antenna 1 set 8 2A fuse 1 piece 9 4A fuse 1 piece 10 1500MM dual cat audio cable 1 set 11 10A MP P power cord 1 set 12 Washer black 4 pieces 13 5 19 cross recessed countersunk head screws white 4 pieces Specification Model M 808 Power supply 230V 50Hz DC 24V Input sensitivity of MIC1 MIC 2 10mV Input sensitivity of lines 1 8 250mV Output voltage of lines 1 8 1V Input sensitivity of EMC 250mV ...

Page 31: ...ver of the machine to prevent the electric shock If necessary it shall be repaired by the professional with the professional certificate The terminal marked with a symbol in the device indicates that it is dangerous and charged The connecting operation of these terminals shall be performed by the trained staff The device is connected with the power grid via the power cord plug so the connection be...

Reviews: