background image

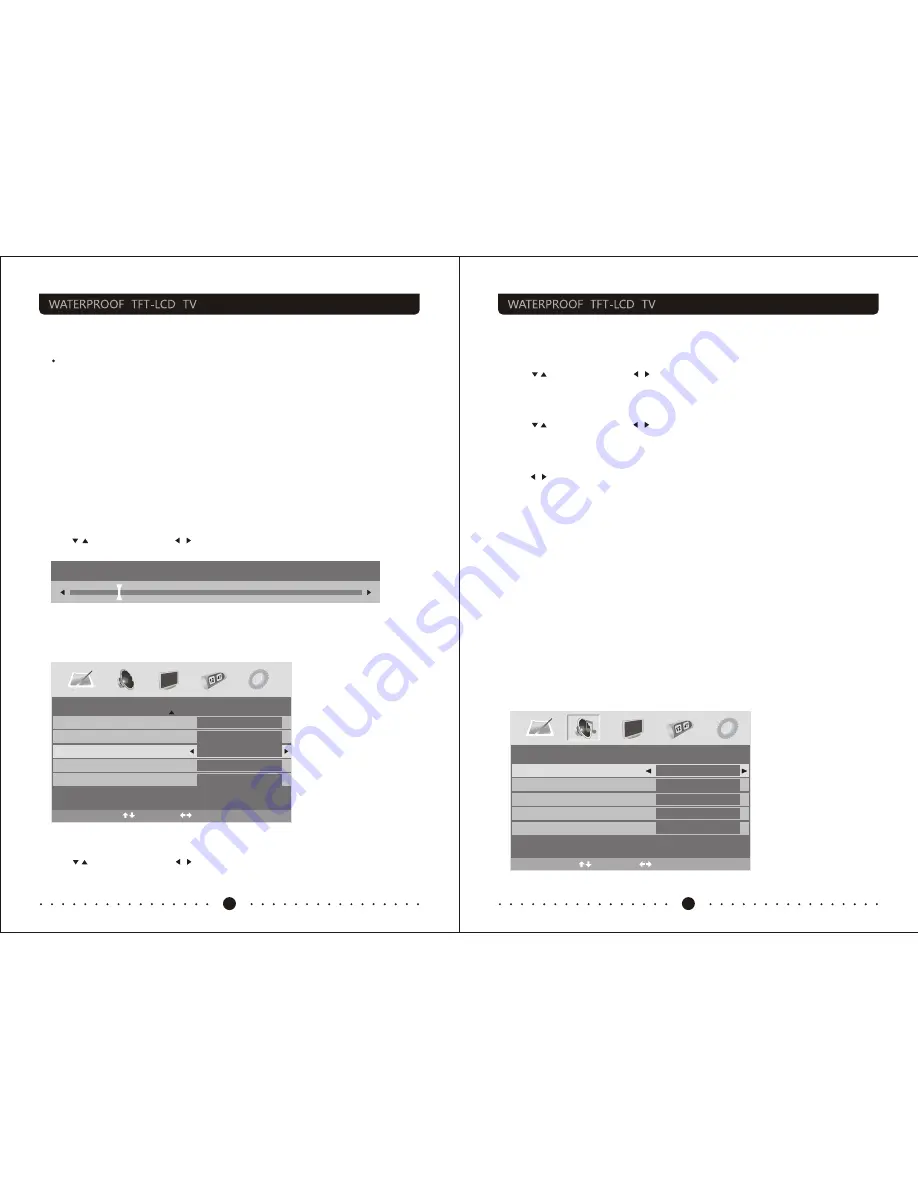
SOUND

Volume

SoundMode


Balance

Treble

Bass

Personal

28

0

0

0

Select

Adjust

Colour temperature

Select an optimum colour temperature mode to suit your eyes for viewing among Normal,
Warm and Cold.

NOTE:

 This option is available only in PC mode.

DNR (Digital Noise Reduction)

If the broadcast signal received is weak, you  can  select  the  DNR  option  to  reduce  the
video noise level between Off, Low,Mid and High.


PICTURE

Colour

Sharpness

Tint

Colourtemperature


DNR

50

0

Normal

Off

Normal

Select

Adjust

7

8

Contrast

Press   /   button and then use   /    to adjust the contrast of the picture.

Contrast

28

After  adjust  the  value  you  want, press  

LCD-MENU

  button  to  return  to  the  preview

MENU.

Brightness

Press   /   button and then use   /    to adjust the brightness of the picture.

Sharpness

Press / To select the sharpness mode of your TV.  (Available Sharpness  Mode: Normal,
Sharp, Sharpest, Softest, Soft.)


Colour


Press   /   button and then use   /   to adjust the colour saturation.

NOTE

: This option is invalid in PC mode, and it will be shown in gray.

Tint

Press   /   button and then use   /   to  adjust the  tone  of  colour  when  your  system  is  in
NTSC.

AUDIO menu options

Press 

MENU

 button on the front panel or 

LCD-MENU

 on the remote control to display

the main menu.

Picture Mode

Select  Picture Mode  in  PICTURE  menu.  (Available  picture  mode: Standard,  Personal,
Movie, Sport, Mild, Game.)
If  you  change  the  value  of  Contrast,  Brightness, Colour, Tint, Sharpness  or  Colour
temperature  on  the  picture  menu,  the  picture  mode  will  be  changed  to "Personal"
automatically. You may select the picture mode directly by pressing PMODE button.

TIPS: 

You can press

 PMODE

 button  on  the  remote  control, to  select  the  Picture  Mode

directly.  

    When you are satisfied with your adjustment,  press the

 LCD

-MENU button to return

    to the previous menu or press the 

EXIT

 button to exit the main menu.

User  Manual

User  Manual

Summary of Contents for 10.4"

Page 1: ...WATERPROOF TFT LCD TV USER MANUAL 10 4 15 4 17 19 The front cover picture is based on concept design and not real product photo reference only ...

Page 2: ... the power and contact an authorised dealer or repair centre The unit must be earthed to the main earth system of the building and must conform to the latest electrical safety regulations When cleaning your TV do not apply any abrasive cleaners wax benzene alcohol or clearing detergents Chemical cleaners may fade dissolve or crack the TV surface We recommend a soft damp cloth and non abrasive clea...

Page 3: ... display menu 5 EXIT Exit current menu to father level menu 6 ENTER Confirmation key 7 DISPLAY display current program information 8 AUTO In VGA mode auto adjust the picture to the middle of screen 9 ASPECT Adjust aspect ratio 4 3 14 9 16 9 Subtitle Fullscreen Zoom1 Zoom2 10 NICAM Near Instantaneous Companded Audio Multiplex 11 INPUT Switching TV SCART CVBS S VIDEO VGA HDMI DTV 12 PMODE Picture mo...

Page 4: ...are power off Connect AV device and LCD TV with AV cable or S VIDEO cable Connect audio cable into the audio input jack on LCD TV Turn on the LCD TV then turn on the AV S VIDEO device Select AV or S VEDIO mode Control the volume by VOL VOL LCD TV can be turned off by power button on remote control 3 Connect to the PC Make sure that both of PC and LCD TV are power off Connect PC and LCD TV with the...

Page 5: ...rst time installation or select Cancel to exit this menu Delete Digital Program Press button and then use to select whether to delete all the digital programs Digital Program Search Press button and then use to select whether to start searching digital programs Analog Program Search Press button and then use to select whether to start searching analog programs If you cancelled the first time insta...

Page 6: ...able Sharpness Mode Normal Sharp Sharpest Softest Soft Colour Press button and then use to adjust the colour saturation NOTE This option is invalid in PC mode and it will be shown in gray Tint Press button and then use to adjust the tone of colour when your system is in NTSC AUDIO menu options Press MENU button on the front panel or LCD MENU on the remote control to display the main menu Picture M...

Page 7: ... are different for different input sources if the input source is selected HDMI YPbPr VGA and there are no relative input signal SETUP menu will be unavailable SETUP menu of TV input Press the button to select SETUP in the main menu Press the button to select your option what you want to adjust in the SETUP menu Press the button to adjust When you are satisfied with your adjustment press the LCD M...

Page 8: ...s below Program The current program number Press to select the upper or lower program Sound System Press to select a corresponding sound system such as DK L L BG Colour System Press to select a corresponding colour system such as Auto PAL SECAM AFT Auto Fine Tune Due to weak signals or a wrong antenna configuration some of the channels may not be tuned to the best reception condition AFT function ...

Page 9: ...ams according to your preferences as following Channel List Channel List Flags ATV Favorite Move Skip Lock 1 2 3 4 5 6 7 8 x x x x x x x SETUP menu of VGA input for setting the PC picture position SETUP menu of HDMI input for setting the HDMI picture position HDMI Position H Position V Position Position Reset Select Adjust 50 50 SETUP menu of YPbPr input for setting the YPbPr picture position YPbP...

Page 10: ...ss the button to select FUNCTION in the main menu Press the button to select your option what you want to adjust in the FUNCTION menu Press the button to adjust When you are satisfied with your adjustment press the LCD MENU button to return to the previous menu or press the EXIT button to exit the main menu Video Size This option allows you to select the screen display mode which best corresponds ...

Page 11: ...t time installation menu and the operation of this menu is in page 3 Reset Press ENTER or button to reset the TV to the factory default Old PIN Code Press 0 9 buttons to enter the correct old PIN code you can not change the PIN code if you entered a wrong PIN code New PIN Code Press 0 9 buttons to enter the new PIN code you want Change PIN Code Press 0 9 buttons to enter the PIN code you entered i...

Page 12: ...the SETUP menu Press the button to adjust When you are satisfied with your adjustment press the LCD MENU button to return to the previous menu or press the EXIT button to exit the main menu Manualtuning Channel Start Search Service Found Frequency Signal Quality Signal Strength 21 Begin 0 474 00 MHz 0 1 Select Adjust Input 0 9 Press button to select Manual Search Press ENTER or button to set the M...

Page 13: ...ound from speakers Insert the AC power cord plug securely in AC power outlet Make sure the remote control is not on standby No picture No picture from AV terminal Check the brightness setting of the display Make sure a cable with no VIDEO input signal is connected to the S VIDEO INPUT terminal Check the input source is set to AV mode Picture is displayed but no sound from the speakers Check the so...

Page 14: ...r Manual User Manual Due to technology changes or improvements changes may be made without pre notice please confirm specifications with your distributors or retailers before purchase 10 4 800x600 60Hz 15 4 1280x800 60Hz 17 0 1680x1050 60Hz 19 0 1440x900 60Hz Power consumption Accessories Resolution System Input Amplify OSD Languages Power suppy Video system Audio system PAL SECAM DVB T BG DK I L ...

Page 15: ...slight distance to make the hanging holes in the back of TV point at the screws in the wall 4 Hang the TV on the screws STANG FOR THE PLUG STAND FOR THE WALL INSTALLATION INSTRUCTION 1 Make a hole of size 320X231X37MM width highness depth in the wall for TV installation 2 Locate the screws as shown in the illustration Front view of the hole 3 Put the TV into the hole raise it a slight distance to ...

Page 16: ...in the back of TV point at the screws in the wall 4 Hang the TV on the screws INSTALLATION INSTRUCTION 1 Make a hole of size 442X280X37MM width highness depth in the wall for TV installation 2 Locate the screws as shown in the illustration Front view of the hole 3 Put the TV into the hole raise it a slight distance to make the hanging holes in the back of TV point at the screws in the wall 4 Hang ...

Page 17: ...he wall 4 Hang the TV on the screws INSTALLATION INSTRUCTION 1 Make a hole of size 495X310X37MM width highness depth in the wall for TV installation 2 Locate the screws as shown in the illustration Front view of the hole 3 Put the TV into the hole raise it a slight distance to make the hanging holes in the back of TV point at the screws in the wall 4 Hang the TV on the screws TV BACK VIEW FRONT VI...

Page 18: ...he wall 4 Hang the TV on the screws INSTALLATION INSTRUCTION 1 Make a hole of size 513X326X45MM width highness depth in the wall for TV installation 2 Locate the screws as shown in the illustration Front view of the hole 3 Put the TV into the hole raise it a slight distance to make the hanging holes in the back of TV point at the screws in the wall 4 Hang the TV on the screws TV BACK VIEW FRONT VI...

Page 19: ...ng the TV When all the material is removed within the dimensions detailed to suit your size TV use an appropriate fixing device with the screws provided leaving a screw thread of 4mm to allow fixing to the TV brackets In some cases alternative fixings screws will be required available from hardware stores Connect and check that all functions of the TV work before final fitting Prior to final fitti...

Page 20: ......

Reviews: