Luxor STAND-NESTC-72, Assembly Manual
Get your hands on the Luxor STAND-NESTC-72 with our free Assembly Manual download. This sleek and durable product is perfect for any setting. Ensure easy and quick setup with the comprehensive manual available for download from our website. Upgrade your display experience effortlessly with Luxor.
Share
Download


Reviews:
No comments
Related manuals for STAND-NESTC-72

Loop
Brand: GAZZDA Pages: 2

801
Brand: Neo Chair Pages: 2

SILENT
Brand: ZEITRAUM Pages: 2

Lincoln
Brand: OBaby Pages: 14

PF Series
Brand: Oakworks Medical Pages: 28

H-1103
Brand: U-Line Pages: 6

GB2
Brand: Watermark Pages: 2

BTSPIN
Brand: Walker Edison Pages: 12

Workbays Port
Brand: VITRA Pages: 36
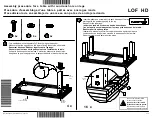
LOF HD
Brand: Canadel Pages: 2

BU44ABMD
Brand: Walker Edison Pages: 25

11222151VW
Brand: FourStarGroup Pages: 6

Adirondack 502829
Brand: World Market Pages: 5

Mystic Bay Dresser & Mirror
Brand: Bob's Discount Furniture Pages: 3

HW67714
Brand: Costway Pages: 8

BRISTOL DR6V
Brand: meubar Pages: 20

Java S614-040
Brand: Samuel Lawrence Pages: 3

Randell AMH6609
Brand: Safavieh Furniture Pages: 2


