

© Pur
eL
ink GmbH 2015
I n n o v a t i o n G e r m a n E n t e r p r i s e s .
K n o w - H o w . Q u a l i t y . D e s i g n .
PureLink GmbH | Von-Liebig-Straße 10 | 48432 Rheine | Germany | Tel.: 0049 (0)5971-800 299-0 | Fax: 0049 (0)5971-800 299-99 | E-mail: [email protected] | Internet: www.purelink.de
This product draws power from an external 12 V power supply sold
separately (Luxi P/N 69-002-01). Do NOT plug the power supply con-
nector into any other connectors; this could cause permanent dama-
ge to the product and void the warranty.
Power options
Mounting options
Luxi has the under desk mount sold separately (Luxi P/N 78-002-01);
the product also fits many other mounting hardware from Extron, Midd
-
le Atlantic, etc. Only use the type 4-40, 3/16” (5 mm) long screws sup
-
plied with the mounting hardware to screw onto the product. Wrong
type of screw could strip the threads; too long screw could touch and
short the internal circuitry, cause permanent damages to the product
and void the warranty.
Luxi Presentation Switcher Quick Start Guide
LU-SHD-310SM
RS-232 controls
Only the input selections can be controlled by front panel or exter-
nal buttons; all other functions can only by controlled by RS-232.
See the RS-232 Setup Guide on Luxi website for more information:
http://luxielectronics.com/attachments/File/Luxi_RS-232_setup_gui-
de.pdf. Refer to page 3 for RS-232 commands and responses.
Pressing the “Input Sel.” button on the front panel will toggle through
the 3 video inputs. 3 sets of external contact closure push buttons
and LEDs can select inputs discretely with the LED indication, see
wiring diagram on the right side; when a button is pressed, the as
-
sociated LED will blink once, then stay on. A RS-232 host connected
to the rear panel can control all functions, see page 3 for the RS-232
commands and responses.
When activated by a RS-232 with an active command, the switcher
will select the last connected input with active signal as the current
input. Auto switching is turned off after any front panel, external but
-
ton push, or a RS-232 input command. Default is auto switching off.
Note: due to the nature of the wide varieties of the DP product de-
signs, some DP source devices may not trigger the auto switch. Use
manual switch when this happens.
Control options
Auto input switching
Please contact your seller directly for local support. See PureLink
Germanys website for RS-232 commands, RS-232 Setup Guide, specifi-
cations and manual.
Support
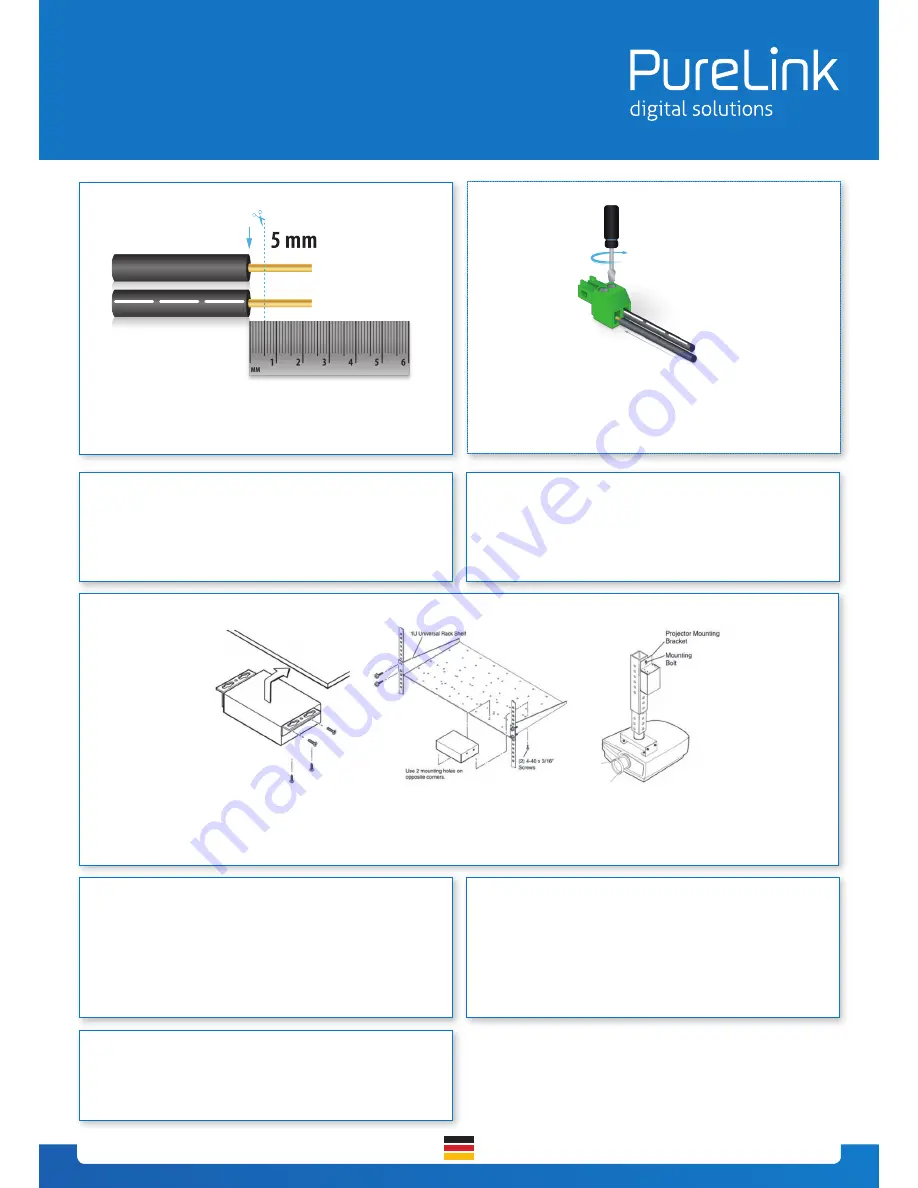
The captive screw plugs for power, audio, RS-232 and contact controls
are supplied with the unit. Separate the wires about 1” (2.5 cm) long;
strip off the wire insulation precisely 3/16” (5mm) from the end.
Captive screw plug termination
Identify the positive and negative leads of the power supply before
assembly. When using a 3rd party PSU this must be checked before
assembly.
CAUTION - always confirm your PSU connection with
a multimeter before inserting it into the product - a miswired
connection will cause damage to the product and void the waranty!!
Captive screw plug termination