background image

Luowice Wireless Security Camera User Manual

Luowice Wireless Security Camera User Manual

When there is no visible router with network cable port for configuration, 
please apply the Hotspot mode to configure the camera with your local 
Wi-Fi network, for this mode does not require a network cable during 
configuration.

Video instruction is available from:
https://youtu.be/48N9BqopzXQ

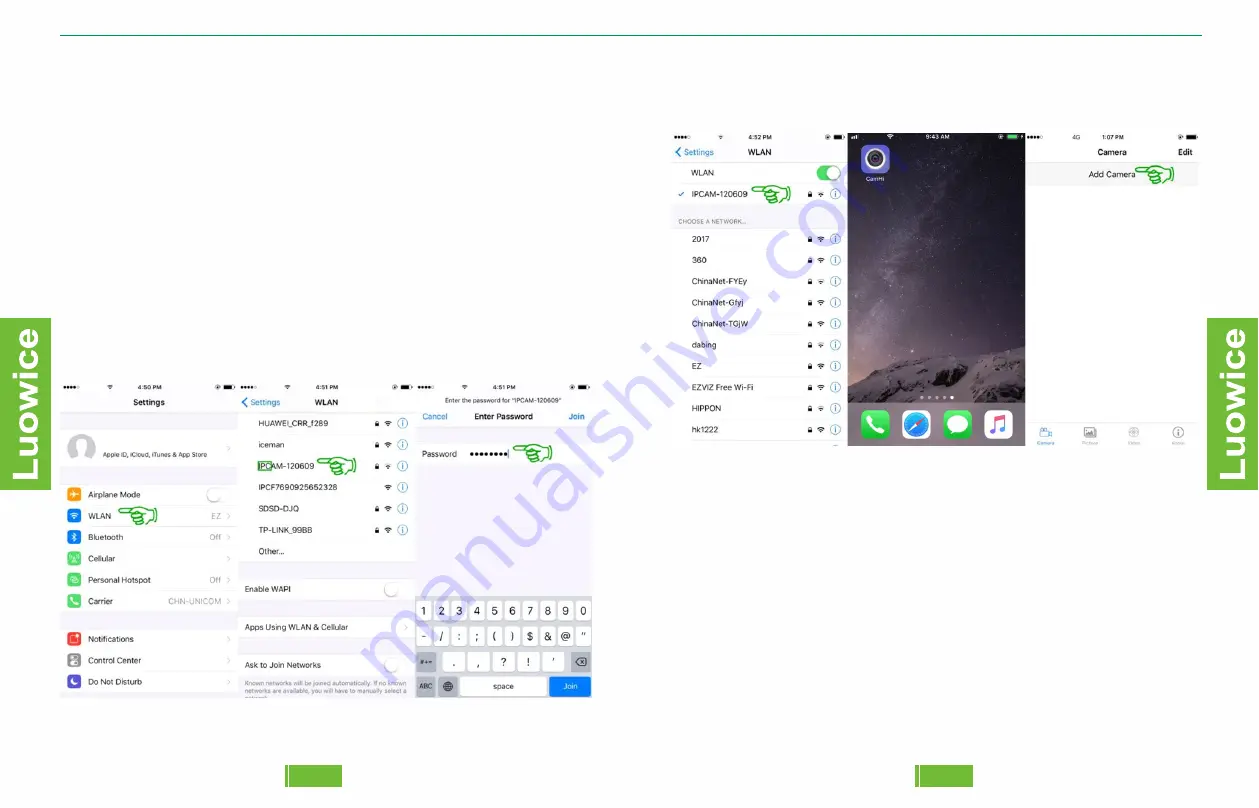
Step 1: Please kindly

click 'Setting' on your phone - Click 'WLAN' - 

Choose the WLAN with the name starts with 'IPC' - Insert the default 
password '01234567' - Click 'Connect'. And your phone has been 
connected the the camera's Wi-Fi Hotspot now.

48

47

Step 2: After confirming your phone has been connected to the camera's 
Wi-Fi Hotspot, please kindly open the APP on your phone. And then click 
'Add Camera'.

Summary of Contents for LWS

Page 1: ...acturer Guangzhou Lieju Electronic Technology Co Ltd Website http www luowice com en Email techsupport luowice com Skype Luowice Tech Support Address Dongfeng Industry Park Lingshan East Road No 15 Zhucun Tianhe District Guangzhou China 510665 US ...

Page 2: ...ilable on YouTube https www youtube com channel UCGl96SBmU0_Fc5d0arV0d_w featured view_as subs criber Preface 1 The name of the camera s Wi Fi Hotspot starts with IPC And the password of the Wi Fi Hotspot is 01234567 The Wi Fi range of the Hotspot is up to 49ft without walls and obstacles 2 The phone APP CamHi is available from Apple Store Google Play Store 3 The address to download PC Client HiP2...

Page 3: ...n Entering the Main Menu 21 2 3 2 Change Password 21 2 3 3 Forget Camera Password or Wrong password 22 2 3 4 Set Up Motion Detection Email Alert 23 2 3 5 Set Up APP Alert Push 33 2 3 6 Record Schedule 34 2 3 7 Audio Setting 34 2 3 8 Video Setting 35 2 3 9 WI Fi Setting 36 2 3 10 SD Card Setting 37 2 3 13 System Setting 40 2 3 14 Device Information 41 2 3 15 Playback Videos Recorded on the SD Card ...

Page 4: ...id using special characters e g etc The camera does not support 5G Wi Fi e Please avoid installing the camera in places where night vision can be affected Make sure that the lens of the camera does not face to walls trees glasses and other stuff that can reflect the IR light back to the camera Otherwise the night vision of the camera will have many bright spots 02 01 1 Avoid having obstacles in fr...

Page 5: ...reparation Things you need to get the system works a Internet Connection The camera can work without Internet But if you want to have remote view which means viewing the camera when you are not within the camera s Wi Fi Hotspot range 49ft Please configure the camera to your local Wi Fi network to get the camera online for remote access 1 3 Installation 1 3 Installation 1 3 Camera Panel 1 2 3 4 5 6...

Page 6: ...firmly to the camera Otherwise the screw interface will be damaged 1 5 Assemble the Camera and the Bracket Please avoid adjusting the angles of the camera bracket directly by hand The angles of camera shall be adjusted via the PTZ function on the mobile APP or PC Client Adjusting the bracket manually can cause damage to the PTZ function Please put the wires 5 6 7 through the bracket 4 one by one P...

Page 7: ... Wi Fi Network LAN Mode Connecting the camera to your local router via a network cable Please plug the camera in power Download the APP CamHi and install it to your smartphone You can search CamHi in Apple Store or Google Play Store Step 1 Please open the APP and click Add Camera 05 08 07 Video instruction for configuration is available from www youtube com watch v B3fV5 _i5l4 ...

Page 8: ...ng click Wi Fi manger Step 2 The default name of the camera on the APP is Camera and you can change it to any name you like e g Office1 And then please click Scan QR Code to scan the QR label on the side of the camera to get the UID of the camera then click Done Some models will show a check mark instead of the word Done Wait for around one minute and the camera shall indicate Online Choose your l...

Page 9: ...op out page 2 Add Camera Click Add Camera to add camera to the APP 3 Click the circled area of 3 you can enter the live view interface 4 Click the icon and you can enter the main menu 5 Click Camera then you can see a list of cameras added on the APP 6 Click Picture and you can check the snapshots you took while live watching the camera 7 Click Video then you can check the video records you took w...

Page 10: ...rom left to right and vice versa Flip will make the view upside down and vice versa When you install the camera under a roof or on a wall where there is restriction on space you may need this function to get a right view Operation Please click the icon and the Mirror Flip interface will appear And then click any of them based on your need Zoom Focus Four times optical zoom allows you to get closer...

Page 11: ...ault interface from left right up down to choose a position that you want to set up as a preset position Then click the icon and the Position Preset interface will appear And then click 2 click Setup Then there shall be indication shown as Default setting successes And the chosen position will be set up as position 1 successfully a Click any place on the interface to exit the Position Preset inter...

Page 12: ... Note a Please check whether the camera model you purchased is with intercom function If not the intercom function will not be applicable b The video record on the SD card is always with audio c If the audio volume is too low please go to Audio Setting to adjust the input output volume of Line In Mic Snapshot Take pictures while you are watching the live video Operation Please click the icon And t...

Page 13: ... the phone will be activated Click the icon and the recording will stop Then exit the default interface Click Video click Local And the camera list will appear Click the camera you want to check the local records and the record list will appear Then click a record you want to check and the opening interface will start playing back the video automatically And then you can click the icon to exit the...

Page 14: ...ault password admin b Please keep the password within 15 letters and avoid using special characters such as 22 21 c If the APP always indicates Wrong password Please kindly follow the following steps to re enter the camera s password Operation Come to the camera list interface and click the Edit icon icon reenter the camera s new password Done Note If your password is correct the password can not ...

Page 15: ...oose from 1 2 3 based on your need 24 23 Luowice Wireless Security Camera User Manual Luowice Wireless Security Camera User Manual Step3 Then reconfigure the camera same as the 1 6 Pair the Camera with Your Phone Page 07 Or you can refer to the video instruction www youtube com watch v B3fV5 _i5l4 Step2 Please kindly click the icon and click Sure when the pop out page indicate Are you sure you wan...

Page 16: ...ecurity Camera User Manual Step 3 Set Up Email Alert Before operation please make sure you have activated the Motion Detection Function and the E mail Alarm with Pictures Function as the following pictures show Operation Please click Email Setting on the main menu interface And then insert the relevant information in the pop out page Then click Test to check whether the email setting works After c...

Page 17: ...n using Passwords Luowice Wireless Security Camera User Manual Luowice Wireless Security Camera User Manual 28 27 Then get the SMTP Server information from the email account you want to use as Sender And if you use a gmail account as Sender the smtp server should be smtp gmail com And if this smtp server doesn t work when you test it you can follow the steps to get an ip address for the SMTP Serve...

Page 18: ... page to set up 2 step Verification You might have to sign in to your Google Account Select Get started Follow the step by step setup process Luowice Wireless Security Camera User Manual Luowice Wireless Security Camera User Manual 30 29 ...

Page 19: ...u want to use as a receiver of the alert e Sender the same as the email address you insert in User Name f Subject the name you want to use as the title of the email alert If the subject can not be saved please kindly change it to another subject and try to save again until it is saved successfully g Sometimes even the Test result indicates as Test Failed the setting is in fact working If you confi...

Page 20: ...e on the main menu interface And then modify the record settings based on your need and click Done to save the settings Note IF you want to set up a specific recording schedule please open your computer and use the PC Client to manage that Operation Please click Audio Setting on the main menu interface Your camera will choose Line in Mic as its transmission method automatically Please do not chang...

Page 21: ...etting Choose your local Wi Fi network Insert the password of your local Wi Fi network Click Save Waiting for around one minute and remote view shall be applicable 2 3 4 Action with Alarm 2 3 8 Video Setting Operation Please click Video Setting on the main menu interface And the camera will gain the proper video setting based on your network environment automatically Please do not change the defau...

Page 22: ...e information of the SD card Or Format the SD card Please remember to back up the data before formatting the SD card 38 37 2 3 4 Action with Alarm 2 3 11 Time Setting Operation Please click Time Setting on the main menu interface And then you can click on Sync with Phone Time to make the device time zone the same as your phone s time setting Or you can choose to set up Device Time Zone and then cl...

Page 23: ...iled please log in your FTP server to check whether snapshots videos are received successfully If yes go directly click on Save and the setting is successful then 2 3 13 System Setting Operation Please click System Setting on the main menu interface And choose Reboot Camera Reset Camera based on your need And then click Yes to apply your choice and click Back to save all the settings Note a When t...

Page 24: ...ction with Alarm 2 3 15 Playback Videos Recorded on the SD Card To have video playback please click Video at the bottom and click Online at the top right side and then click the camera you want to playback And the recordings list will show Choose a time period and click it the recorded video will start playback automatically You can drag the playing bar to get video playback at a specific time Not...

Page 25: ...p out and click Download to start backup automatically And the video will be stored on your phone then To view the video please click Video Local and then click the name of the camera you chose to back up videos Then click Download and you will see the backup videos 2 3 4 Action with Alarm 2 3 16 Backup Videos Recorded on the SD Card to Your Phone If you want to converted the video format as MP4 f...

Page 26: ...folder 46 45 Luowice Wireless Security Camera User Manual 3 Note Please keep the camera within your local Wi Fi range Please plug the camera in power Download the APP CamHi and install it to your smartphone You can search CamHi in Apple Store or Google Play Store Pair the Camera with Local Wi Fi Network via Hotspot Mode WhenThere Is No Network Cable Port on Your Local Router for Configuration ...

Page 27: ... network cable during configuration Video instruction is available from https youtu be 48N9BqopzXQ Step 1 Please kindly click Setting on your phone Click WLAN Choose the WLAN with the name starts with IPC Insert the default password 01234567 Click Connect And your phone has been connected the the camera s Wi Fi Hotspot now 48 47 Step 2 After confirming your phone has been connected to the camera s...

Page 28: ... the QR Code After you get the UID please kindly click Done on the top right side Wait for around one minute and the camera shall indicate Online 50 49 Step 4 When the camera indicates Online you can click on the image to live view the camera or click the icon to enter the main menu Step 4 Remote View Setup The camera has to be connected to your local Wi Fi network for remote view To have remote v...

Page 29: ...will disappear automatically 2 Please kindly make sure your local router name and password without any space and special charters such as etc Otherwise the WIFI Setting will fail Cause the camera can t recognize special charters automatically 3 If your local Wi Fi network is not stable you can keep connecting the camera with your local router via network cable to gain more stable signal transmissi...

Reviews: