


| + 44(0)208 144 1694 | [email protected]
Lumishore USA 7137 24TH Court East Sarasota, Florida 34234 | (941) 405-3302 | [email protected]
Lumishore UK, Unit D12, Upper Fforest Way, Swansea Enterprise Park, Swansea, SA6 8QR
2
Mechanical installation
Tools: Drill, drill bits, marine sealant (3M 4200, or equivalent),F2 Frearson type screwdriver, Flat head screw
driver, cloth for clean-up:
Pilot Hole for Screws - 9/64” / 3.5mm
Hole for Cable - 9/32” / 7mm
Recess for Gland - 17/32” / 13.5mm hole to a depth of 5/8” / 15mm
1. Select a suitable flat surface that is accessible from behind and ensure the cable can be run without a
problem.
2. With one hole at the bottom center, mark and drill the pilot holes for the screws & drill a ø4mm
counter bore to a depth of 5mm in each location. Drill the power cable hole. The cable hole must be
recessed on the outside of the hull to accept the cable gland on the back of the light, so that the lights
sits flush.
Note: Cored hulls must be sealed prior to fitting the lights - refer to the manufacturers instructions.
3. Clean and prepare the hull ready for the sealant.
R
ear side
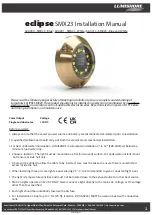
Basic Dimensions
Apply sealant
Bottom center
70 mm
(2.75in)
17mm
(0.67in)
12mm
(0.47in)
PCD 61mm (2.40in)
120°