background image

 Lumin Smart Panel - Outdoor


DOCUMENTATION AND INSTALLATION MANUAL


31 


STEP 24. LSP Configuration 

Configuration and Account Setup 

1.


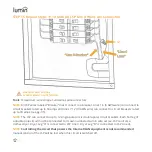
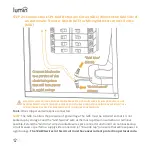
After completing the hardware installation, ensure the LSP power switch is in 

the “

ON

” position 

(“I”). The blue and green indicator lights will begin blinking in unison, indicating that the LSP is 

ready for commissioning.  


2.


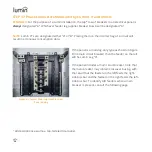
If feasible, make an Ethernet co

nnection between the Lumin Smart Panel’s Ethernet port and a 

LAN port on the location’s router. This Ethernet connection is more reliable than a Wi

-Fi 

connection and is not affected by replacing the router or resetting the Wi-Fi network 
password. Utilize the 3/4" trade size knockouts in the LSP enclosure and liquid-tight conduit to 
route communication wiring. 


3.


Replace the LSP cover by hooking over the top lip of the enclosure and latching the toggle 
clamps on both sides. 


4.


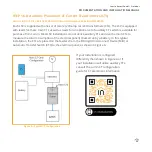
Download the Lumin mobile app. In the Apple App Store or Google Play Store, search for "Lumin 
Smart".  


5.


Log in with an existing account or create a new account. 


6.


Expand the 

 menu (upper left of screen) and select "Set up a new Lumin Smart Panel".  


7.


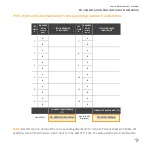
Follow the in-app instructions to set up your Lumin Smart Panel 

(completed 

LSP Circuit Label & 

CT Table 

required)

. Invite users to grant access to the commissioned LSP. 


Need help? 

For account setup assistance or troubleshooting, please call 1-888-421-0616 (North 

America) or e-mail [email protected]


Summary of Contents for LS-100544

Page 1: ...WWW LUMINSMART COM LS 100544 Rev 2 Lumin Smart Panel Outdoor DOCUMENTATION AND INSTALLATION MANUAL...

Page 2: ...U S Registered Trademark Patents pending Copyright 2022 Coulomb Inc DBA Lumin All rights reserved...

Page 3: ...TION 4 Items in the Box 4 Required Materials Not Included 5 Required Tools 6 Hardware Installation Overview 7 Hardware Installation Steps 8 Configuration and Account Setup 31 TROUBLESHOOTING AND REPAI...

Page 4: ...This page intentionally left blank...

Page 5: ...osts as well as providing the user with the ability to control or automate their energy use remotely NOTE A Lumin Smart Panel will not function as designed until it is fully commissioned It is general...

Page 6: ...cal and national electrical codes Lumin Certified Installer training is required for installation and servicing Review entire manual before starting the installation or servicing Personal protective e...

Page 7: ...to grid conditions a connection to non backed up utility grid power is required for the LSP grid detection circuit See pg 28 This will require wiring beyond the LSP s connected electrical panel Contr...

Page 8: ...kets NOTE Additional items include an antenna installation hardware and an LSP Circuit Label CT Table 1 Pair of 200A Current Transformers A second pair is optional Lower Outdoor Wall Mounting Brackets...

Page 9: ...rade size may be required for communication wiring see pg 31 The conduit provided is 2 trade size NMLT Type B Additional NMLT Type B conduit and fittings maybe required depending on installation condi...

Page 10: ...for determining current transformer placement see pg 25 2 Knockout punch 2 3 8 hole size Pliers Tape measure Stud finder Optional Fish tape Optional Utility knife Wire stripper Drill Phillips screwdri...

Page 11: ...nect One LSP Wire Labeled Line 1 Breaker to Circuit Breaker STEP 13 Connect Corresponding LSP Wire Labeled Line 1 Load to Load and Turn Circuit Breaker Back On STEP 14 Record Circuit Label Name and Br...

Page 12: ...lectrical Panel Cover WARNING HIGH VOLTAGE ENSURE MAIN BREAKER IS OFF MAIN SERVICE LINES ARE ALWAYS LIVE AVERTISSEMENT HAUTE TENSION ASSUREZ VOUS QUE LE DISJONCTEUR PRINCIPAL EST TEINT LES CONDUCTEURS...

Page 13: ...out hole location in electrical panel may vary depending on spacing constraints Choose a location that avoids existing obstructions and provides adequate clearance for routing of the LSP wire whips Us...

Page 14: ...QUE LE DISJONCTEUR PRINCIPAL EST TEINT LES CONDUCTEURS DE SERVICE PRINCIPAUX SONT TOUJOURS SOUS TENSION NOTE The LSP must be mounted in the vertical orientation shown with the conduit exiting the LSP...

Page 15: ...y that the bracket placement provides a level installation without introducing strain on the conduit attachments Then mark the applicable hole locations using the mounting brackets Exact hole location...

Page 16: ...re securely threaded into studs sheathing brick masonry or other suitable structural anchors For masonry applications including brick use the appropriate fasteners included in the installation hardwar...

Page 17: ...LINES ARE ALWAYS LIVE AVERTISSEMENT HAUTE TENSION ASSUREZ VOUS QUE LE DISJONCTEUR PRINCIPAL EST TEINT LES CONDUCTEURS DE SERVICE PRINCIPAUX SONT TOUJOURS SOUS TENSION NOTE Attach the antenna provided...

Page 18: ...DE SERVICE PRINCIPAUX SONT TOUJOURS SOUS TENSION Tools Drill washer and nuts x3 NOTE Lift the LSP to align with the mounting holes and secure it to the mounting brackets utilizing the hardware provid...

Page 19: ...WIRE MUST BE INSTALLED FOR SAFETY AVERTISSEMENT HAUTE TENSION ASSUREZ VOUS QUE LE DISJONCTEUR PRINCIPAL EST TEINT LES CONDUCTEURS DE SERVICE PRINCIPAUX SONT TOUJOURS SOUS TENSION UN FIL DE TERRE DOIT...

Page 20: ...lternating A B A B pattern continues down the rows of breakers Exception All breaker rows are designated A in panels with two wire single phase power rather than three wire single phase split phase NO...

Page 21: ...LSP wires as pictured to the existing neutral bar and a double pole 15 to 20 amp breaker landing Line A on an A row breaker terminal and Line B on a B row breaker terminal Exception Use a single pole...

Page 22: ...TENSION ASSUREZ VOUS QUE LE DISJONCTEUR PRINCIPAL EST TEINT LES CONDUCTEURS DE SERVICE PRINCIPAUX SONT TOUJOURS SOUS TENSION Tools Screwdriver NOTE Breaker labels should be marked to indicate that the...

Page 23: ...UREZ VOUS QUE LE DISJONCTEUR PRINCIPAL EST TEINT LES CONDUCTEURS DE SERVICE PRINCIPAUX SONT TOUJOURS SOUS TENSION Tools Screwdriver and wire stripper NOTE All LSP wires labeled Line Breaker must conne...

Page 24: ...DUCTEURS DE SERVICE PRINCIPAUX SONT TOUJOURS SOUS TENSION Tools Wire stripper and wire splice connector NOTE All LSP wires labeled Line Load must connect to a load wire via a wire splice connector ens...

Page 25: ...ith the corresponding LSP line number in the LSP Circuit Label CT Table provided with the LSP ex record Refrigerator next to LSP Line 1 and circle Breaker Row B if the circuit labeled Refrigerator is...

Page 26: ...can connect to circuit breakers rated up to 30 amps see pg 35 NOTE The LSP can connect to up to 12 single pole or six double pole circuit breakers Each hot leg of a double pole circuit must be connec...

Page 27: ...ble for purchase from Lumin Most LSP installations do not utilize auxiliary CTs and use the main CTs to measure the total consumption of the electrical panel s backed up by a battery In this typical i...

Page 28: ...onsumption data If the panel is a main lug only type as shown in Figure B no main circuit breaker then the feeder on the left will be Lumin Leg A If the panel includes a main circuit breaker note that...

Page 29: ...le test between the left lug and the terminal on the top left circuit breaker See Figure C If V between these points 240 the main breaker is a crossover type Place CT A on the right and CT B on the le...

Page 30: ...h to Leg B Ensure the sticker on the CT reading This side toward grid is facing toward the grid utility meter WARNING HIGH VOLTAGE MAIN SERVICE LINES ARE ALWAYS LIVE AVERTISSEMENT HAUTE TENSION LES CO...

Page 31: ...one CIRCUIT BREAKER LABEL NAME 1 A 7 A B B 2 A 8 A B B 3 A 9 A B B 4 A 10 A B B 5 A 11 A B B 6 A 12 A B B CURRENT TRANSFORMER CT CURRENT TRANSFORMER CT Line A B CTs Ex Main Service Lines Aux A B CTs...

Page 32: ...ctors NOTE The GDC monitors the presence of grid voltage The GDC must be installed so that it is not backed up by storage Land the Grid Neutral wire at the most upstream neutral bar or terminal possib...

Page 33: ...AL EST TEINT LES CONDUCTEURS DE SERVICE PRINCIPAUX SONT TOUJOURS SOUS TENSION Tools Screwdriver NOTE Please make any necessary exterior wall repairs if applicable and clean up the area around the circ...

Page 34: ...ES ARE ALWAYS LIVE AVERTISSEMENT HAUTE TENSION ASSUREZ VOUS QUE LE DISJONCTEUR PRINCIPAL EST TEINT LES CONDUCTEURS DE SERVICE PRINCIPAUX SONT TOUJOURS SOUS TENSION Tools Screwdriver NOTE If the LSP co...

Page 35: ...the Wi Fi network password Utilize the 3 4 trade size knockouts in the LSP enclosure and liquid tight conduit to route communication wiring 3 Replace the LSP cover by hooking over the top lip of the...

Page 36: ...ION OF THE COVER AVERTISSEMENT POUR TOUTES LES INSTALLATIONS L EXT RIEUR LE FONCTIONNEMENT DU LSP AVEC LE COUVERCLE RETIR LORS DE TEMPS MAUVAIS PLUIE NEIGE GLAC CONDITIONS POUSSI REUSES ETC ANNULERA L...

Page 37: ...eakers are switched on Inspect the system for installation and wiring faults e g loose wire connections If the issue is not resolved contact Lumin Lumin Certified Installer training is required before...

Page 38: ...oth lights are seen blinking during normal operation it is likely that the Setup button was pressed taking the LSP offline In most instances an additional press and release of the Setup button will br...

Page 39: ...s Manually Directly Automated Schedules and Automated Modes ELECTRICAL SYSTEM AC Voltage 120 240 VAC Split Phase 50 60Hz Supply Breaker Rating 15 20 A non GFCI Supply Amperage 0 4 A Maximum Standby Po...

Page 40: ...oncerning electricity consumption and or to remotely control electrical circuits which the product is connected to the Lumin Service Use of the Lumin Service is subject to and governed by the terms of...

Page 41: ...ppareil est conforme la partie 15 des r gles de la FCC et aux CNR d Innovation Sciences et D veloppement conomique Canada applicables aux appareils radio exempts de licence L exploitation est autoris...

Page 42: ...38 NOTES...

Page 43: ...Lumin Smart Panel Outdoor DOCUMENTATION AND INSTALLATION MANUAL 39 NOTES...

Page 44: ...egistered Trademark Patents pending Copyright 2022 Coulomb Inc DBA Lumin All rights reserved 501 Locust Ave Floor 1 Suite 2 Charlottesville VA 22902 SUPPORT LUMINSMART COM 1 888 421 0616 WWW LUMINSMAR...

Reviews: