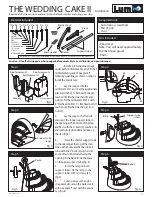


fi g . 3
S t ep 3
THE WEDDING C AKE II
Installation
fi g . 2
Éta p e 2
fi g . 5
S t ep 5
fi g . 4
S t ep 4
B r a c e
(sho r t )
R am p
Sup p o r t tu b e
(long)
Rev. 2007-11-20
H elpful hi n t : t o ease the install a tion of r ails and b olt s , use a sc r e w d r i v er t o line up hole s .
M a t e r ial included:
16x
P lastic c ap (4 )
R am p
B r a c e
Sup p o r t tu b e s
#1
#2
Sup p o r t tu b e
- A u t om a tic sc r e w d r i v e r
- P air of g r i p
R equi r ed t o ols :
N ot included :
4“ fl a t head b olt
F inished w ashe r
N u t
L o c k nu t
¾“ sc r e w
½ ” fl a t head b olt
1½ ” sc r e w
3“ b ol t
9x 9x 4x 4x 7x 5x
2x
#3
W ashe r
4x
S t ep 2
- C iso r
4- P la c e the sho r t er sup p o r t tu b e
in the o p ening a t the t op of the s t e p .
Line up the holes and fix the sup p o r t
tu b e with the 3 ” b olts (2) , w ashers (4) ,
and l o c k nuts (2) included using the
o p ening in the back . S lide the b r a c e
on the up p er sup p o r t tu b e (fi g . 4) .
1- Install 2 protective foam pads
under each reinforcement parts. Fill the 3
reinforcement parts of pea gravel*,
following quantities as shown on (fig.1).
Install the plastic caps.
5- Inse r t the r amp on b ot h
sup p o r t tu b e s . F ix the r amp t o the
sup p o r t tu b es with ¾ ” sc r e w s (4) .
(fi g .5) .
2- Lay the step and fix the
reinforcement 1 and 2 at the appropriate
places with the 1 ½ flat head bolts (6),
washers (6), finished washers (6) and
nuts (6). Fix the reinforcement #3 with
4” flat head bolt(2), 1 ½ flat head bolt (1),
washers (2), finished washers (3), and
nuts (3).
S t ep 6
fi g . 6
B allas t
6-
Cut and dispose the nylon
strap placed to retain the ballast unit
with pea gravel*, seal with the plastic
cap. (fig. 6).
fi g . 1
R ein f o rc eme n t 2
R ein f o rc eme n t 1
R ein f o rc eme n t 3
M ax . q t y .
S t ep 1
F ill c omple t el y
F oam pad (6 )
- Pea gravel
Note : You will need approximately
150 lbs of pea gravel.
- Shim
3- L a y the s t ep on the fl a t side
and inse r t the longer sup p o r t tu b e in
the o p ening a t the b ot t om of the s t ep
and fix it with the 3 ” b olts (2) , w ashers (4)
and l o c k nuts (2) included and r aise up
the s t ep (fi g .3) .
p.1
Read carefully the cautions and every steps before assembly and using your step.
Caution : File off all stripped or sharp edges before assembly to avoid injuries and pool damage.


