SETUP
1.
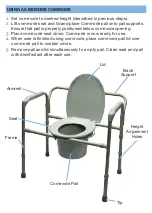
Remove frame, seat, lid, pail, cover, and splash shield from carton.
2.
Attach front support bar to arm rest by depressing the locking button
and sliding into the armrest channel guide. When locking button locks
into place an audible click can be heard. Repeat for other side.
3.
Attach seat and then lid to rear support of frame. In the upright
position, place splash shield or pail and cover in frame.
NOTE:
When installing the seat onto the frame, make sure that the seat is
evenly spaced between the side frames to ensure proper stability.
NOTE:
Push down firmly until the seat snaps into place.
NOTE:
DO NOT use excessive force when installing the seat and lid.
ADJUSTING COMMODE HEIGHT
1.
Depress the height adjustment button and slide the lower leg upward
or downward until the height adjustment button is fully engaged in the
desired hole.
NOTE:
An audible “click” will be heard.
2.
Repeat for other 3 legs.
CAUTION:
Ensure that all four commode legs are adjusted to the
same height, and that all height adjustment buttons protrude fully
through adjustment holes before use.
INSERTING BACK BAR
1.
Remove back bar from carton.
2.
Insert back bar into channel guides on back of commode until back
bar push buttons protrude fully through channel guide holes (you will
hear an audible click).
USING COMMODE OVER TOILET
1.
Set commode to desired height (described in previous steps).
2.
Remove commode pail and lid.
3.
Position splash shield in place onto pail supports.
4.
Remove back support (described in previous steps).
5.
Lift toilet bowl seat.
6.
Place commode over toilet with splash shield positioned over the
center of the toilet bowl. Commode is now ready for use. Clean seat
and splash guard with disinfectant after each use.


