background image


English 

9


Chapter 4 Instruction for installation 

4.1 Preparation before installation 

Installation and connection of HD camera requires special skills. To install 
by yourself, please follow necessary steps, ensure steady and tight 
installation of the device, and pay attention to your safety to avoid any 
accident. 

4.1.1  Ensure the safety of the installation environment. Please do 

not install the device on unstable ceiling or in a place where 
the device is in danger of falling to avoid any accident. 

4.1.2  Please check whether accessories in the box are complete 

or not. Please contact the supplier for any shortage, and 
make sure to keep the accessories in the box intact. 

4.1.3  Please choose a proper place for installation of camera in 

advance. Please determine an installation place according 
to the following requirements 

4.1.1.1 Confirm the position for the object to be captured. 

4.1.1.2 Confirm whether the camera is set at a proper distance from 

other light sources. 

4.2 Instruction for installation 

4.2.1  I would like to install camera on the desk 

4.2.1.1 

Precautions for installation 

  Please install the machine on a flat desk 

  Do not grab the camera head by hand when handling the device 

  Do not rotate the camera head by hand. Improper rotation may 

result in breakdown of the camera 

Summary of Contents for VC-B30U

Page 1: ...0U PTZ Video Camera Installation Guide English Important To download the latest version of Quick Start Guide multilingual user manual software or driver etc please visit Lumens https www MyLumens com support ...

Page 2: ...16 5 1 Functions of remote control 16 5 2 Setting Menu 17 Chapter 6 Descriptions of Major Functions 24 6 1 I would like to switch camera 24 6 2 I would like to control the camera 24 6 3 I would like to save the current lens position data 24 6 4 I would like to clear the saved position data 24 6 5 I would like to turn on the back light compensation function 24 6 6 I would like to adjust the shootin...

Page 3: ...change the camera direction 27 6 14 I would like to display the current status 27 6 15 I would like to reset to the original setting 27 Chapter 7 DIP switch setting 28 7 1 SYSTEM SWITCH 28 7 2 IR SELECT 28 Chapter 8 Troubleshooting 29 Supplier s Declaration of Conformity 47 CFR 2 1077 Compliance Information 30 ...

Page 4: ... product Lumens Digital Optics Inc hereby reserves the right to make changes to product specifications without prior notice The information in this file is subject to change without prior notice To fully explain or describe how this product should be used this manual may refer to names of other products or companies without any intention of infringement Disclaimer of warranties Lumens Digital Opti...

Page 5: ...ventilation and prevent the product from overheating 1 10 Except as specifically instructed in this User Manual do not attempt to operate this product by yourself Opening or removing covers may expose you to dangerous voltages and other hazards Refer all servicing to licensed service personnel 1 11 Unplug the product from the wall outlet and refer servicing to licensed service personnel when the f...

Page 6: ...is symbol indicates that there are important operating and maintenance instructions in this User Manual with this unit FCC Warning This HD camera has been tested and found to comply with the limits for a Class A digital device pursuant to Article 15 J of FCC Rules These limits are designed to provide reasonable protection against harmful interference in a commercial installation This digital appar...

Page 7: ...English 6 Chapter 2 Package Contents VC B30U Instruction for installation Remote Control Power Cord Power Adapter USB cable USB 3 0 Appearance may vary depending on country region HDMI cable ...

Page 8: ...Chapter 3 Product Overview 3 1 Overview 1 Camera Lens 2 Power LED Indicator 3 Standby LED Indicator 4 Power Input 5 RS232 IN 6 USB 3 0 Port 7 HDMI Output 8 RS232 Output 9 IR Select DIP Switch Front View Back View ...

Page 9: ... No Light Power on 3 2 2 2 Orange Startup in progress or in standby mode 3 2 2 3 Flickering orange Power off in progress 3 3 System Requirements 1 Windows System Windows 7 or later 2 Chrome system 3 MAC System Mac OS X 10 8 and above Remark When connecting to MAC please refer to Chapter 7 DIP Switch Setting to modify DIP Switch ...

Page 10: ...e box are complete or not Please contact the supplier for any shortage and make sure to keep the accessories in the box intact 4 1 3 Please choose a proper place for installation of camera in advance Please determine an installation place according to the following requirements 4 1 1 1 Confirm the position for the object to be captured 4 1 1 2 Confirm whether the camera is set at a proper distance...

Page 11: ...ation steps 1 Install the camera on the wall with VC AC03 Remark For the installation of VC AC03 please refer to VC AC03 Quick Installation Guide 4 2 1 3 Camera Size Length x Width x Height 267 69 x 123 x 155 60 mm Weight 1 3 Kg ...

Page 12: ...English 11 ...

Page 13: ...e confirm the orientation of the machine relative to the object to be captured 2 It is recommended that the machine should be set at a distance of more than 1 meter away from the object to be captured Please adjust for a best distance according to the magnification of the lens ...

Page 14: ...ra System Switch should be set to USB Mode 4 3 2 Video Conference connecting to dual monitor Remark Camera System Switch should be set to USB Mode Monitor Camera Computer Speakerphone USB 2 0 Cable USB 3 0 Cable HDMI Cable Monitor Monitor Camera Computer USB 3 0 Cable HDMI Cable HDMI Cable ...

Page 15: ...set to HDMI Mode 4 3 4 Connect Multiple VC B30U Sets Through VISCA Remark Camera System Switch should be set to HDMI Mode Remark With RS 232 in out at most 7 VCs can be connected Camera Decoder AUDIO Cable Microphone Monitor HDMI Cable HDMI Cable VISCA Cable Monitor Camera HDMI Cable VISCA Cable AUDIO Cable ...

Page 16: ... 15 4 3 5 IR Out IR Out includes IR Right and IR Left use VISCA command to switch 1 IR right and IR left ON 2 IR left OFF IR right ON 3 IR left ON IR right OFF 4 NA no signal from IR receiver IR Right IR Left ...

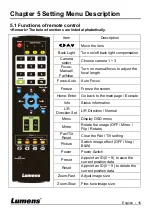
Page 17: ...ength Focus Auto Auto Focus Freeze Freeze the screen Home Enter Go back to the main page Execute Info Status information L R Direction Set L R Direction Normal Menu Display OSD menu Mirror Rotate the image OFF Mirror Flip Rotate Pan Tilt Reset Clear the Pan Tilt setting Picture Switch image effect OFF Neg B W Power Power Switch Preset Appoint an ID 0 9 to save the current position data Reset Appoi...

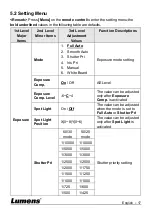
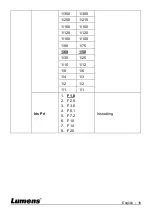
Page 18: ... 6 White Board Exposure mode setting Exposure Comp On Off AE Level Exposure Comp Level 6 C 4 The value can be adjusted only after Exposure Comp is activated Spot Light On Off The value can be adjusted when the mode is set to Full Auto or Shutter Pri Spot Light Position X 0 8 Y 0 6 The value can be adjusted only after Spot Light is activated Shutter Pri 60 30 mode 50 25 mode Shutter priority settin...

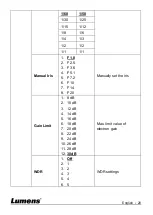
Page 19: ...18 1 350 1 300 1 250 1 215 1 180 1 150 1 120 1 120 1 100 1 100 1 90 1 75 1 60 1 50 1 30 1 25 1 15 1 12 1 8 1 6 1 4 1 3 1 2 1 2 1 1 1 1 Iris Pri 1 F1 8 2 F2 5 3 F3 6 4 F5 1 5 F7 2 6 F10 7 F14 8 F20 Iris setting ...

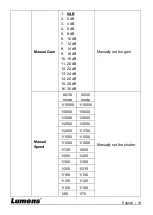
Page 20: ...dB 13 24 dB 14 26 dB 15 28 dB 16 30 dB Manually set the gain Manual Speed 60 30 mode 50 25 mode Manually set the shutter 1 10000 1 10000 1 5000 1 5000 1 3000 1 3000 1 2500 1 2500 1 2000 1 1750 1 1500 1 1250 1 1000 1 1000 1 725 1 600 1 500 1 425 1 350 1 300 1 250 1 215 1 180 1 150 1 120 1 120 1 100 1 100 1 90 1 75 ...

Page 21: ...1 Manual Iris 1 F1 8 2 F2 5 3 F3 6 4 F5 1 5 F7 2 6 F10 7 F14 8 F20 Manually set the iris Gain Limit 1 8 dB 2 10 dB 3 12 dB 4 14 dB 5 16 dB 6 18 dB 7 20 dB 8 22 dB 9 24 dB 10 26 dB 11 28 dB 12 30dB Max limit value of electron gain WDR 1 Off 2 1 3 2 4 3 5 4 6 5 WDR settings ...

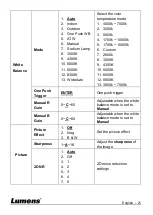
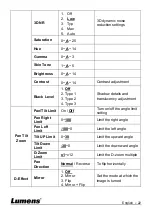
Page 22: ...6 Custom 7 2800k 8 3000K 9 4300K 10 5000K 11 6500K 12 8000K 13 3000k 7000k One Push Trigger ENTER One push trigger Manual R Gain 0 C 60 Adjustable when the white balance mode is set to Manual Manual B Gain 0 C 60 Adjustable when the white balance mode is set to Manual Picture Picture Effect 1 Off 2 Neg 3 B W Set the picture effect Sharpness 1 A 16 Adjust the sharpness of the image 2D NR 1 Auto 2 O...

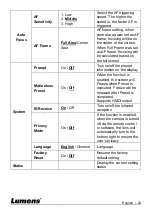
Page 23: ... translucency adjustment Pan Tilt Zoom Pan Tilt Limit On Off Turn on off the angle limit setting Pan Right Limit 0 100 Limit the right angle Pan Left Limit 100 0 Limit the left angle Tilt UP Limit 0 30 Limit the upward angle Tilt Down Limit 30 0 Limit the downward angle D Zoom Limit x1 x12 Limit the D zoom multiple Pan Direction Normal Reverse To flip horizontally D Effect Mirror 1 Off 2 Mirror 3 ...

Page 24: ...off the prompt information on the display Motionless Preset On Off When the function is enabled the screen will Freeze when Preset is executed Freeze will be released after Preset is completed Supports HMDI output IR Receive On Off Turn on off the infrared reception Privacy Mode On Off If the function is enabled when the camera is turned off via the remote control or software the lens will automat...

Page 25: ... USB PTZ Camera Controller Manual for more details The VS K20 Compact Camera Controller can be purchased separately Please refer to the VS K20 User Manual for more details 6 3 I would like to save the current lens position data 1 Hold Preset ID on the remote control to save the current position data ID shall be a digit 0 9 Use VISCA Command to store position data to 0 127 6 4 I would like to clear...

Page 26: ... reset the angle to the center point 6 7 I would like to zoom in out images 6 7 1 Adjust image size 1 Press Fast on the remote control to zoom in images 2 Press Fast on the remote control to zoom out images 6 7 2 Fine tune image size 1 Press Slow on the remote control to zoom in images 2 Press Slow on the remote control to zoom out images 6 8 I would like to adjust the focal length 6 8 1 Auto tune...

Page 27: ...vity can be set to Low 1 Press MENU to activate the setting menu 2 Press or to select Auto Focus 3 Press ENTER to activate 4 Press or to select AF Sensitivity 5 Press ENTER to activate 6 Press or to select High Middle Low 7 Press MENU to exit 6 9 2 Adjust the AF speed The focus speed upon triggering AF Sensitivity Normal default Image flickering may not occur Fast Fast focus speed 1 Press MENU to ...

Page 28: ...p Mirror Flip 6 13 I would like to change the camera direction 1 Press L R Direction Set on the remote control to switch L R Direction Off Normal 6 14 I would like to display the current status 1 Press Info on the remote control to display the current status information 6 15 I would like to reset to the original setting 1 Press MENU to activate the setting menu 2 Press or to select System 3 Press ...

Page 29: ...M SWITCH Setting Function Descriptions DIP 1 HDMI USB Mode OFF USB Mode USB and HDMI can output screens simultaneously ON HDMI Mode Only HDMI has output screens DIP 2 Output Resolution OFF 1080P ON 720P DIP 3 Power Frequency OFF 60Hz ON 50Hz DIP 4 Bulk ISO Mode OFF Bulk Mode ON ISO Mode 7 2 IR SELECT ID Setting 1 2 3 ...

Page 30: ...ated by remote control 1 Please confirm that VC B30U has been connected to the computer and launch video software 2 Please prevent VC B30U from direct sunshine 3 Make sure the energy saving bulb and the IR touch screen are as far as possible in order to avoid interference 4 When several VC B30U are connected in the same area the operation of two remote controls at the same time may result in signa...

Page 31: ...ormation Supplier Lumens Integration Inc 4116 Clipper Court Fremont CA 94538 United States e mail support mylumens com FCC Compliance Statement This device complies with Part 15 of the FCC Rules Operation is subject to the following two conditions 1 This device may not cause harmful interference and 2 this device must accept any interference received including interference that may cause undesired...

Reviews: