background image


English

  - 

10


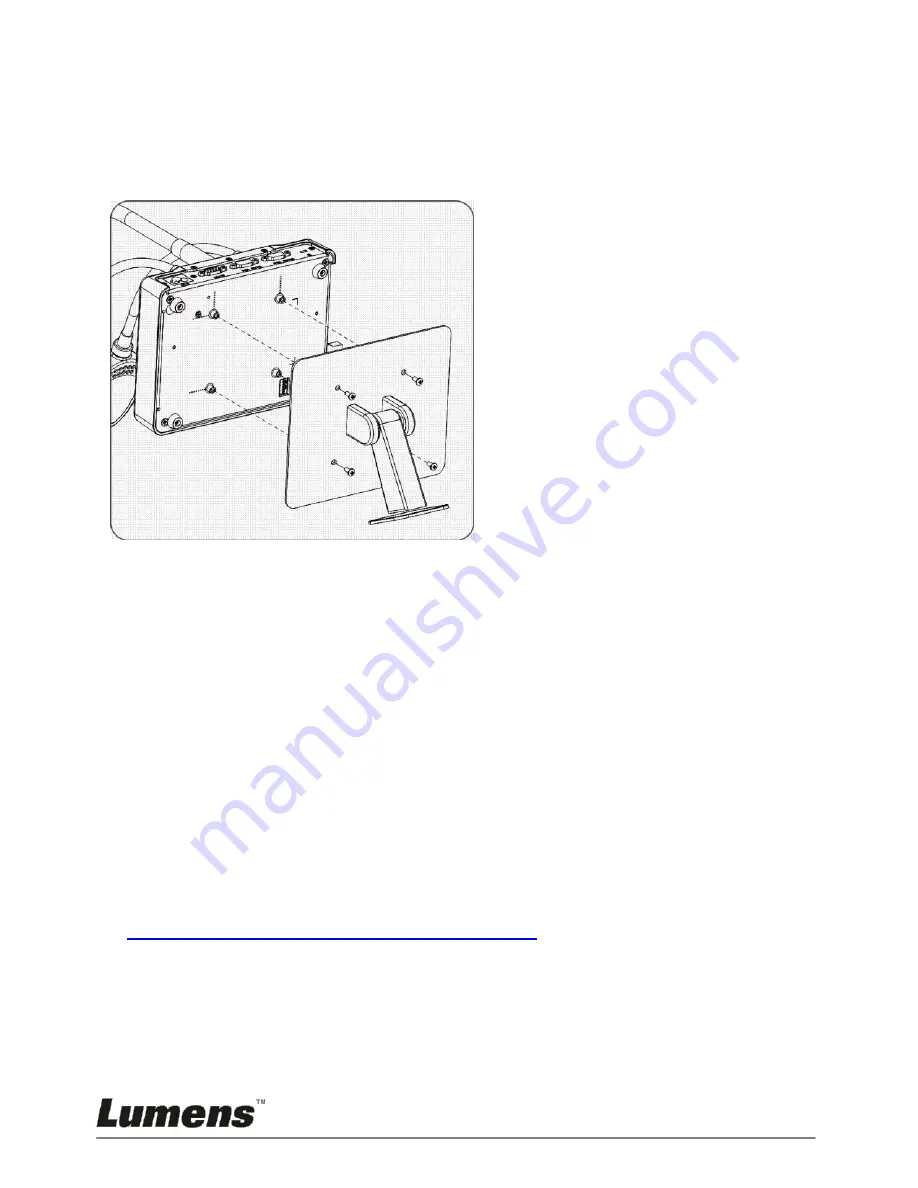
4.3 Mounting at desk 

1. Please purchase the standard VESA installation base. 

2. Please use appropriate screws: Screw length = 5 mm + base thickness (H1); 

M4 screw (P = 0.7) 


4.4 Installing application software 

After installing Lumens image software, you can use the following functions: 

  Control the 3D101. 

  Capture and record images. 

  Annotate the image, highlight important details and save it. 

  Support the full screen function. 

<Note> 3D functions must be used together with 3D computer, 3D display 

and 3D display software. It is recommended to use the software   

1. 3D-Hub Interactive Media Player 

(

http://www.3d-hub.co.uk/3d-hub-player.php

2. together with Stereoscopic Multiplexer and Stereoscopic Player 


VESA bolt pitch 75 * 75 mm


VESA base thickness (H1)


Screw length = 5 mm + base 

thickness (H1)


  M4 screw (P = 0.7) 

Summary of Contents for 3D101

Page 1: ...nglish 0 3D101 Document Camera User Manual Important To download the latest version of Quick Start Guide multilingual user manual software or driver etc please visit Lumens http www Mylumens com goto htm ...

Page 2: ...age Contents 6 Chapter 3 Product Overview 7 3 1 Relative Operation Position 8 3 2 Correct use 8 Chapter 4 Installation and Connections 9 4 1 Connecting to 3D display 9 4 2 Connecting to an Interactive Whiteboard IWB 9 4 3 Mounting at desk 10 4 4 Installing application software 10 Chapter 5 Start Using 13 5 1 Description of LED indicator 14 Chapter 6 Troubleshooting 15 ...

Page 3: ...ct Lumens Digital Optics Inc hereby reserves the right to make changes to product specifications without prior notice The information in this file is subject to change without prior notice To fully explain or describe how this product should be used this manual may refer to names of other products or companies nevertheless without any intention of infringement Disclaimer of warranties Lumens Digit...

Page 4: ...ation unless proper ventilation is provided 6 Never push objects of any kind through cabinet slots Never allow liquid of any kind to spill onto the Document Camera 7 Except as specifically instructed in this User Manual do not attempt to operate this product by yourself Opening or removing covers may expose you to dangerous voltages and other hazards Refer all servicing to licensed service personn...

Page 5: ...his unit FCC Warning This Document Camera has been tested and found to comply with the limits for a Class A Clause J digital device pursuant to Part 15 of FCC Rules These limits are designed to provide reasonable protection against harmful interference in a commercial installation EN55022 CE Radiation Warning This product is intended for use in a commercial industrial or educational environment It...

Page 6: ...English 5 Revisions ...

Page 7: ...English 6 Chapter 2 Package Contents 3D101 Quick Start Guide 4 Steps Card For download of other language versions please visit Lumens website USB Cable ...

Page 8: ...English 7 Chapter 3 Product Overview 4 Lens 3 Gooseneck 2 AF button 1 LED indicator ...

Page 9: ...English 8 3 1 Relative Operation Position 3 2 Correct use ...

Page 10: ...and Connections 4 1 Connecting to 3D display 4 2 Connecting to an Interactive Whiteboard IWB Computer USB Cable USB Cable VGA cable DVI cable or HDMI cable 3D display or TV Computer USB Cable USB Cable USB Cable VGA Cable 3D projector ...

Page 11: ... 3D101 Capture and record images Annotate the image highlight important details and save it Support the full screen function Note 3D functions must be used together with 3D computer 3D display and 3D display software It is recommended to use the software 1 3D Hub Interactive Media Player http www 3d hub co uk 3d hub player php 2 together with Stereoscopic Multiplexer and Stereoscopic Player VESA b...

Page 12: ...in CPU P4 2 8 GHz Min Memory 1 GB 32 bits 2 GB 64 bits Supporting Direct X 9 Min Resolution 1024 x 768 Min Hard Drive Space 100 MB 4 4 2 Install software 1 Please download Ladibug software at Lumens website 2 Extract the file downloaded and then click Setup to install 3 Select language 4 The installation wizard will guide you through the process Please follow the on screen instructions and press N...

Page 13: ...English 12 5 Press Yes to create Ladibug shortcut on your desktop 6 Press Finish and restart the computer ...

Page 14: ...enu will be displayed 3 Place the object to be displayed under the camera 4 Press to display the setting screen of POWER Frequency and follow the screen instructions A live image is displayed when the setting is finished This setting is required for the first use only Note You are advised to confirm the local voltage frequency before setting the POWER Frequency For example 60Hz is applicable for A...

Page 15: ...seneck as needed and press FOCUS button Each time the camera head is moved press the FOCUS button to refocus the lens 5 1 Description of LED indicator 1 Enable the image LED indicator will light up 2 Display the image LED indicator will light up 3 Disable the image LED indicator is OFF LED indicator ...

Page 16: ...ated or incomplete OS versions might not be able to identify USB devices like 3D101 Please use Windows XP SP2 or newer versions that are compatible 5 Output screen flicker Ladibug current frequency presetting value is 60 Hz if current frequency of your local country is 50 Hz during the use of Ladibug output screen flicker may occur Please refer to Ladibug User Manual to change Power frequency to 5...

Reviews: