


19
EN
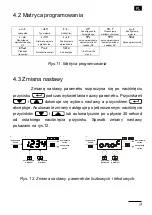
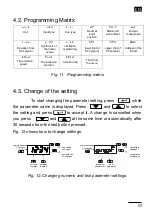
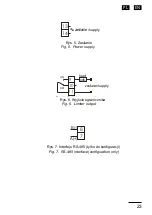
4.2. Programming Matrix
Fig. 11. Programming matrix
RL10-09 User's manual
[Wpisz tekst]
[Wpisz tekst]9
10
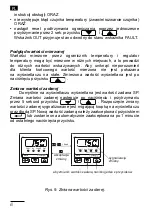
Some parameters may not be visible -
this depends on the current configuration. Description of
parameters can be found in table 1. The return to normal operation is automatic after 30
seconds since the last key press.
6.1. Programming matrix
unit
Unit
iNty
Input type
t-li
Line type
Dp
Decimal
point
position
sHif
Measured
value offset
out
Output
configuration
lJdu
lJHy
lJlt
spl
spH
addr
Deviation
from
SP setpoint
Hysteresis of
the limiter
output
Limitation
maintaining
lower limit of
SP setpoint
upper limit of
SP setpoint
Address of the
limiter
baud
Transmission
speed
prot
Transmission
protocol
seCU
Access code
. . .
Exit from
the menu
Fig. 11: Programming matrix
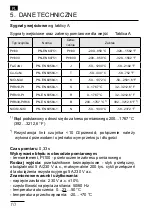
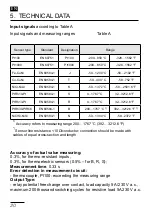
6.2. Change of setting
Changing the parameter setting starts when you press the
button while displaying
the parameter name. Using buttons
and
the setting is selected, and using button
the setting is accepted. To cancel a change press simultaneously buttons
and
or automatically after 30 seconds since the last press of the button. The way of changing the
setting is shown in Fig. 12.
rozpoczęcie
zmian
anulowanie
zmian
zwiększenie
wartości
zmniejszenie
wartości
akceptacja
zmian
+
rozpoczęcie
zmian
anulowanie
zmian
następny
parametr
poprzedni
parametr
akceptacja
zmian
+
Fig. 12: Changing numeric and text parameter settings.
cancelling
changes
acceptance
of changes
cancelling
changes
acceptance
of changes
commencement
of changes
decrease
in
value
increase
in value
previous
parameter
next
parameter
commencement
of changes
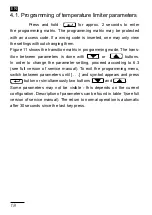
4.3. Change of the setting
To start changing the parameter setting, press
while
the parameter name is displayed. Press
and
to select
the setting and press
to accept it. A change is cancelled when
you press
and
at the same time or automatically after
30 seconds from the last button pressed.
Fig. 12 shows how to change settings.
RL10-09 User's manual
[Wpisz tekst]
[Wpisz tekst]9
10
Some parameters may not be visible -
this depends on the current configuration. Description of
parameters can be found in table 1. The return to normal operation is automatic after 30
seconds since the last key press.
6.1. Programming matrix
unit
Unit
iNty
Input type
t-li
Line type
Dp
Decimal
point
position
sHif
Measured
value offset
out
Output
configuration
lJdu
lJHy
lJlt
spl
spH
addr
Deviation
from
SP setpoint
Hysteresis of
the limiter
output
Limitation
maintaining
lower limit of
SP setpoint
upper limit of
SP setpoint
Address of the
limiter
baud
Transmission
speed
prot
Transmission
protocol
seCU
Access code
. . .
Exit from
the menu
Fig. 11: Programming matrix
6.2. Change of setting
Changing the parameter setting starts when you press the
button while displaying
the parameter name. Using buttons
and
the setting is selected, and using button
the setting is accepted. To cancel a change press simultaneously buttons
and
or automatically after 30 seconds since the last press of the button. The way of changing the
setting is shown in Fig. 12.
rozpoczęcie
zmian
anulowanie
zmian
zwiększenie
wartości
zmniejszenie
wartości
akceptacja
zmian
+
rozpoczęcie
zmian
anulowanie
zmian
następny
parametr
poprzedni
parametr
akceptacja
zmian
+
Fig. 12: Changing numeric and text parameter settings.
cancelling
changes
acceptance
of changes
cancelling
changes
acceptance
of changes
commencement
of changes
decrease
in
value
increase
in value
previous
parameter
next
parameter
commencement
of changes
Fig. 12: Changing numeric and text parameter settings.