background image

8

SEAT-TO-FLOOR HEIGHT

1.  Determine if the seat should 

be raised or lowered.

2.  When the chair is unoccupied, 

lay it on its side, unlock 
the spring pull by turning 
the knob counterclockwise 
(about 2 turns), then pull.

3.  Position the adjustable leg at the 

desired height then release the 
pull. If the holes are properly 
aligned, the pull will automatically 
go into place.

4.  IMPORTANT: lock the spring pull by 

turning the knob firmly clockwise.

The height adjustment (from 16 ½

"

 to 19 ½

"

) is done according to 

the length of the user’s lower leg. It is important that the user’s hips, 

knees, and ankles are at 90 degrees. Their feet must make good contact 

with the floor.

5.  Adjust all four legs to the same 

height.

The Nomad Z-55 model is not adjustable in height. It can be equipped 

with wheels of different sizes.

ADJUSTMENT AND OPERATING 

INSTRUCTIONS

Summary of Contents for Nomad Z Series

Page 1: ...UAL FOCUSED ON WHAT MATTERS patient room chair Versatile Nomad Z series VERSATILE Z 25 VERSATILE Z 15 NOMAD Z 55 lpamedical com 2527 Dalton avenue Quebec Qc G1P 3S6 CANADA T 418 681 1313 1 800 663 486...

Page 2: ...into an aesthetic design that helps maintain the user s dignity and well being Please read this instruction manual carefully and consult it often to maximize the benefits of your LPA chair If you have...

Page 3: ...9 Backrest Cushion 10 Backrest Cushion 11 Seat Cushion 12 Tilt Model Z 25 13 Seat Tilt Option Z C2 A 14 Seat Depth Options Z C3 A and Z C4 A 15 Backrest Angle Option Z C3 A 16 Backrest Tilt Option Z...

Page 4: ...use and maintenance of your LPA chair It is important that anyone using the chair reads it in its entirety It is the responsibility of caregivers including family or loved ones using this chair to fol...

Page 5: ...adjustments and mobilization handling must be performed by professionals who have been trained for this purpose The caregiver team must ensure that it does not pose a risk to their safety or that of...

Page 6: ...canbeshippedfullyassembledorpartiallyassembled Itmust be inspected when unpackaged and you must notify your supplier if there is any damage or missing parts accessories so that the situation is remedi...

Page 7: ...ding the recommended weight limit CLEANING Followtheselectedcoveringmanufacturer srecommendationsforcleaning Check with your supplier that the products you use are compatible Thechairshouldnotbepressu...

Page 8: ...rly aligned the pull will automatically go into place 4 IMPORTANT lock the spring pull by turning the knob firmly clockwise The height adjustment from 16 to 19 is done according to the length of the u...

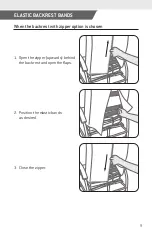
Page 9: ...9 1 Open the zipper upwards behind the backrest and open the flaps When the backrest with zipper option is chosen ELASTIC BACKREST BANDS 2 Position the elastic bands as desired 3 Close the zipper...

Page 10: ...ind the backrest and open the flaps 2 Unhook the two black plastic J moldings from the bottom slat of the backrest frame and push them forward 3 Pull the backrest cushion upwards holding it by the sid...

Page 11: ...ion in the back until you see the two black plastic J moldings 2 Unhook the two J moldings from the bottom slat of the backrest frame and push them forward 3 Pull the backrest cushion upwards holding...

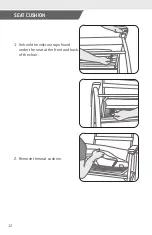
Page 12: ...12 SEAT CUSHION 2 Remove the seat cushion 1 Unhook the velcro straps found under the seat at the front and back of the chair...

Page 13: ...models are equipped with gas springs that allow adjustment with a user in the chair Only the three starting positions at the base of the gas spring allow a variation in the type of tilt TILT MODEL Z 2...

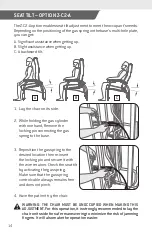
Page 14: ...ommended to lay the chair on its side for safer maneuvering to minimize the risk of jamming fingers It will also make the operation easier A B C 1 Lay the chair on its side 2 While holding the gas cyl...

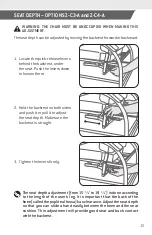
Page 15: ...raight The seat depth adjustment from 15 to 19 is done according to the length of the user s leg It is important that the back of the knee called the popliteal fossa has clearance Adjust the seat dept...

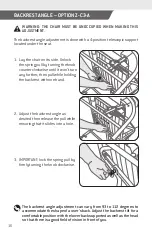
Page 16: ...hand The backrest angle adjustment can vary from 93 to 112 degrees to accommodate the shape of a user s back Adjust the backrest tilt for a comfortablepositionwiththelowerbacksupportedaswellasthehead...

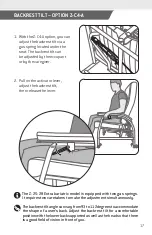
Page 17: ...via a gas spring located under the seat The backrest tilt can be adjusted by the occupant or by the caregiver 2 Pull on the activator lever adjust the backrest tilt then release the lever Thebackrest...

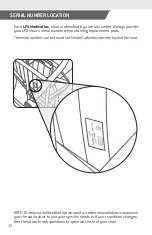
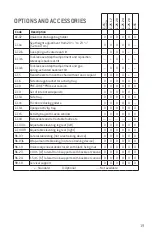
Page 18: ...ng replacement parts Theserialnumbercanbefoundonthelabelaffixedunderthebackof theseat SERIAL NUMBER LOCATION NOTE Thereareamultitudeofoptionsandaccessoriesavailabletocustomize your Versatile chair to...

Page 19: ...O O O O O Z C9 Set of interior side panels O O O O O Z C10 Side tray O O O O O O Z C11 Friction reducing gliders O O O O O Z C14 Opaque activity tray O O O O O O Z C15 Activity tray with Lexan window...

Page 20: ...o sit down in the Versatile chair safely Tilt the chair forward Stand in front of the chair and back up until the chair touches the back of your knees Bend your knees while placing your hands on the a...

Page 21: ...d damage during this period will void the LPA Medical Inc warranty Additional costs of handling and or using a platform when unloading may apply and are at the customer s expense RETURNS Merchandise t...

Page 22: ...Model serial and part 2 Purchase date and invoice number 3 Description of the problem The useful lifespan of an LPA chair is estimated to be 10 years OUR COMMITMENT LPAMedicalinc agreestoprovidereplac...

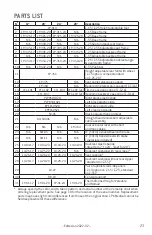
Page 23: ...ic slide 18 XPE65052R Right green end guide 19 XPE65052L Left green end guide 20 SU 05 Black polyurethane armrest 21 QCL50006 N A Straight handle and short adjustable cable assembly 22 N A N A N A ZP...

Page 24: ...15 30 3 22 11 18 17 VUE CLAT E EXPLODED VIEW Mod les Z 15 20 et Z 25 20 illustr s les versions 24 et 28 pourraient pr senter certaines diff rences Z 15 20 and Z 25 20 models shown the 24 and 28 widths...

Page 25: ...25 25 26 28 29 7 4 8 10 23 24 21 14 12 5 Z 25 Z 55...

Reviews: