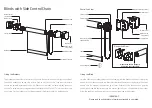
Fitting the Brackets
The bracket positions illustrated are for a blind with the control chain on the right hand side of
the blind. Brackets can be top, side or face fixed to any flat surface. They must be level to
ensure the smooth operation of the blind. Check that the rolled up fabric will not touch any
surface. To calculate the spacing between the brackets, add 35mm (1
3
/
8
”) to the width of the
blind fabric. Fix the brackets so that the outsides of the brackets are this distance apart.
Blinds with Side Control Chain
Fitting the Blind
Hold the blind to the brackets with the fabric hanging from the back of the blind. Fit the spring
plunger into its bracket and push the blind into the bracket, depressing the plunger. When fitted
ensure that the plunger is depressed by at least 4mm. With the locating hook pointing
downwards, place the control end into the vertical part of the ‘+’ shaped hole in the bracket.
Allow the hook to drop downwards so that it locks into place in the bracket.
IMPORTANT
Please read the child safety information attached to your blind.
When fitted ensure plunger is
depressed by at least 4mm
Bracket Cover
Bracket (in face
fix position)
Plunger End
Bottom Bar
Bracket Cover
Bracket (in top
fix position)
Control End
Operating Chain
Aluminium Tube
Bracket Cover
Bracket (in top
fix position)
Locating Slots
Bracket Cover
Bracket (in face fix position)
Bottom Bar End Cap
Locating Spigot
Optional Easy Break
Chain Connector
Locating Hook
Fabric
Bottom Bar
Cord & Chain Tidy
Plunger End View
Control End View


