INSTALLATION AND OPERATING INSTRUCTIONS
[1]
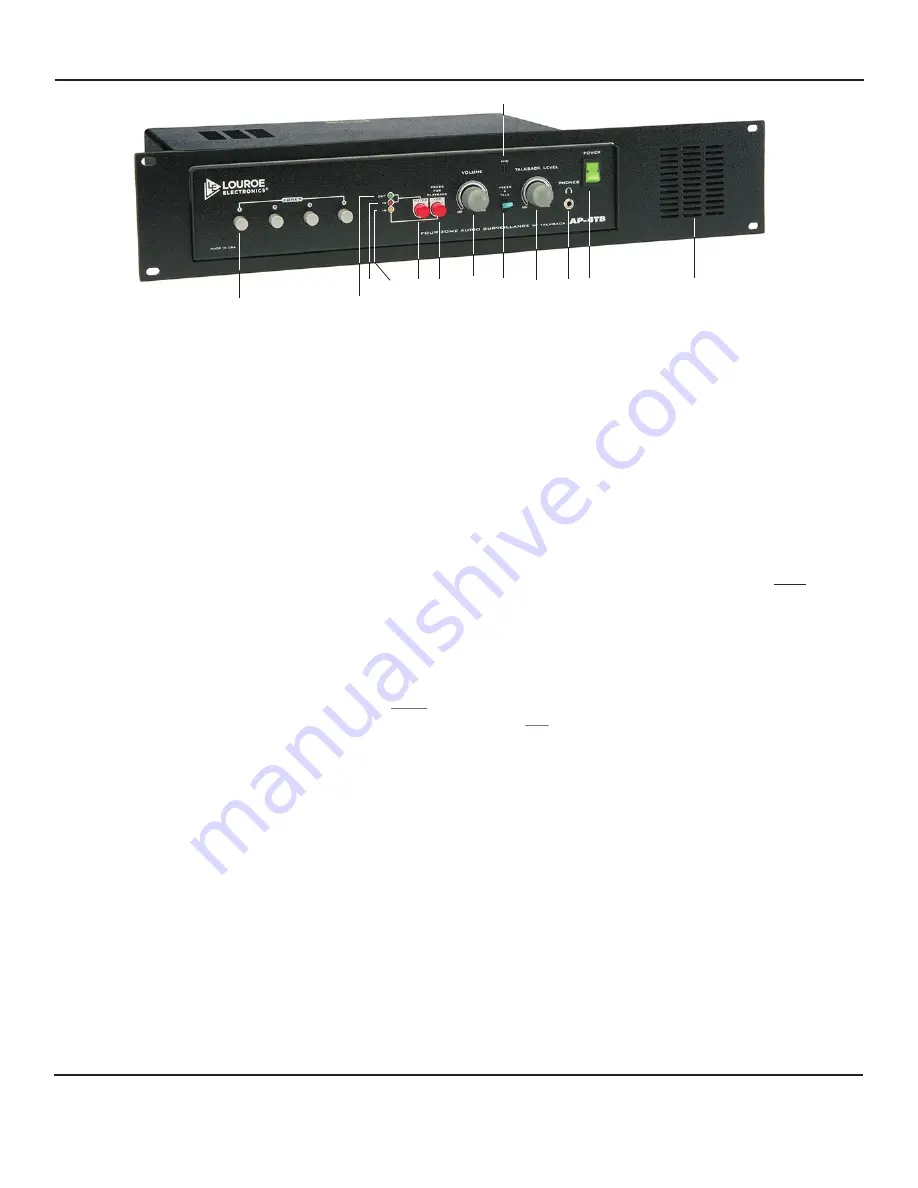
- Zone Selector Switches
Selects zone for monitoring. Press switch of desired zone to listen to
live monitored audio. Pressing more than one switch to monitor
several zones is possible, but not recommended. Audio pickup from
two or more zones will be mixed and difficult to distinguish.
[2]
- Filter-OUT Indicator
Lights (green) when audio filter is not in use. Indicates power is “ON”.
[3]
- Filter-IN Indicator
Lights (amber) when Filter Switch
[5]
is pressed to “ON” position.
[4]
- VCR-IN Indicator
Lights (yellow) when VCR Switch
[6]
is pressed to “ON” position.
[5]
- Filter Switch
Used only when audio playback is from a 12 or 24 hr. time lapse
recorder. Pressing Filter Switch[5] will illuminate red LED for 12/24 hour
mode. This enhances the quality of recorded audio playback. If
playback is from a DVR, filter switch is not used and should be in the
“OUT” position. If no recording device is used, then filter switch must
be in the “OUT” position. Otherwise live audio will be muted. The
green LED illuminates when filter switch is in the “OUT” position.
[6]
- VCR Switch
If AP-4TB-RM is connected to a DVR, VCR etc. audio is
automatically recorded whether VCR switch
[6]
is in the “IN” or “OUT”
position. But for audio playback through the AP-4TB, VCR
button
must
be pressed in the IN position. If no DVR or VCR is used,
VCR switch must be in the
out
position.
[8]
- Talkback switch
Press to talk to remote speakers. Select a zone by pressing the appropriate
Zone Selector Switch
[1]
to talk to desired zone. The built-in Talk back
Microphone
[11]
is located above the Talkback Switch
[8]
.
[9]
- Talkback Control Knob
Rotate knob clockwise to increase the volume of talkback output;
counterclockwise to decrease.
[7]
- Volume Control Knob
[10] - Headphone Jack
Used for private listening. Any 3.5mm stereo headphone with 8 to
600
W
impedance may be used. Speaker is muted when headphone is used.
[11] - Talkback Microphone
Built-in microphone for talkback to remote speaker.
[13] - Monitor Speaker
Delivers audio through speaker. Muted when a headphone is plugged
into the Headphone Jack
[10]
.
(includes DVR’s)
(not used with DVR’s)
(includes DVR’s)
[1]
[11]
[12]
[13]
[2]
Fig. 1
[12] - Power Switch
Turns on power to the unit. Illuminates green when powered
Rotate clockwise to increase volume of monitored audio produced
through Monitor Speaker
[13]
. Counterclockwise to decrease.
INSTALLATION AND OPERATING INSTRUCTIONS
Page 2 of 8
LOUROE ELECTRONICS 6 9 5 5 VA L J E A N AVENUE, VAN NUYS, CA 91406
TEL (818) 994-6498
FAX
994-6458
website: www.louroe.com e-mail: [email protected]
(818)
®
ap4tb-rm_inst_3/15
[3] [4]
[6]
[5]
[10]
[8]
[9]
[7]


