www.lorextechnology.com
LW2960_SERIES_QSG_EN_R1 Page 2
©2014 Lorex Technology Inc.
As our product is subject to continuous improvement, Lorex Technology &
subsidiaries reserve the right to modify product design, specifications, prices &
warranty without notice and without incurring any obligation. E&OE
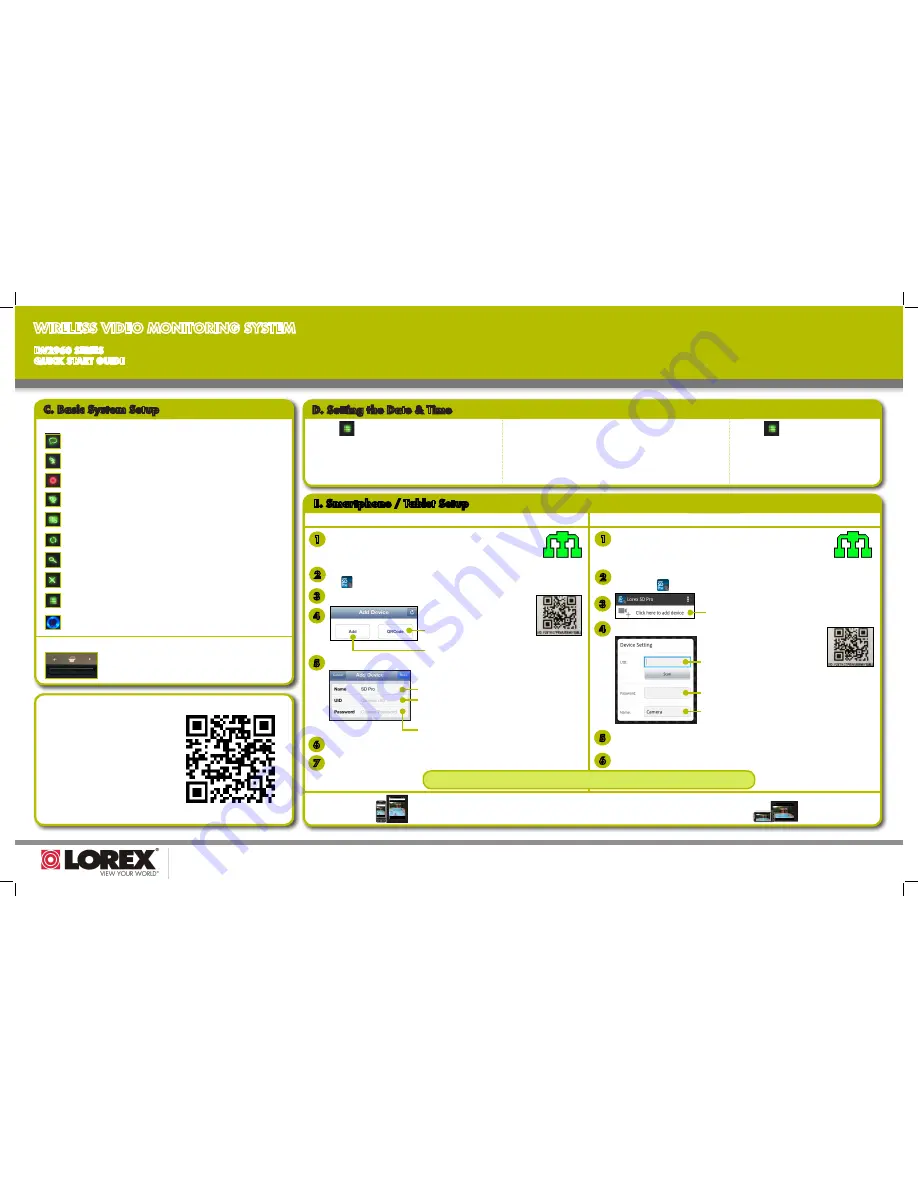
Front Panel Buttons:
Menu:
Open main menu. Return to previous menu / exit menus without
saving changes.
Quad / Sequence Viewing:
Switch between Quad mode (up to 4
channels) and Auto Sequence mode (automatically cycles through channels).
Scan Mode:
Enter Scan mode (display turns on only when motion is
detected).
Channel Select:
Change channel.
Zoom:
Activate / deactivate 2x digital zoom. Use the joystick to adjust the
viewing area (must be in single-channel view).
Delete File:
Delete the highlighted file in Playback mode.
Joystick:
Scroll up / down / left / right in menus. Push to make a
selection in menus, or enter Playback mode from live view.
Side Panel Buttons:
Motion Recording:
Activate / deactivate motion recording.
Manual Recording:
Activate / deactivate manual recording.
Talk:
Press and hold to activate intercom (two-way audio).
C. Basic System Setup
WIRELESS VIDEO MONITORING SYSTEM
LW2960 SERIES
QUICK START GUIDE
Scan the QR code or go to the
address below for the complete
user’s guide.
lorex.ca/SDPro9
1.
Press
to open the main menu. Move the joystick
left / right to highlight
Settings
and push the joystick to
select.
2.
Select
Date & Time
and push the joystick to confirm.
3.
Move the joystick left / right to move the cursor. Move the joystick
up / down to change the year, month, day, hour, minutes, seconds.
NOTE:
The system uses a 24-hour clock.
4.
Push the joystick to save your settings.
5.
Press
to close any remaining menu
windows.
NOTE:
See the user’s guide for details on
configuring Daylight Savings Time and
Network Time Protocol.
D. Setting the Date & Time
NOTE:
It is important to set the date and time to ensure that they are properly captured on recordings.
1
Connect the included Ethernet cable from the Ethernet port on the
LCD receiver to your wireless router. The network icon turns green.
2
Download the free
Lorex SD Pro
app from the App Store. Once installed,
tap
to launch the app.
Tap
QRCode
to scan the QR
code on the back of the receiver.
OR
Tap
Add
to enter the UID manually.
iPhone
®
/ iPad
®
Android™
4
5
Enter the following:
Enter the password (default:
000000
).
Enter a personalized name for the system.
Enter the UID printed below the QR code on the back
of the receiver. If you tapped
QRCode
in Step 4, this
field populates automatically.
6
Tap
Save
. The system will show in your device list with an
Online
status.
7
Tap the name of the system. You will be asked to enter a new, secure password.
Congratulations!
You are now connected to your surveillance system over the Internet.
View live video from your camera(s) in portrait or landscape mode.
3
Tap
Click here to add device
.
4
Enter the following:
Enter the password (default:
000000
).
Enter a personalized name for the system.
Tap
Scan
to scan the QR code on the
back of the receiver.
OR
Enter the UID printed below the QR code.
7
Tap
OK
. The system will show in your device list with an
Online
status.
8
Tap the name of the system. You will be asked to enter a new, secure password.
5
Tap
OK
. The system will show in your device list with an
Online
status.
6
E. Smartphone / Tablet Setup
3
Tap
Add Device
.
1
Connect the included Ethernet cable from the Ethernet port on the
LCD receiver to your wireless router. The network icon turns green.
2
Download the free
Lorex SD Pro
app from the Google Play Store. Once
installed, tap
to launch the app.
NOTE:
You may need to turn the receiver off and on again.
NOTE:
You may need to turn the receiver off and on again.
Write your password down for future reference: __________________________________________
It’s all on the Web
NOTE:
Be sure to leave the receiver connected to a power outlet to ensure remote connectivity.


