

Quick Connection Guide
1. LEFT-CLICK:
• During split-screen display mode:
Click an individual channel to view it in full-
screen. Click again to return to the split-screen display mode.
• While navigating menus:
Click to open a menu option.
2. RIGHT-CLICK:
• During live view:
Right-click anywhere on the screen to open the Quick Menu.
• Within system menus:
Right-click to exit menus.
3. SCROLL WHEEL:
• During live view:
Use the scroll wheel to zoom in / out.
Using the Mouse
Setting the Date and Time
LHV5100_SERIES_QCG_EN_R2
NOTE:
In live view, hover the mouse cursor over the bottom of the screen to open the Navigation Bar. Move
the mouse cursor away from the bottom of the screen to close the navigation bar.
Enter the current time and select
your time zone, and click
OK
.
It is important to set the correct time to ensure accurate time stamps on video
recordings.
1.
In live view, right-click and click
Main Menu
.
2.
Log in using the system user name (default:
admin
) and your new, secure password.
3.
Click
and select
Setting
.
4.
Click
General
and select the
Date&Time
tab.
Check
DST
to enable auto
Daylight Savings Time updates.
(Optional) Check
NTP
to sync
your system with an Internet
time server. Click
Manual Update
to instantly update the time.
NOTE:
A constant Internet
connection is required to use
NTP.
5.
Click
Apply
to save changes.
Quick Access to System Information
To quickly open a window that displays vital system information such as device
ID, firmware version and device IP address:
• Press the
ENTER
button on the front panel.
• Right-click to open the Quick Menu and click
Info
. If prompted, enter the system user
name (default:
admin
) and your new, secure password.
OR
When using your system for the first time, you will be prompted to create a
new 6
character password
.
1.
Connect your system according to the instructions on the front of this guide.
2.
When the DVR turns on, create and confirm your new, secure password. This password will be used to
connect to your system from now on.
Creating a New Password
Record your password below and store in a secure place:
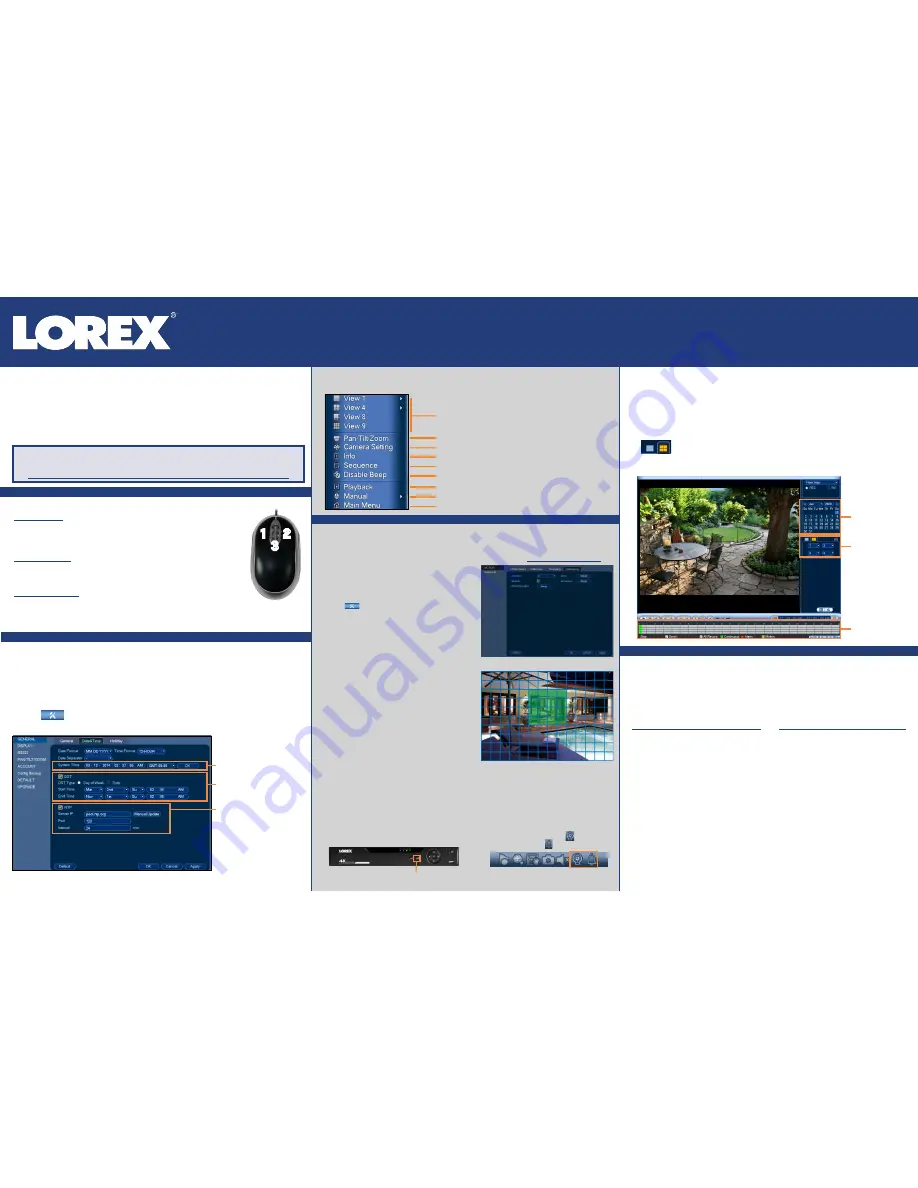
Playback and Search
1.
From live view, right-click and then click
Playback
.
2.
Log in using the system user name (default:
admin
) and your new, secure password.
3.
Use the calendar on the right to select the date to playback.
4.
Use the drop-down menus to select the channels you would like to playback. Click the display options
(
) to playback multiple channels simultaneously.
5.
Click inside the video bar to select the playback time. Playback starts immediately at the selected
time.
Select the day to
playback.
Select channels to
playback.
Click inside the bar to
select a playback time.
Using the Quick Menu
Right-click to open the Quick Menu.
Select camera/live display view
Control PTZ cameras (not included)
Adjust camera color and image settings
View system information
Start/stop sequence mode
Search and playback recordings
Open manual recording controls
Open Main Menu
Disable current audible warning
3
2
1
Configuring Deterrence Settings
1.
In live view, right-click and click
Main Menu
.
2.
Log in using the system user name (default:
admin
) and
your new, secure password.
3.
Click
and select
Setting
.
4.
Click
Event
>
Motion
>
Deterrence
(see
Figure 1
).
5.
Select the channel of the deterrence camera to configure
next to
Camera
.
6.
Click the
Enable
checkbox to enable automatic warning
light deterrence.
7.
Click
Setup
next to
Area
to set the active area for
automatic deterrence:
• The camera image appears with a grid of green boxes
over top. The green area is the active area for deterrence.
• Click or click-and-drag to add / remove boxes from the
active area.
• In
Figure 2
, only motion around the doorway will trigger
warning light.
• Right-click when finished.
8.
Click
Setup
next to
Schedule
to set a schedule during
which automatic deterrence will be used:
• The default schedule is active during the night, between
5pm and 7am.
• Right-click when finished.
9.
Click
Warning Light
to set preferences for the warning
light:
To configure automatic deterrence using DVR:
Set preferences for the automatic warning light triggering on compatible Lorex deterrence
cameras. For a complete list of compatible deterrence cameras, see
lorex.com/compatibility
.
To activate deterrence features manually:
Figure 1:
Deterrence Tab
Figure 2:
Deterrence Active Area Example
• Enter a time for the white light to be active up to 30 seconds.
• Select
Warning Light
for sustained light or
Strobe
for a flashing light.
• Click
OK
to save and exit.
10.
Click
Apply
to save changes.
4K MPX Security DVR
LHV5100 Series
• Press and hold
ESC
on the front panel for 5
seconds. Warning lights and sirens will be activated
for all connected deterrence cameras.
Press and hold for 5 seconds.
• From live display, hover near the top of a channel
to reveal the Mini Menu. Click
to activate
warning light, or click
to activate siren.