If you are having trouble connecting, please try
the following before contacting support:
• Restart the recorder by disconnecting the power
adapter, then reconnecting it.
• Ensure the recorder is connected to the router
using an Ethernet cable and then restart the
recorder.
• Double check the Username, Password, and Client
Port.
• Ensure your recorder has the latest firmware.
• Ensure your mobile app / client software is
up-to-date.
Troubleshooting
Default access information:
• Default Username:
admin
• Password: See the
Quick Setup Guide
for the
password created upon initial setup.
Default system ports:
• HTTP Port:
80
• Client Port:
9000
If you have forgotten your password,
please contact Lorex technical support.
Click
Login
.
STEP 3A:
PC / Mac Setup
a
b
c
d
•
PC Users:
Download and install
Lorex Client 13 for PC
f
rom
lorex.com
.
Download and install the client software:
•
Mac Users:
Download and install
Lorex Client 13 for Mac
from
lorex.com
. Double-click to extract the software,
then drag the software to
Applications
.
Double-click the
Lorex Client 13 icon (
)
on the desktop or Applications list.
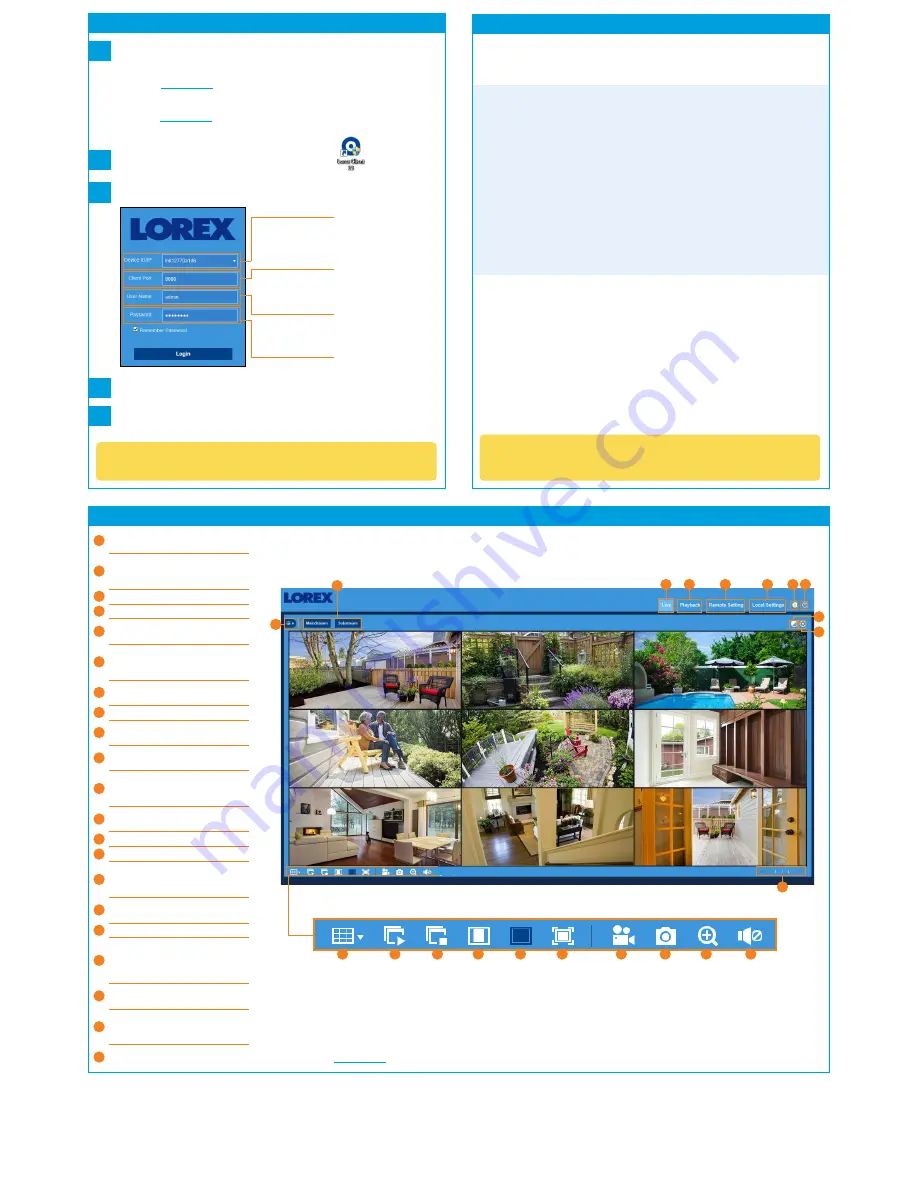
Enter the DVR’s
Device ID recorded
in section 1
Enter the following information:
Enter the DVR’s
Client Port
(default:
9000
)
Enter the DVR’s
user name
(default:
admin
)
Enter the secure
password you
created for the DVR
e
All connected cameras are shown on screen in the
Lorex Client 13 home screen.
NOTE:
For complete app instructions, see the Lorex Client 13 instruction manual on your product
page at
lorex.com
.
Congratulations!
You can now view video from your
cameras on your PC or Mac.
STEP 3B:
Lorex Client 13 Overview
Channel List:
Open the channel list for
quick camera functions.
PTZ Controls:
Access controls for using
PTZ cameras (not included).
Navigation:
Shows current page number
for the channels shown on screen. Use the
arrow keys to switch between pages.
Video Quality:
Select
MainStream
for the
highest possible video quality, or select
SubStream
for reduced video quality.
Live Viewing
Playback:
View recorded video.
Remote Setting:
Access functions of
the recorder menu.
Color Controls:
Access controls for
changing camera image color.
Local Settings
:
Set download locations
for recordings and snapshots, and
choose file type for video files.
Information:
Hover over to see
system details.
Exit
A
B
C
D
E
F
G
H
I
J
K
A
B
C
D
E
F
G H
I
J
K
L
M
N
O
P
Q
R
S
T
U
Digital Zoom:
Click, then click-and-drag
over an area of the live image to enlarge.
Right-click to return to the full image.
Mute/Unmute:
Requires audio-enabled
cameras (not included).
Page View:
Click to select how many
channels appear on screen at a time.
Play All
Stop All
Original Proportions:
Shows live video
at the original proportions of the chosen
recording resolution.
Snapshot:
Click to save a snapshot of the
current live display to your computer.
Stretch:
Stretch live video to fit the full
area for each channel on screen.
Full Screen
Manual Recording:
Click to start manually
recording video. Click again to stop
recording. Manual recordings are saved to
your computer.
L
M
N
O
P
Q
R
S
T
U


