

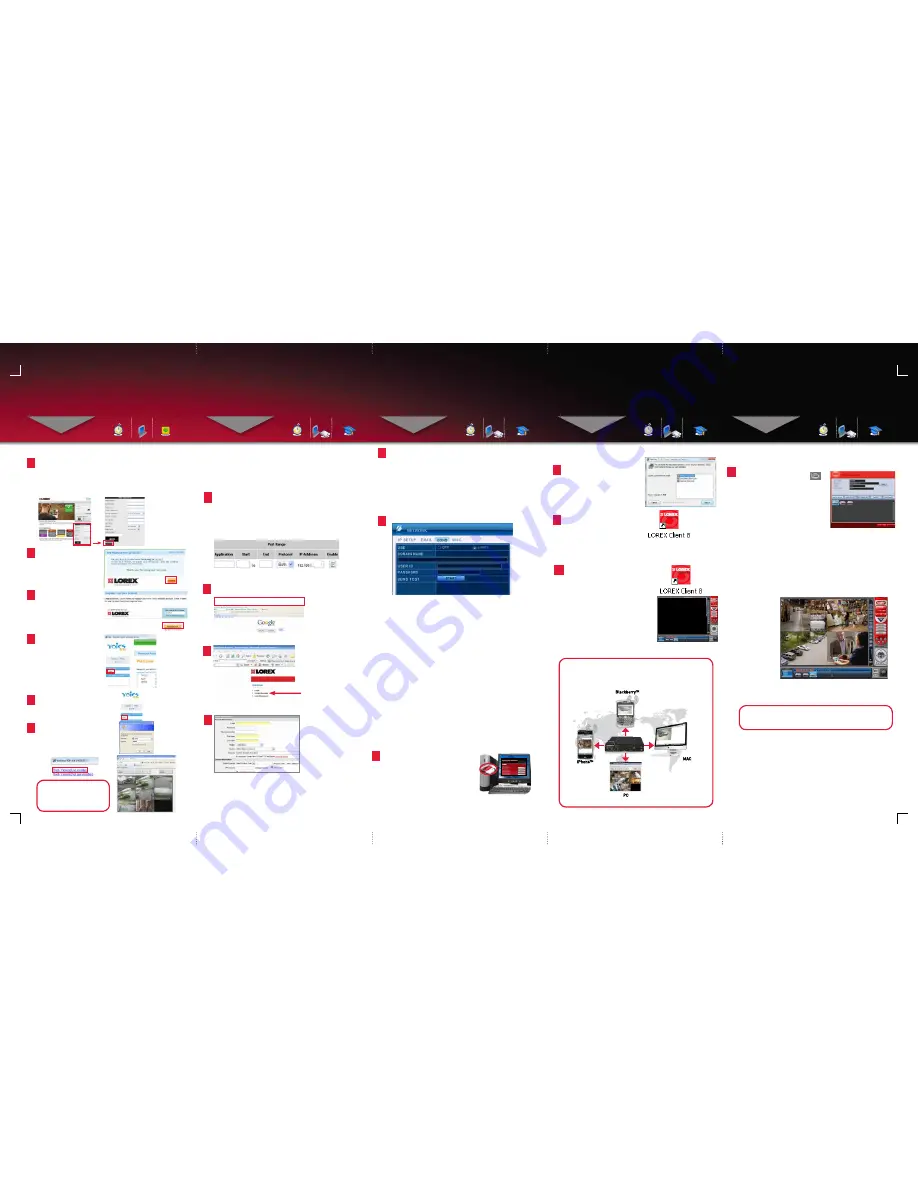
1. Open the MAiN MENu and click NETWORK.
2. Select the ddNS tab.
3. Under uSE, select LOREX.
4. Under dOMAiN NAME, enter only the first portion of your ddNS
domain from the confirmation email. For example, if your domain
name is “tomsmith
@
lorexddns.net”, you only need to enter
“tomsmith” in the text field.
5. Under uSER id, enter your Lorex ddNS user id.
6. Under PASSWORd, enter your Lorex ddNS Password.
NOTE: Obtain your Lorex DDNS user ID and password from the
confirmation email.
7. Under ddNS TEST, select START. You should receive a “GOOd”
message. If there is an error, check your network connections;
check that you have entered the correct domain name, user ID, and
password.
8. Press ENTER to save your settings. Press MENu/ESC to close
remaining windows.
Port Forward your Router:
1
Port forward your router first before proceeding with the set-up.
You must forward
Port: 7000
All routers are different. To port forward your router, please
refer to your router’s user manual.
An example of a port forwarding screen is shown for illustration
purposes.
System
7000
7000
12
EXAMPLE
2
Open your web browser (Internet Explorer by default) and enter
http://www.lorexddns.net in the address bar.
ddNS (dynamic domain Name System) Set-up:
http://www.lorexddns.net
Create Account
3
Create Account:
1. FOR PRODUCT LICENSE select the
LH400 Series
option
from the drop down menu.
2. FOR PRODUCT CODE enter the MAC address (recorded in step
2, section 1).
3. FOR URL REQUEST enter a unique URL name (e.g. tomsmith).
NOTE: URL name should not be more than 15 characters.
Complete New Account information:
1
2
3
4
An automated REGiSTRATiON CONFiRMATiON EMAiL will be
sent to your email. Print and Save this confirmation. You will
need this information to access your System remotely.
Registration Email:
Service Provider: dns1.lorexddns.net
domain Name: tomsmith.lorexddns.net
user id: tomsmith
Password: (your password)
5
SET-uP iNTERNET REMOTE SECuRiTY
MONiTORiNG
STEP 3B
CONTiNuEd
Enter ddNS Set-up on your dVR:
6
SET-uP iNTERNET REMOTE SECuRiTY
MONiTORiNG
CONTiNuEd
Once the installation finishes,
click Close. A shortcut icon
appears on your desktop.
9
Run Lorex Client 8.0 Software (on your remote
computer):
1. Double-click the Lorex Client 8.0
icon on the desktop. The Lorex
Client 8.0 main screen opens.
using Lorex Client 8.0 Software (on your remote
computer):
11
SET-uP iNTERNET REMOTE SECuRiTY
MONiTORiNG
CONTiNuEd
Congratulations! You have completed 3B successfully. You can now
view, playback and Remotely control the system on your Remote
computer over the Internet (Wide Area Network).
10
SET-uP iNTERNET REMOTE SECuRiTY
MONiTORiNG
STEP 3B
Skill Level
Intermediate
easy
advanced
Time
under 30 minutes
under 15 minutes
under 60 minutes
Hand Tools
Hardware
Router
Hi Speed
over 60 minutes
Skill Level
Intermediate
easy
advanced
Time
under 30 minutes
under 15 minutes
under 60 minutes
Hand Tools
Hardware
Router
Hi Speed
over 60 minutes
REMOTE ViEWiNG iNSTALLATiON GuidE
Time: 60 Minutes
Skills - Advanced
Hardware
PC/Router
Skill Level
Intermediate
easy
advanced
Time
under 30 minutes
under 15 minutes
under 60 minutes
Hand Tools
Hardware
Router
Hi Speed
over 60 minutes
Skill Level
Intermediate
easy
advanced
Time
under 30 minutes
under 15 minutes
under 60 minutes
Hand Tools
Hardware
Router
Hi Speed
over 60 minutes
Skill Level
Intermediate
easy
advanced
Time
under 30 minutes
under 15 minutes
under 60 minutes
Hand Tools
Hardware
Router
Hi Speed
over 60 minutes
REMOTE ViEWiNG iNSTALLATiON GuidE
Time: 60 Minutes
Skills - Advanced
Hardware
PC/Router
Skill Level
Intermediate
easy
advanced
Time
under 30 minutes
under 15 minutes
under 60 minutes
Hand Tools
Hardware
Router
Hi Speed
over 60 minutes
Lorex Client 8.0 Software (on your remote
computer):
Follow the installation screens to
complete Lorex Client 8.0
Software installation.
8
To add a DVR:
1. From the main screen, click
at
the bottom right corner. The SET
LiST MANAGER window opens.
2. In the corresponding text fields
enter the information:
Once you have
added and
connected to a
DVR, you can
monitor and
control the
system in real
time.
REMOTE LiVE SiTE
ATTENTiON: You MUST enter your DDNS information LOCALLY
in your system before attempting remote access.
LH400 Link Series Quick Setup Guide - English - R1
install Software (on your remote computer):
Insert the software CD into your
computer’s CD/DVD-R drive. At
the prompt, run or double-click
LOREXClient8installer.exe
7
NOTE: By default, Lorex Client 8.0
opens to a black multi-screen display.
You must add a DVR to Lorex Client
8.0 before images will be visible on
the main screen.
• SET NAME: enter a title for
the DVR (e.g. DVR1)
• iP/ddNS: enter the ddNS dOMAiN
NAME from the Registration Email
sent to you. (e.g. tomsmith.lorexddns.net)
• PORT: 7000 (by default)
• PASSWORd: Enter the system password (by default, 000000)
• Click Add TO LiST to save the DVR
4. Click OK to save your settings or click CANCEL to exit without
saving.
5. Right click on the DVR icon and select LiVE.
You will automatically log in to the dVR Remote View when you
launch Lorex Client 8.0 .
NOTE: Remote viewing is only compatible with Internet Explorer. Mozilla
Firefox, Opera, Safari and other browsers are not supported.
Comput
er - not included
EASY CONNECT iNSTANT REMOTE
ViEWiNG uSiNG YOiCS
STEP 3A
Skill Level
Intermediate
easy
advanced
Time
under 30 minutes
under 15 minutes
under 60 minutes
Hand Tools
Hardware
Router
Hi Speed
over 60 minutes
REMOTE ViEWiNG iNSTALLATiON GuidE
Time: 20 Minutes
Skills - Easy
Hardware
- PC
Easy Connect Setup
Router port forwarding is not required
Detailed instructions
available in the User Manual.
1
Go to http://lorex.yoics.com and
create an account.
NOTE: there is no “www” in front of the address. Use Internet
Explorer web browser only. The system must be connected to your
local network router for Yoics to automatically detect the system.
A pop-up window opens.
Click CONTiNuE in the
registration screen to
enable Yoics Easy Connect.
2
Under Yoics Device Name,
you can rename your
system (e.g. myoffice).
Click REGiSTER NOW.
After the registration, your
system will be detected
automatically.
3
Your system now appears
on the left side bar under
“My Stuff”
4
Click on the name of your device
under “My Stuff” on the left side
bar. Install ActiveX when
Internet Explorer prompts you.
5
NOTE: This service is
provided free of charge.
You do not have to click the
Upgrade Now button to use
the Remote Viewer service.
Connect
Enter your User Name (ADMIN)
and Password (000000) to login.
On the Welcome window click
on Web Viewer (Use overlay for
higher resolution) option to view
your device.
6
Congratulations! Now that you
have a Yoics account set up you
can log in to http://lorex.yoics.com
to remotely view your cameras
from anywhere in the world using
Internet Explorer web browser.
tomsmith
tomsmith_1
******
STEP 3B
STEP 3B
Skill Level
Intermediate
easy
advanced
Time
under 30 minutes
under 15 minutes
under 60 minutes
Hand Tools
Hardware
Router
Hi Speed
over 60 minutes
* For setup of instant Mobile Viewing and
MAC Compatibility refer to your user
Manual.
This step offers more advanced internet remote
monitoring features. if you are only interested
in instant remote viewing (Step 3A) you can skip
Step 3B.