background image

Warning:   

        This section is casual version of the series frame, non-professional version. For road cycling 

tour.  Very  bad  road  conditions  are  not  suitable  for  cross-country  road  washboard  roads.  Thus 

causing damage to the equipment the company does not undertake any responsibility! 


For your safety during the ride,  please loosen the fixing knob on “Connecting rod” before 

adjusting the angle of the screen. Fasten the same knob “Connecting rod” after you adjust the 

screen to the desirable angle. Here, we also kindly remind you not to adjust the screen during the 

ride. 


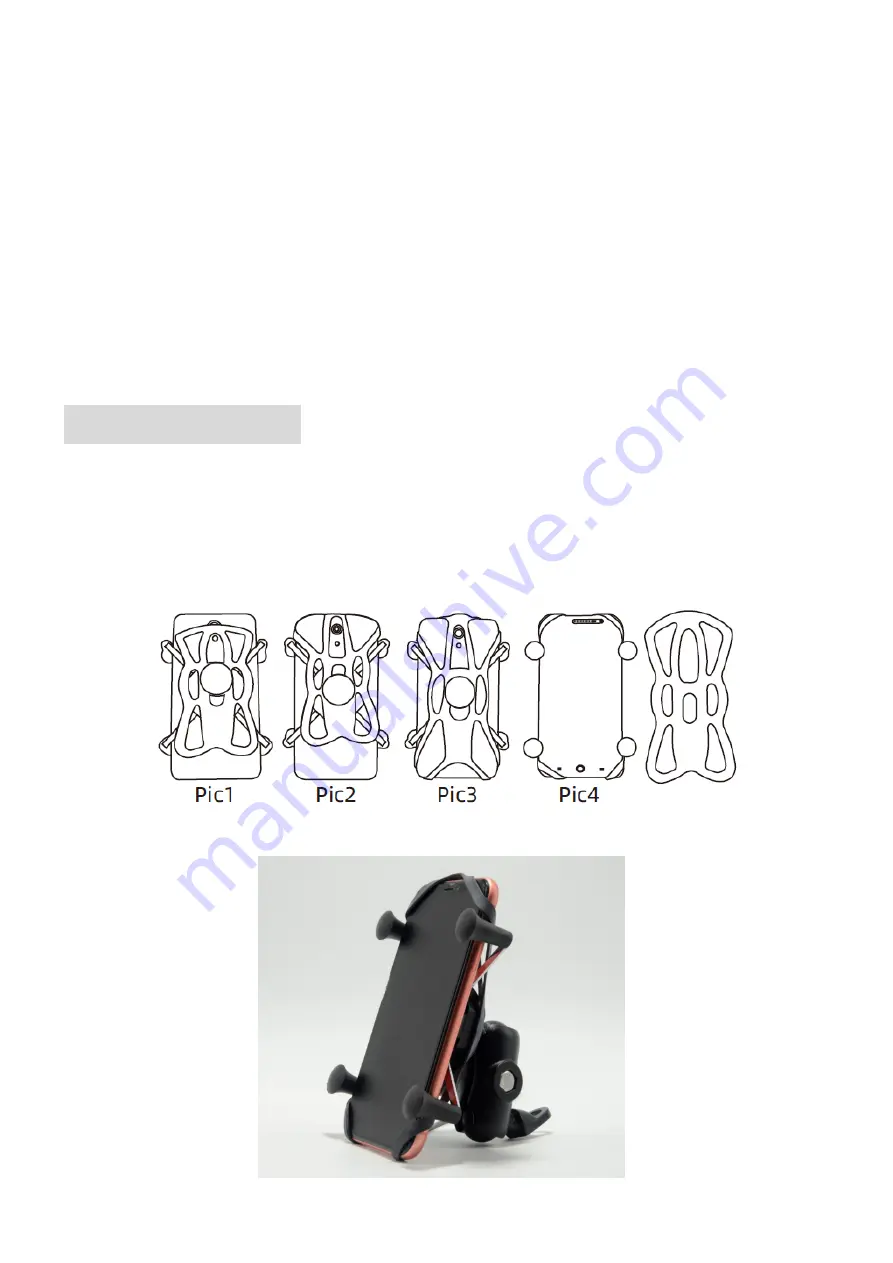
Bracket Mounting steps 

1. As shown in Pic 1, secure mounting ball through the hole in the middle. 

2. As shown in Pic 2

3

4, hook up four corners of the mobile. 

3. In order not to block the lens of the mobile phone, please adjust the position of the 

reinforcement net to the lower part of the mobile phone. 


Summary of Contents for XP-007

Page 1: ...2 in 1 phone holder and Qi wireless charger Version 1 0 ...

Page 2: ...installation methods can be mounted to the right size and round tubular base on Supports all types of protective cover clip used in conjunction The device can be easily mounted to the motorcycle dirt bike cruise cars station wagons utility vehicles and off road vehicles and other upper circular tube like using a base above Built in 10W fast wireless charging module the phone can be wirelessly char...

Page 3: ... nut head and the multi function clip on the fixed and confirmed firmly fixed before use As shown 2 Clamp Connecting rod onto spherical ball of fixed ball joint 3 Multi function clip and then fix the assembly to the other side of Connecting rod ...

Page 4: ...fixing knob on Connecting rod before adjusting the angle of the screen Fasten the same knob Connecting rod after you adjust the screen to the desirable angle Here we also kindly remind you not to adjust the screen during the ride Bracket Mounting steps 1 As shown in Pic 1 secure mounting ball through the hole in the middle 2 As shown in Pic 2 3 4 hook up four corners of the mobile 3 In order not t...

Page 5: ...e is not right after the screw is tightened As is shown in the picture 2 Assemble other pieces if necessary other pieces can be fixed on any position with screws whose mounting holes go with the ball head bolts Power Connection 1 Connect the red wire to the ACC positive and the black to the GND 2 Connect the USB receptacle line with the waterproof connector of the main line Item Parameters Input 9...

Page 6: ... if the charging part of the bracket is aligned with the wireless charging part of the mobile phone or if there is metal object between the wireless charging and the mobile phone holder Indicator description 1 Connect the wireless charging USB port to the smart management power cable connect the power cable to the motorcycle switch and the white indicator light is always on for about 4 seconds for...

Page 7: ... 170 70 100mm 245g Working Temp 20 60 FEATURES Efficient wireless charging speed with maximum 10W output just simply attach your smartphone 720 degrees rotated double ball bracket bases can be adjusted easily for perfect viewing angles IP67 waterproof dustproof and anti UV design to fit any environments Foreign Object Detection technology once a foreign object been detected the charging will stop ...

Reviews: