background image

Introduction 


2016/02/15  Version:  1.1 

9

1.3


Outlook   

RDT-150F POS terminal is easy-to-use and designed to enhance user business flexibility by offering 
a superior customer experience. Please follow the below instructions for more info of RDT-150F 
Series Terminal outlook and dimension.   


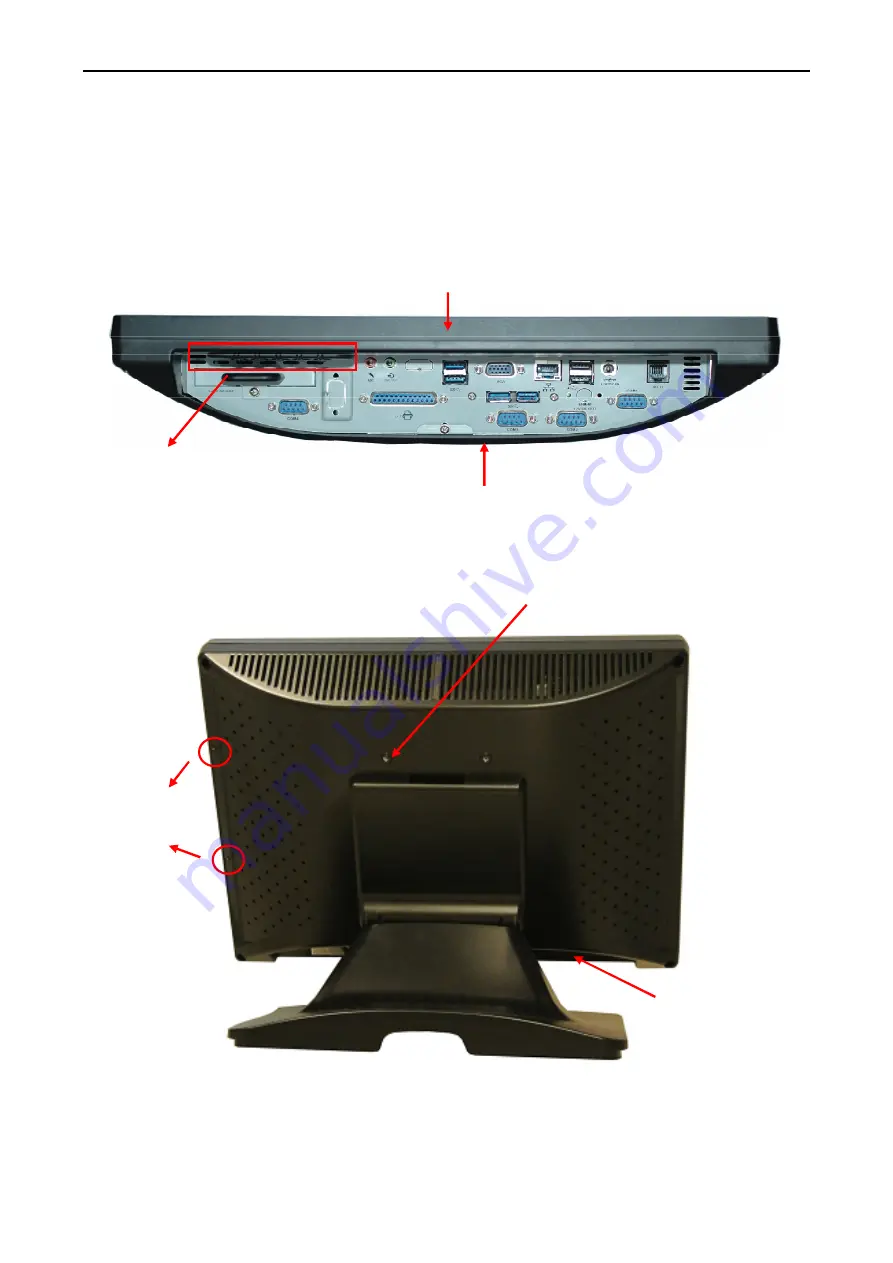
I/O Connector Ports 

(Button side of LCD panel)


Elegant, Solid, Fashionable Compact Design 

VFD Mounting 

Removable Hard drive   

MSR Mounting 

Control Buttons 

Power on/off, Up/Down, Reset 

Summary of Contents for RDT-150F Series

Page 1: ...Fanless Classy High Performance RDT 150F System Series USER S MANUAL Windows POS systems Intel Celeron Processor J1900 technology Version 1 1 Date February 15 2016 ...

Page 2: ...s how to setup and connect to user s terminal Copyright The information in this guide is subject to change without prior notice Copyright 2015 All rights reserved This product and related documentation are protected by copyright and are distributed under licenses restricting their use copying and distribution No part of this documentation may be reproduced in any form by any means without prior wr...

Page 3: ...equipment off and on the user is encouraged to try to correct the interference by one or more of the following measures Reorient or relocate the interference receiving antenna Increase the distance of separation between the equipment and interference receiver Connect the equipment to a power outlet on a circuit different from that to which the interference receiver is connected Consult the dealer ...

Page 4: ... frequency POWER SUPPLY SAFETY NOTICE Disconnect this terminal from the AC outlet before cleaning Use only a moistened cloth for cleaning Check the voltage of the power source when connecting the equipment to the power outlet Make sure the voltage of the power outlet conforms within voltage range of the terminal Failure to comply may cause the electric shock or damage to the terminal If you are no...

Page 5: ...provided on the sides of this unit Do not block any ventilation openings to prevent the equipment from overheat Do not place the unit locations with high humidity and dust They can cause extensive damage Avoid places where unit is likely to be exposed to oily fumes and vapors Places exposed to direct sunlight or near heating appliances can attain extremely high temperatures which may deform the ca...

Page 6: ...ON ANGLE 10 1 5 CONNECTOR PANEL 14 2 HARDWARE SETUP 15 2 1 PRE INSTALLATION NOTICE 15 2 2 HARDWARE ASSEMBLY 15 2 2 1 Motherboard Introduction 15 2 2 2 MSR and 2 in 1 Reader Installation 19 2 2 3 VFD Customer Display Installation 21 2 2 4 HDD SSD kit Installation 23 3 SPECIFICATIONS 25 3 1 TOUCH PANEL CALIBRATION 25 4 SPECIFICATIONS 30 ...

Page 7: ...ou purchased RDT 150F system terminal for assistance The package includes 1 RDT 150F main system with LCD panel 1 2 Power adapter with AC power cord 1 3 Driver CD 1 4 Jumper 5 Besides above standard items with POS RDT 150F Series terminal we also provide MSR VFD customer display 2 in 1 Reader and peripheral accessories as an optional Please refer to below for more info of optional items 1 Magnetic...

Page 8: ...lity c Easy maintenance Compact size Aesthetic design RDT 150F comes with 380 W x 239 19 D x 308 9 H mm dimension which is slimmer than POS industry standard size With this elegant economic and compact design user can save counter space and add appeal to the service environment Dust water proof RDT 150F features a highly durable rigorously tested design that is reliable and dependable in rugged en...

Page 9: ...exibility by offering a superior customer experience Please follow the below instructions for more info of RDT 150F Series Terminal outlook and dimension I O Connector Ports Button side of LCD panel Elegant Solid Fashionable Compact Design VFD Mounting Removable Hard drive MSR Mounting Control Buttons Power on off Up Down Reset ...

Page 10: ...Introduction 2016 02 15 Version 1 1 10 1 4 Dimension and Operation Angle 15 POS RDT 150F Terminal standard Dimensions 15 TFT LCD 1024 X 768 Resolution Touch Monitor Stand ...

Page 11: ...Introduction 2016 02 15 Version 1 1 11 15 POS RDT 150F Terminal with MSR Dimensions 15 POS RDT 150F Terminal with 2 in 1 Reader Dimensions ...

Page 12: ...Introduction 2016 02 15 Version 1 1 12 15 POS RDT 150F Terminal with VFD Customer Display Dimension 15 POS RDT 150F Terminal with 7 2nd Display ...

Page 13: ...Introduction 2016 02 15 Version 1 1 13 15 POS RDT 150F Terminal with 10 2nd Display Adjustable LCD Operation Angle Super Firm and Perfectly Secured LCD display Angles from 90 180 degree ...

Page 14: ...l Ports with 5V 12V power selectable VGA VGA Connector The VGA port is for external LCD or CRT monitor LAN 10 100 1000Mbps Ethernet Connect RDT 150F to network USB USB Connect to USB 2 0 device RDT 150F has 6 USB 2 0 connectors Printer Parallel Connect to receipt printer Cash Drawer RJ 11 12V 24V Connect to cash drawer Power Connector DC 12V IN Supply power to RDT 150F Please note that if DC 12V p...

Page 15: ...the Maximum memory support to 8G 5 The spill proof design of POS RDT 150F conforms to IP 65 standard from front bezel 2 2 Hardware Assembly POS RDT 50F terminal supports optional accessories such as MSR 2 in 1 Reader VFD customer 2nd display based on customized requirements This chapter will introduce how to assemble optional accessories Soft remind that the system power must be off and disconnect...

Page 16: ...Hardware Setup 2016 02 15 Version 1 1 16 Kindly refer to below table for main board introduction STEP 3 1 2 3 4 5 6 7 8 9 10 11 12 13 14 15 16 ...

Page 17: ...n 1 DC_JACK 2 USB 2 0 Port 3 LAN RJ_45 Port 4 VGA Port VGA1 5 USB 2 0 Port 6 HDMI Port HDMI1 7 Line Out Green 8 Microphone Pink 9 PWR_COM3 Jumper 10 PWR_COM4 Jumper 11 PWR_COM6 Jumper 12 Internal COM Port Headers COM 1 2 3 4 6 RS232 13 Printer Port Header ...

Page 18: ...tor 15 mSATA Select 1 2 SATA2_2 mini PCIe 2 3 mSATA SATA2_2 no function 16 USB 2 0 Connector for MSR 2 in 1 Reader Important Notice The default power electricity for RDT 150F COM port is 0 please follow item 9 10 11 intructions to change the power electricity ...

Page 19: ...ce Before installing kindly check the package content first The MSR package content includes 1 MSR 1 2 Screw 2 The 2 in 1 Card Reader package content includes 1 2 in 1 Reader 1 2 Screw 2 Install MSR 2 in 1 Reader for your RDT 150F Please turn off the system power Please remove RDT 150F cover to find the main board and plug MSR 2 in 1 reader cable to USB pin header Please refer to 2 2 1 Motherboard...

Page 20: ... cable to USB pin header successfully please open the below hole on the right side of device to pull out MSR 2 in 1 cable Assemble the terminal and screws MSR 2 in 1 Card Reader to the back side of the monitor MSR 2 in 1 Reader Integration completed STEP 3 STEP 4 STEP 5 ...

Page 21: ...s check the package contents when installing VFD to RDT 150F VFD Customer Display Package Content Includes 1 VFD 1 2 Screw 2 3 Driver CD 1 4 Adapter 1 Install a VFD customer display Please turn off the system power Please screw VFD on the back of the terminal and plug cable to COM 2 COM3 COM4 Secure VFD customer display is on the back side of the monitor STEP 1 STEP 2 COM4 COM3 COM2 ...

Page 22: ...d then turn on system power Important Notice The default power electricity for RDT 150F COM port is 0 Please change the power electricity to 5V or 12V before installing VFD customer display Kindly refer to 2 2 1 Motherboard Introduction for more info of changing power electricity STEP 3 ...

Page 23: ...below instructions for exchanging storage Please turn off the system power Please position the terminal as shown below on the working table and find the 2 5 SATA II HDD SSD kit on the button side of the LED display Please unscrew and pull out factory embedded 2 5 SATA II HDD SSD kit Please parallel push HDD or SSD kit into the terminal and screw it on the terminal STEP 1 STEP3 STEP 2 STEP4 ...

Page 24: ...Hardware Setup 2016 02 15 Version 1 1 24 Important Notice The terminal may be damaged if user aslant push in HDD SSD kit Please parallel push HDD or SSD kit into the device ...

Page 25: ...Win8 1 Before using RDT 150F please install the OS system as factory recommend Please follow the below instructions to calibrate the touch panel when successfully install OS system Soft remind that the factory setting for RDT 150F excludes OS system Please find the eGalax folder on RDT 150F table when installing CD driver And kindly click eGalax Touch folder to install eGalax Touch application STE...

Page 26: ...Software Setup 2016 02 15 Version 1 1 26 Please open eGalax Touch program to select Tool page and click 4 points calibration items for touch panel calibration STEP 2 ...

Page 27: ...Software Setup 2016 02 15 Version 1 1 27 Please click 4 points of screen for calibration STEP 3 ...

Page 28: ...Software Setup 2016 02 15 Version 1 1 28 ...

Page 29: ...tup 2016 02 15 Version 1 1 29 After 4 points calibration complete please click ok as below picture to continue using the terminal Important Notice Please calibrate the touch panel before using the ternimal STEP 4 ...

Page 30: ... Black Power Supply 80W 12V 6 6A power adapter External I O Ports USB 6 x USB 2 0 COM port 4 x DB 9 with 5V 12V power selectable VGA 1 LAN 1 x 10 100 1000Mbps Parallel 1 Audio I O 2 MIC and Line out Cash drawer 1 x RJ 11 12V 24V Expansion Slot PCI E Slot 1 Mini PCIe socket 2 1 shared with mSATA Optional Peripherals MSR 3 Tracks JIS I or II 2 in 1 Reader MSR i Button Customer Display 2 x 20 VFD RFI...

Page 31: ...0 C 32 F 104 F Storage Temperature 10 C 55 C 14 F 131 F Relative Humidity 10 90 Non Condensing Dimension Dimension 380 W x 217 D x 306 H mm Weight 5 3Kg Other Indicator Powe LED HDD LED Button Power on off Reset UP Down Buzzer Yes Product specifications are subject to change without prior notice ...

Reviews: