background image

Page 3

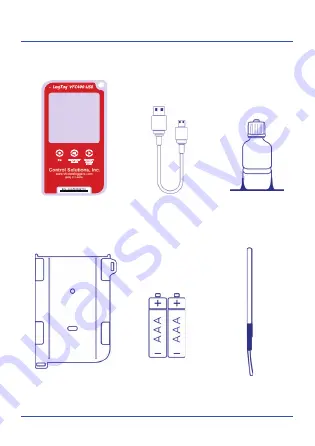
What’s included

Please check you have each of the items shown below before 
continuing with setting up your VFC400-USB.

VFC400-USB

USB Cable 

Installation & 

Mounting Kit 

Wall mount bracket 

(included)

External Probe

2x AAA Battery

Glycol Buffer with 

Acrylic Stand

Summary of Contents for VFC400-USB

Page 1: ...Version A www logtagrecorders com Quickstart Guide ...

Page 2: ... s included 3 Battery Installation 4 Downloading Control Solutions VTMC 5 Configuring your VFC400 USB 6 Installing the Wall Mount 7 Starting your VFC400 USB 8 Downloading Results 9 Quickstart Guide Contents ...

Page 3: ...check you have each of the items shown below before continuing with setting up your VFC400 USB VFC400 USB USB Cable Installation Mounting Kit Wall mount bracket included External Probe 2x AAA Battery Glycol Buffer with Acrylic Stand ...

Page 4: ... the direction each battery must be installed 3 Once both batteries are securely installed replace the battery cover and secure via the screw you used to open the cover The AAA batteries are the main power source for your VFC400 USB A 5V 5W USB power supply is another available source if you wish to power the unit permanently via the USB socket Warning Please note the VFC400 USB will not start if ...

Page 5: ...uble click the downloaded file to open Control Solutions VTMC Setup 3 Follow the on screen prompts to install Control Solutions VTMC 4 Click Finish to exit VTMC Setup Warning Please ensure no other LogTag software is currently running on your computer before running the Analyzer software Note If you already have the Control Solutions VTMC installed please see whether you need to update to the late...

Page 6: ... seal 1 Open Control Solutions VTMC 2 Click Configure from the LogTag menu or click the Wizard icon 3 Adjust your logger configuration settings as required For more information on configuration settings please refer to Configuring the VFC400 USB in the Product User Guide 4 Click Next to upload the configuration settings to the logger 5 Click Close to exit the configuration page ...

Page 7: ...trip provided with the Wall Mount Before sticking on the Wall Mount make sure the sensor cable and the USB cable from the VFC400 USB can both reach the device comfortably without obstruction or at risk of being accidentally disconnected if knocked Insert the VFC400 USB into the Wall Mount connect the USB and sensor cables The display should show the word READY as seen in the image right ...

Page 8: ... Logger will not start if You release the button before READY disappears You keep holding the button for more than 2 seconds after READY disappears The backup battery is critically low and the logger is not connected to power Please ensure you have connected an ST100X external probe to your device before starting Please ensure you have connected an ST100X external probe to your device before start...

Page 9: ...g from the Download menu or press F4 3 Click Close to exit the download page Connect your VFC400 USB to your computer via the USB cable provided The USB socket on the device is located on the bottom protected by a rubber seal A new device drive will appear in file explorer with the files containing the recorded data ...

Reviews: