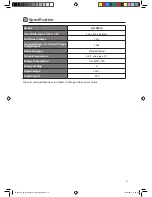
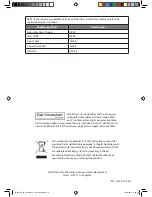
Logik LUL55S10 Instruction Manual Download Page 12

12

 Maintenance

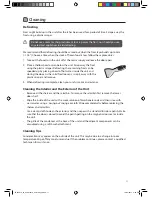
Changing the Internal Light

1.  Before carrying out the bulb replacement always 

adjust the thermostat control dial to Position 0, then 

disconnect the mains supply.

2.  Hold and unscrew the light bulb cover.
3.  Remove the plastic light bulb cover.
4.  Remove the old bulb by unscrewing in an anti-clockwise direction.
5.  Replace with a new bulb (10W SES). Please make sure that it is secure in the bulb cover.
6.  Refit the light bulb cover and reconnect the unit to the mains supply and switch on.

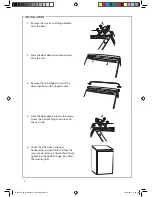
Care When Handling / Moving Your Unit

Hold the unit around its sides or base when moving it. Under no circumstances should it be 

lifted by holding the edges of the top surface.

Servicing

The unit should be serviced by an authorised engineer and only genuine spare parts should be 

used. Under no circumstances should you attempt to repair the unit yourself. Repairs carried 

out by inexperienced persons may cause injury or serious malfunction. Contact a qualified 

technician.

Switching Off for Long Periods of Time

When the unit is not in use for a long period of time, disconnect it from the mains supply, 

empty all food and clean the appliance, leaving the door ajar to prevent unpleasant smells.

 Disposal

Old units still have some residual value. An environmentally friendly method of disposal will 

ensure that valuable raw materials can be recovered and used again. The refrigerant used in 

your unit and insulation materials require special disposal procedures. Ensure that none of the 

pipes on the back of the unit are damaged prior to disposal.
Up to date information concerning options of disposing of your old unit and packaging from 

the new one can be obtained from your local council office.
When disposing of an old unit break off any old locks or latches and remove the door as a 

safeguard.

LUL55S10_IB_final110512_door change.indd   12

12/05/2011   4:26 PM

Summary of Contents for LUL55S10

Page 1: ...Undercounter Larder Fridge Instruction Manual LUL55S10 LUL55S10_IB_final110512_door change indd 1 12 05 2011 4 26 PM...

Page 2: ...LUL55S10_IB_final110512_door change indd 2 12 05 2011 4 26 PM...

Page 3: ...de the Unit 10 Shopping for Chilled Foods 10 Tips for Keeping Food Perfect in the Unit 10 Cleaning 11 Defrosting 11 Cleaning the Interior and the Exterior of the Unit 11 Cleaning Tips 11 Maintenance 1...

Page 4: ...oufor purchasing your new Logik Larder We recommend that you spend some time reading this instruction manual in order that you fully understand all the operational features it offers Read all the safe...

Page 5: ...unit backwards You should rest the unit on something solid e g a chair just below the top panel All parts removed must be saved to do the reinstallation of the door You should rest the unit on somethi...

Page 6: ...hinge Screw the bottom hinge into place on the new side 6 Check that the door is aligned horizontally and vertically and that the seals are closed on all sides before finally tightening the bottom hi...

Page 7: ...n the exterior of the unit with a damp cloth If you require more information refer to the Cleaning section Before Plugging in YOU MUST Check that you have a socket which is compatible with the plug su...

Page 8: ...view Adjustable Glass Shelves Glass Shelf Salad Bin Internal Light and Thermostat Control Dial Light Switch Lower Door Shelf Levelling Feet Door Shelves LUL55S10_IB_final110512_door change indd 8 12 0...

Page 9: ...4 To ensure that the unit is cool enough to sufficiently chill your food wait 24 hours before filling it with food 5 If you are concerned that your unit is not being kept cold enough and wish to chec...

Page 10: ...a car or at room temperature for a prolonged period of time could raise the food temperature to a dangerous level which allows harmful bacteria to grow Always unpack and place chilled food in the uni...

Page 11: ...rbonate soda and then rinse with warm water using a wrung out sponge or cloth Wipe completely dry before replacing the shelves and salad bin Use a damp cloth to clean the exterior and then wipe with a...

Page 12: ...epair the unit yourself Repairs carried out by inexperienced persons may cause injury or serious malfunction Contact a qualified technician Switching Off for Long Periods of Time When the unit is not...

Page 13: ...h Food Storage Compartment 126L Defrosting Type Manual Defrost Storage Temperature 0 8 C average 4 C Energy Consumption 0 41kWh 24h Energy Grading A Rated Voltage 230V Rated Current 0 7A Features and...

Page 14: ...as radiators or fires as refrigerant and vesicant are burnable Young children should be supervised to ensure that they do not play with the unit Do not damage the refrigerant circuit applicable only...

Page 15: ...uent opening of the doors for long periods will cause a loss of coldness Store food in an organised way If food is not stored in an organised way searching for an item will mean the door is open for l...

Page 16: ...should be disposed at the end of its life separately from your household waste There are separate collection systems for recycling in the EU For more information please contact the local authority or...

Page 17: ...LUL55S10_IB_final110512_door change indd 17 12 05 2011 4 26 PM...

Page 18: ...LUL55S10_IB_final110512_door change indd 18 12 05 2011 4 26 PM...

Page 19: ...LUL55S10_IB_final110512_door change indd 19 12 05 2011 4 26 PM...

Page 20: ...LUL55S10_IB_final110512_door change indd 20 12 05 2011 4 26 PM...

Reviews: