background image

29

If the IP address item shows a number in four sections separated by dots, then the unit is 

connected to your local network. If online services still do not work, you should check your router’s 

connection to the Internet. If “Not Connected” is shown, you should carefully check the broadband 

connection and the Network Configuration.
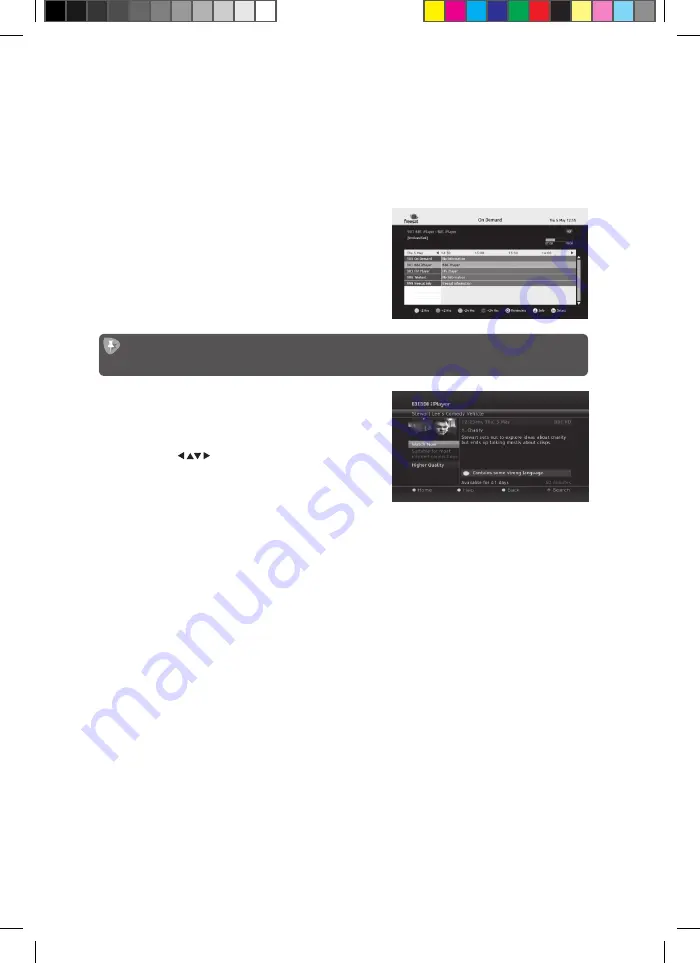
Watching Online TV

You can switch to online TV either through the 

interactive services on a channel providing online TV, or 

through an online channel chosen by number or using 

the channel list or programme guide.

The online TV channels are numbered from 900 and are in the On Demand section of the 

programme guide.

When you switch to an online TV channel, it may take 

a few seconds longer to show the picture than a freesat 

satellite channel. You will then need to progress 

through a series of menus, using the 

0-9 buttons, the 

colour buttons,       buttons and the OK button, to 

find and start the programme you want to watch. You 

go through these menus in a different way depending 

on the online broadcaster.

LHDFSAT11_IB_110725.indd   29

25/07/2011   10:15 AM

Summary of Contents for LHDFSAT11

Page 1: ...Instruction Manual Welcome to your new freesat satellite HD digital box How to set up and use your LHDFSAT11 LHDFSAT11_IB_110725 indd 1 25 07 2011 10 15 AM ...

Page 2: ...LHDFSAT11_IB_110725 indd 2 25 07 2011 10 15 AM ...

Page 3: ...urning On the Unit 13 Changing the Channel 13 Changing the Volume 13 Browsing Bar 14 Subtitles and Audio Description 15 Using the Channel List 15 Searching for a Channel 15 Regional Channels 16 Using the Programme Guide 16 Interactive TV Services 17 Recording Freesat Programmes 17 Advanced Use 18 The Lock Pin 18 Display Mode 18 TV DTV 18 Changing the Channel List 19 Using the Favourite Channels Li...

Page 4: ...llation 25 Add Non freesat Channels 25 Network Configuration 25 Parental Guidance 26 Hide Adult Channels 26 Lock Online Content 26 Set Lock Pin 26 Software Update Via OAD 27 OAD Software Manual Scan 27 Software Update Via USB 27 Restore Factory Default 27 Online TV 28 Setting Up for Online TV 28 Watching Online TV 29 Non freesat Channels 30 Tuning in Non freesat Channels 30 Watching Non freesat Ch...

Page 5: ...nd tips to help you resolve any issues Read all the safety instructions carefully before use and keep this instruction manual for future reference Remote Control P N 49141 B6312 Batteries P N 46106 00002 001 Mains Adapter P N 42011 00299 Instruction Manual P N LHDFSAT11 IB 002 HDMI Cable P N 45011 00441 Quick Start Guide P N LHDFSAT11 QSG 002 Unpacking Remove all packaging from the unit Retain the...

Page 6: ...ote control Rear View LNB IN 6 8 7 9 10 11 12 13 6 LNB IN Input for connecting to the satellite dish 7 RJ 45 Network socket for connecting to the Internet 8 USB Socket for upgrading the unit s software 9 SPDIF Optical audio output for connecting to a digital audio system 10 HDMI Output for connection to a HD ready TV 11 TV SCART Output for connection to a non HD TV 12 VCR SCART Output input for co...

Page 7: ...e screen display modes 11 Colour Buttons Red Green Yellow Blue Chooses options within menus 12 MUTE Button Silences the unit s sound 13 Button Displays your favourite channels lists and adds channels to them in the channel list 14 Button Displays channel and programme information 15 OK Button Selects the option in a menu 16 LIST Button Displays the channel list Remote Control 17 EXIT Button Exits ...

Page 8: ...es Do not install new batteries with used ones and do not mix different types of batteries Do not dispose of used batteries as domestic waste Dispose of them in accordance with local regulations Handling the Remote Control Take care of your fingernails when you press and hold the battery release tab Do not drop or cause impact to the remote control Do not spill water or any liquid on the remote co...

Page 9: ...o receive freesat you must connect your unit to an appropriate satellite dish fixed in position and accurately pointed at the 28 2 East satellite position For safety reasons and to provide reliable reception we strongly recommend that you have your dish installed by a professional You may be able to use a satellite dish already installed at your home If you have any questions about the satellite d...

Page 10: ...re is open Monday Saturday 8am 8pm or Sunday 8am 6pm 3 Plug the mains adapter into the POWER socket at the back of the unit and then plug it into an available mains socket that is turned off 4 You may have other equipment such as a DVD recorder or surround sound system to connect to the unit 5 A video recorder or DVD recorder may be connected to the unit to record freesat programmes and to play th...

Page 11: ...take some time to perform the first time installation when using the unit for the first time 2 The signal check screen shows the strength and quality of the freesat signal received from your satellite dish If the signal strength or quality is below 50 you should check the satellite dish connection at the back of the unit switch the unit off and reconnect the cable if necessary If the connection is...

Page 12: ... introduced you do not need to retune the unit because it is automatically updated 5 The unit will take a couple of minutes to find and store the available freesat channels The number of freesat TV and radio channels found is shown on the screen as the scan proceeds along with an indication of how far the scan has to go When the scan is complete press the OK button to proceed 6 To use the unit s p...

Page 13: ...ons on the remote control or the CH CH buttons on the front of the unit Press the P or CH button to select the next channel in the channel list Press the P or CH button to select the previous channel in the list If you know the channel s number you can switch directly to the channel you want by using the 0 9 buttons on the remote control As you enter a channel number each digit appears at the top ...

Page 14: ...cate the programme is in High Definition subtitles are available Audio Description is available Dolby Digital audio is available parental guidance is advised as the programme contains language or scenes that may not be suitable for children the channel is locked see the Advanced Use section an HD version is available on another channel press the button for further details While the bar is displaye...

Page 15: ...displays a preview window of the currently selected channel on the right hand side of the screen You can return to watching TV at any time by pressing the EXIT button You can also display the channel list by pressing the OK button while watching TV Move a page at a time through the channel list by using the P P buttons Press the buttons to highlight a channel and then press the OK button to view i...

Page 16: ...o the programme guide for all of the channels The programme guide shows a table of the programmes with each page showing eight channels over a two hour period Information on the highlighted programme is shown above the table and you can read a full summary by pressing the button Press the button again to remove the summary box The current date and time is displayed at the top right of the screen a...

Page 17: ...ange of digital text and interactive services such as news weather games sports information and video alongside normal TV If interactive services are available they will be indicated by an on screen prompt usually a red button in the top right hand corner of the screen You can use the interactive options by pressing the TXT button or the RED button while watching the TV channel This will display a...

Page 18: ...e MODE button will take you through the three available options If you have set up your unit for a 16 9 Widescreen TV the options are Auto the broadcaster chooses the best display format Widescreen a 4 3 broadcast is stretched to fill the 16 9 screen Pillarbox a 4 3 broadcast is shown unaltered with black bars on each side If you have set up your unit for a 4 3 Traditional TV the options are Auto ...

Page 19: ...list using the on screen keyboard Changing the Channel List The channel list contains all the freesat channels that the unit found when it was first installed and may include some channels that you do not watch do not want to include in the on screen list or do not want some members of your family to watch If you want to alter the channel list first press the LIST button to display the channel lis...

Page 20: ...CK button or the EXIT button to exit the main menu HDCP 1 Press the MENU button to enter the SETUP menu 2 Press the buttons to select General in the section bar Press the buttons to select HDCP 3 Press the OK button to switch on or off the HDCP High bandwidth Digital Copy Protection on the unit s HDMI output If the broadcaster has flagged that a programme must use HDCP this has no effect 4 Press t...

Page 21: ...ress the buttons to choose between 16 9 Widescreen and 4 3 Traditional Press the OK button to confirm your choice 4 Press the BACK button or the EXIT button to exit the main menu Display Mode 1 Press the MENU button to enter the SETUP menu 2 Press the buttons to select Picture in the section bar and then press the buttons to select Display Mode 3 Press the OK button to display the Display Mode men...

Page 22: ...e menu and then press the buttons to select the desired language you want for the sound track Press the OK button to confirm your choice 4 Press the BACK button or the EXIT button to exit the main menu If you set an incompatible resolution or move your unit to a different TV that doesn t support the active resolution ensure the unit is turned on and then press and hold the MODE button for 10 secon...

Page 23: ...d you watch programmes with Dolby Digital sound the unit will decode the audio for you 4 Press the BACK button or the EXIT button to exit the main menu Lip Sync Delay Resolution If you find the sound and picture falling out of sync you can delay the sound output by a small amount to compensate 1 Press the MENU button to enter the Setup menu 2 Press the buttons to select Sound in the section bar Pr...

Page 24: ...s to select Time in the section bar Press the buttons to select Auto Turn On 3 Press the OK button to show the Sleep Timer menu and then press the buttons to show the auto turn on menu and then press the buttons to set the timer to turn the unit on once every day each week on weekdays weekends or particular days of the week Then press the buttons along with the buttons and the 0 9 buttons to set t...

Page 25: ...ls you have deleted from the channel list 4 Press the BACK button or the EXIT button to exit the main menu Add Non freesat Channels 1 Press the MENU button to enter the Setup menu 2 Press the buttons to select System in the section bar Press the buttons to select Add Non freesat Channels 3 Press the OK button to tune the Non freesat Channels See the Non freesat Channels section of this instruction...

Page 26: ...ACK button or the EXIT button to exit the main menu Lock Online Content 1 Press the MENU button to enter the Setup menu 2 Press the buttons to select System in the section bar Press the buttons to select Lock Online Content 3 Press the OK button to turn on or off the online content lock that prevents any online services being viewed without first entering the lock PIN See the Online TV section of ...

Page 27: ...e Update Via USB 3 Press the OK button to load new software for the unit from a storage device connected to the USB socket on the back of the unit You can only load update software from the USB socket and it must be in the correct format to update successfully 4 Press the BACK button or the EXIT button to exit the main menu Restore Factory Default 1 Press the MENU button to enter the Setup menu 2 ...

Page 28: ...splay the menu You should check that the Network Configuration menu option shows DHCP to automatically configure the network connection If your broadband modem router is not compatible with DHCP Dynamic Host Configuration Protocol you will need to set the addresses manually Press the buttons to change the configuration to Static and for each of the addresses in turn IP Address Subnet Mask Router A...

Page 29: ...ing online TV or through an online channel chosen by number or using the channel list or programme guide The online TV channels are numbered from 900 and are in the On Demand section of the programme guide When you switch to an online TV channel it may take a few seconds longer to show the picture than a freesat satellite channel You will then need to progress through a series of menus using the 0...

Page 30: ...nnels you must enter the tuning details for an individual transponder a group of channels 4 Enter the frequency and symbol rate of the transponder to scan using the 0 9 buttons and its polarization by using the buttons You can move between the three items using the buttons When you have entered the tuning information press the OK button to start the scan 5 The unit will take a few moments to compl...

Page 31: ...se the freesat channels Press the button or the buttons to display the information bar and then press the buttons to see what is showing at the moment on any of the other non freesat channels and the button to see the programmes on next Non freesat TV channels are stored from channel number 3001 and non freesat radio channels from 4001 The programme guide does not display non freesat channels When...

Page 32: ...ller if necessary Signal strength below 50 Satellite dish in the wrong position Reinstall the satellite dish Consult your installer if necessary Not accepting postcode Broadcast error Postcode tables are not being transmitted Press GREEN button to activate default tuning No signal message Cable from the satellite dish disconnected Satellite dish damaged or in the wrong position Check the satellite...

Page 33: ...locked Choose the channel from the channel list Enter the PIN If you have forgotten the PIN phone the helpline on 020 8450 0005 No information for a channel in the programme guide Information on the channel not downloaded You are on a non freesat channel Wait for the download Select a freesat channel No digital text or interactive services Services not available on chosen channel Switch to a chann...

Page 34: ... 9 and letter box Audio TV VCR SCART Output Audio Left Right Optical SPDIF Output Dolby Digital Dolby Digital PCM USB Host 2 0 5V 1A max for software upgrade only Internet Connectivity Ethernet RJ 45 10 100 Base T with green Link LED yellow Data LED Power Requirements Mains input voltage 100 240VAC 50Hz Power Consumption Max 10W LNB with 200mA Standby less than 1W Dimensions Width Depth and Height...

Page 35: ... in cabinet or in another confined space Ensure the unit is well ventilated Safety Always disconnect the unit from the mains supply before connecting disconnecting other devices or moving the unit Unplug the unit from the mains socket during a lightning storm Mains Adapter Cable Make sure the unit or unit stand is not resting on top of the mains cable as the weight of the unit may damage the mains...

Page 36: ...important operating and maintenance servicing instructions in the manual accompanying the unit Service To reduce the risk of electric shock do not remove screws The unit does not contain any user serviceable parts Please leave all maintenance work to qualified personnel Do not open any fixed covers as this may expose dangerous voltages Maintenance Ensure to unplug the unit from the mains socket be...

Page 37: ...sehold waste There are separate collection systems for recycling in the EU For more information please contact the local authority or your retailer where you purchased the product The freesat service is marketed by Freesat UK Ltd registered company number 6250097 The freesat word and logo are trademarks of Freesat UK Ltd and are used under licence DVB is a trademark of the Digital Video Boardcasti...

Page 38: ...LHDFSAT11_IB_110725 indd 38 25 07 2011 10 15 AM ...

Page 39: ...LHDFSAT11_IB_110725 indd 39 25 07 2011 10 15 AM ...

Page 40: ... about freesat at w w w f r e e s a t c o u k Follow freesat on w w w t w i t t e r c o m f r e e s a t _ T V Like freesat on w w w f a c e b o o k c o m f r e e s a t LHDFSAT11_IB_110725 indd 40 25 07 2011 10 15 AM ...

Reviews: