background image

7

Use only the mains adapter provided for the base unit.

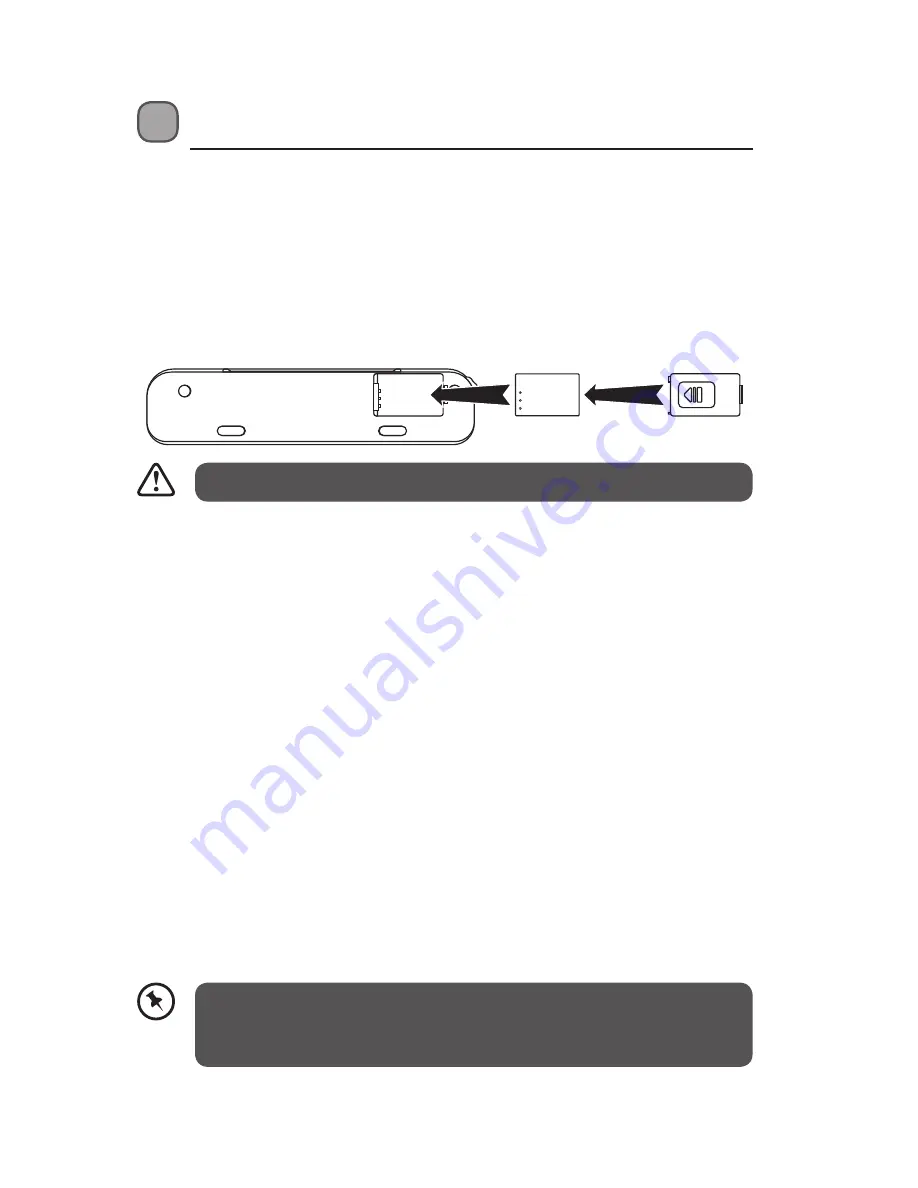
  Installing and Charging Battery

1.  Slide open the battery compartment cover.
2.  Place the lithium battery as indicated. Follow the polarity indicated on the 

scanner.

3.  Slide the battery compartment cover back on.
4.  Plug the mains adaptor to the scanner.
5.  Plug the mains adaptor into the mains socket. Charge the scanner for 14 

hours the first time you charge it.

Battery Status

All the battery status will emit in the Battery Indicator.

Battery power indicator
When the scanner power is on: 

•  Green light indicate: 

The battery is of full capacity

•  Orange light indicate: 

The battery is of medium capacity.

•  Red light indicate: 

The battery is of low capacity.

Charging Battery
When the battery power indicator is light red that mean the battery power 

almost empty and need to recharge it.
1.  Power off the scanner.
2.  Connect scanner to PC USB ports or adaptor and the Battery Indicator 

show the charge status as below :

•  Red light indicate: 

Charging battery.

•  Blank light indicate: 

The battery has fully charged.

• 

The adaptor is for recharge only.

• 

Fully charged it before to use the scanner.

• 

Please don’t turn on or scan while battery is charging.

Summary of Contents for L4SCAN11

Page 1: ...Portable A4 Scanner Instruction Manual L4SCAN11 ...

Page 2: ...tus 7 Operation 9 Select the Scan File Format 10 Scan an Original 11 Power off the Scanner 12 Connecting to a Computer 13 Connect the scanner to a computer 13 Disconnect the scanner from a computer 14 Arcsoft BizScanner 15 Install BizScanner 15 Run BizScanner 17 Start to Use BizScanner 18 Maintenance 24 Calibrating the scanner 24 Cleaning the Sensor Glass 25 Hints and Tips 26 Specifications 27 Saf...

Page 3: ...you fully understand all the operational features it offers You will also find some hints and tips to help you resolve any issues Read all the safety instructions carefully before use and keep this instruction manual for future reference Software Disc P N 2D1 PS003 D0161A CIS Cleaning Swab P N 2AX PS003 00001 Mains Adapter P N 060 CAP00 50513 Calibration Card P N 2P8 PS003 0001 USB Cable P N 052 U...

Page 4: ...Windows XP Vista Windows 7 Support Windows OS only Pentium IV 2 4 GHz or equivalent AMD Athlon 512 MB DDR RAM or above 500MB free hard disk space 32 bit color display at 800x600 with DirectX 3D support DirectX 9 0c or above ...

Page 5: ... Product Overview 6 7 8 9 10 3 1 2 4 5 1 Power Button 2 Custom Button 3 Battery Indicator 4 Function Indicator 5 Feeding Slot 6 SD Slot 7 USB Slot 8 PC Connection Port 9 Battery Cover 10 Roller Releaser ...

Page 6: ...ange Green Battery is medium and the file format is PDF On Red Red Blink Battery low and no SD card or lock flash disk or paper jam USB Connect for recharge battery only or read copy file Indicator Power LED 1 Battery LED 2 Function Status Off Red Off Charging battery Off Off Off Battery fully charged On Green Orange Battery full and can read or copy file from PC or Mac On Green Orange Blink Conne...

Page 7: ... Battery power indicator When the scanner power is on Green light indicate The battery is of full capacity Orange light indicate The battery is of medium capacity Red light indicate The battery is of low capacity Charging Battery When the battery power indicator is light red that mean the battery power almost empty and need to recharge it 1 Power off the scanner 2 Connect scanner to PC USB ports o...

Page 8: ...tall the batteries correctly by following the polarity and indications in the battery compartment Use only the types of the batteries which are indicated in this manual Do not install new batteries with used ones and do not mix different types of batteries Do not dispose of the used batteries as domestic waste Dispose of them in accordance with local regulations ...

Page 9: ...ion 2 Press and hold the button for about 0 5 seconds The Function Indicator green light blinks 3 Wait until the Function Indicator stops blinking then change to orange and stays on to indicate the scanner is ready 1 Insert a memory card into the memory card slot or a flash disk into the flash disk slot Function Indicator ...

Page 10: ...ile format is JPG Green Steadily on The scanner is ready for use and the file format is PDF Orange Green Blinks Continuously Initializing system and memory card Please wait until the initialization process is complete before using the scanner Busy scanning and storing image files Please wait until the process is complete before scanning another original Sensor cleaning in progress Please wait unti...

Page 11: ...d the date time attribute will not be added If the memory card is near full lower than 1MB the power indicator light blinks Use another card or delete some files on it if necessary Insert only one original at a time and insert the next original only when the previous one is done and the blinking has stopped otherwise the scanner may malfunction The scanner will not scan when the power adapter is c...

Page 12: ...iginal to jam in the slot Originals thicker than 0 5mm Originals with either side shorter than 50mm below 2 Originals with lots of black or dark colors Originals with dark colors surrounding the edges Transparencies filmstrips celluloid etc Printed images pictures on newspapers magazines etc Soft and thin materials thin paper cloth etc Originals that exceed or below the acceptable size 4 The scann...

Page 13: ...devices Connect the scanner to a computer Must use the dual plugs of USB cable in the packing to connect scanner with PC 1 Insert a memory card or flash disk that contain your scanned images into the memory card slot 2 Connect the mini end of the USB cable included with scanner to the Mini USB connector on the scanner USB TO PC 3 Power on your PC then connect the dual plug of USB cable to USB port...

Page 14: ...or flash disk and the scanned image will be saved in JPEG or PDF file format 7 You can now view or edit the files on the memory card or flash disk using your own graphic editing software Disconnect the scanner from a computer 1 On the Windows System Tray click the hardware removal icon 2 Click the Safely remove USB mass Storage device message with the corresponding Drive 3 When the Safe to Remove ...

Page 15: ...g the need to manually type in names phones and other key information BizScanner also provides convenient tools for you to manage all business cards With just a few clicks you can synchronize the application s database with other programs such as Microsoft Office Outlook and so on Install BizScanner The BizScanner only support Windows OS 1 Insert the installation CD into the CD ROM drive and click...

Page 16: ...16 3 Install completely ...

Page 17: ...un BizScanner There are several ways that you can launch BizScanner Double click BizScanner icon on the desktop or right click the icon and select open Click Start All Programs ArcSoft BizScanner BizScanner ...

Page 18: ...18 Start to Use BizScanner Input Business Cards Input Switch to Input Business Cards to quickly and easily capture contact information from business cards Input business cards main screen ...

Page 19: ...siness cards Select thumbnail and detailed contact information of that card is displayed To remove a specific business card before importing it to the database click the Delete icon located on the bottom right corner of the selected thumbnail Contact Information Displays detailed information of the selected business card Any characters that do not appear correct are highlighted Modify any informat...

Page 20: ...20 Manage Business cards Manage Switch to Manage Business Cards to manage the application s database and preview all imported business cards Manage business cards main screen ...

Page 21: ...o a CSV file a file format used for the digital storage of data structured in a table of lists Backup Restore Select Backup from the drop down list to save the selected business cards as a backup If you delete any card by mistake use Restore from the drop down list and import all backup cards to the database Search Sort business cards by keywords BizScanner searches all business cards and displays...

Page 22: ... selected at the same time List View Displays detailed information in a table format E mail and website addresses are displayed in hyperlink format Click to send an e mail or visit the website Thumbnail View Displays business cards as thumbnails to provide a direct way of viewing contact information ...

Page 23: ...ard to go to the Edit screen The main screen is as follows After editing the card click Confirm to save your modifications Use the Previous and Next buttons to navigate to any card you want to modify Repeat the editing process When done click OK to save your modifications and close the Edit window or you can click Cancel to quit without saving the modifications that have not been confirmed Delete ...

Page 24: ...nd of right side 3 Press and hold the power button for about 0 5 second to power the scanner on 4 Press and hold the button until the indicator LED blinks 6 Insert the calibration card to the feed slot in 5 seconds 7 The scanner starts calibrating 8 The calibration chart will move and stop some time then reject when calibrate done Always keep the calibration card clean and avoid dirty scrape or wr...

Page 25: ...lean To clean the sensor glass 1 With the scanner powered off and disconnected from the power supply 2 Press the Roller Releaser to reveal the glass 3 Wet the supplied cleaning swab with some alcohol 95 4 Slide in the CIS cleaning swab then left and right on the glass five or six times consecutively 5 Remove the CIS cleaning swab store it in a safe place and protect it from dust ...

Page 26: ...ite protect Unlock the card Is the memory card full The indicator blinks when the free space on the memory card is below 1MB Use another card if necessary Make sure the memory cards are in FAT or FAT32 file formats only not NTFS or any other file format Did you insert the next original before the scanning process of the previous one was completed Power the scanner off and back on and try again Mak...

Page 27: ...ctivity Acts like removable storage device Optical Resolution 1200 dpi Scan resolution 300 dpi Scan Speed Less than 10sec jpg A4 Size Scan Element Type Contact Image Sensor Output format JPEG color 48bit PDF Gray 24bit Auto crop Yes Color match Yes Calibration Yes Input USB 2 0 Power consumption 5V 1A Dimension L 292 3 x H 56 x W 72 7 mm We continually strive to improve our products Specifications...

Page 28: ...away from water and other liquids Do not use the scanner with wet hands Never use the scanner in the rain or snow Moisture creates the danger of fire and electric shock Keep the scanner and its accessories out of the reach of children and animals to prevent accidents or damage to the scanner If you notice smoke or a strange odor coming from the scanner turn the power off immediately Take the scann...

Page 29: ... instructions means that your electrical and electronic equipment should be disposed at the end of its life separately from your household waste There are separate collection systems for recycling in the EU For more information please contact the local authority or your retailer where you purchased the product P N 2D1 PS003 D0161A Visit Partmaster co uk today for the easiest way to buy electrical ...

Page 30: ......

Reviews: