background image

12

Connections

This section involves various methods of connecting the product to other 

external components. Ensure all audio connections of the unit are connected 

before connecting to the mains power socket.

After the unit is connected to an external device, audio will only be heard from 

the soundbar while the connected device is used as a source output.

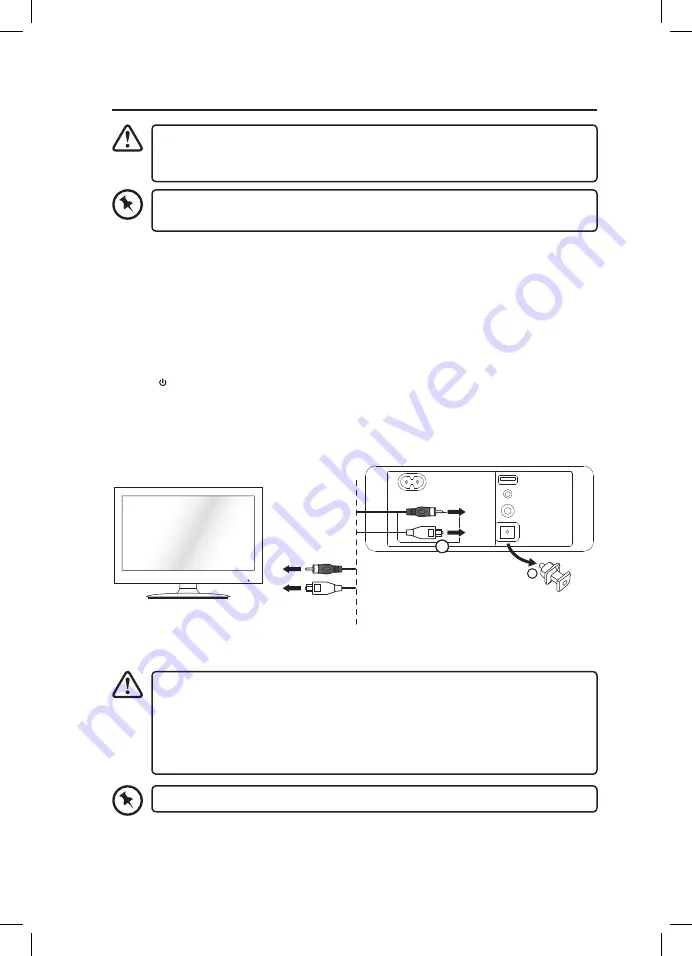
Method 1: Optical / Coaxial Connection

Use an optical cable (not included) / coaxial cable (included) to connect the soundbar’s 

OPTICAL / COAXIAL socket to the OPTICAL OUT / COAXIAL OUT socket of the external 

device. The simplest option is to connect your soundbar directly to your TV. If you connect 

the soundbar to another external device (e.g. Blu-Ray player), you will hear the sound from 

that device through the soundbar.
After the connection is complete,
1.  Press   button on the unit or remote control to switch on the unit.
2.  Press SRC button on the unit repeatedly or press OPTICAL or COAXIAL button on the 

remote control to select Optical or Coaxial mode.

AC~

SERVICE ONLY

AUX

COAXIAL

OPTICAL

1

2

Optical cable 

(not included)

Coaxial cable 

(included)

TV

Rear view of the unit

DO NOT connect the soundbar to the TV through its Yellow/Red/White sockets.

The unit may not be able to decode all digital audio formats from the input 

source. In this case, the Optical/Coaxial indicator will flash quickly, and the unit 

will prompt “Unsupported format, please refer to the Instruction Book”. This 

is NOT a defect. Ensure that the audio setting of the input source (e.g. TV, game 

console, DVD player, etc.) is set to PCM (Refer to the user manual of the input 

source device for its audio setting details) with Optical/Coaxial input.

L32SBIN16_IB_Final191216V8.indd   12

17/12/2019   11:08

Summary of Contents for L32SBIN16

Page 1: ...2 1CH Soundbar with Built in Subwoofer Instruction Manual L32SBIN16 L32SBIN16_IB_Final191216V8 indd 1 17 12 2019 11 08 ...

Page 2: ...L32SBIN16_IB_Final191216V8 indd 2 17 12 2019 11 08 ...

Page 3: ...s 12 Method 1 Optical Coaxial Connection 12 Method 2 Using the AUX Connection 13 Method 3 Connecting to an external device 14 Connecting to the Mains Supply 14 General Operation 15 Selecting Modes 15 Adjusting the Volume 15 Selecting the Equaliser 15 Adjusting the Bass Treble Level in CUSTOM EQ mode 16 Bluetooth Operation 16 Listen to Music from Bluetooth Device 17 Maintenance 17 Hints and Tips 18...

Page 4: ...t off at the mains immediately Withdraw the mains plug and consult your dealer Safety Warnings Ventilation To prevent the risk of electric shock or fire hazard due to overheating ensure that curtains and other materials do not obstruct the ventilation vents A minimum distance of 5cm around the unit should be maintained to allow for sufficient ventilation Do not install or place this unit in a book...

Page 5: ...uninsulated dangerous voltage within the unit s enclosure that may be of sufficient magnitude to constitute a risk of electric shock The exclamation point within an equilateral triangle is intended to alert the user to the presence of important operating and maintenance servicing instructions in the manual accompanying the unit Service To reduce the risk of electric shock do not remove screws The ...

Page 6: ... purchasing your new product We recommend that you spend some time reading this instruction manual in order that you fully understand all the operational features it offers You will also find some hints and tips to help you resolve any issues Read all the safety instructions carefully before use and keep this instruction manual for future reference If items are missing or damaged please contact Pa...

Page 7: ...th Optical or Coaxial mode 1 AC Socket 2 SERVICE ONLY Socket The USB socket is for service only It is not designed to charge smartphones tablets or similar devices 4 Optical Indicator Light up orange in Optical mode Light up once while selecting MOVIE EQ effect 5 Coaxial Indicator Flash orange in Coaxial mode 2 3 4 5 1 AC SERVICE ONLY AUX COAXIAL OPTICAL 1 3 4 5 2 3 AUX Socket 4 COAXIAL Socket 5 O...

Page 8: ...the Plastic Strip from the Remote Control Remove the plastic strip from the battery if the battery is being used for the first time It is located at the bottom rear of the remote control 9 CUSTOM Button Press to select the default EQ setting 10 MUTE Button Silence the unit or restore the sound 11 BT Button Press to select Bluetooth mode 12 PAIR Button Press to activate the pairing function in Blue...

Page 9: ...waste Dispose of it in accordance with local regulations Small button cell batteries such as the one used in the remote control are easily swallowed by young children and this is dangerous Keep loose button cells away from young children and make sure that the battery is secure in the remote control Seek medical advice if you believe a battery cell has been swallowed Handling the Remote Control Ta...

Page 10: ...n must be carried out by qualified personnel only Incorrect assembly can result in severe personal injury and property damage if you intend to install this product yourself you must check for installations such as electrical wiring and plumbing that may be buried inside the wall It is the installer s responsibility to verify that the wall will safely support the total load of the soundbar Addition...

Page 11: ...57 mm ø2 5 3mm ø 6mm 657 mm 657 mm 5 mm 25 30 mm 4 Leave a 5 mm gap between the wall and the screw s head Lift the unit with the attached wall brackets over the heads of the screws and slot into place Wall mounting with dowels and screws Wall mounting with screws only Make sure that the mounting screws are in the centre of the timer stud L32SBIN16_IB_Final191216V8 indd 11 17 12 2019 11 08 ...

Page 12: ...ugh the soundbar After the connection is complete 1 Press button on the unit or remote control to switch on the unit 2 Press SRC button on the unit repeatedly or press OPTICAL or COAXIAL button on the remote control to select Optical or Coaxial mode AC SERVICE ONLY AUX COAXIAL OPTICAL 1 2 Optical cable not included Coaxial cable included TV Rear view of the unit DO NOT connect the soundbar to the ...

Page 13: ...ss button on the unit or remote control to switch on the unit 2 Press SRC button on the unit repeatedly or press AUX button on the remote control to select AUX mode AC SERVICE ONLY AUX COAXIAL OPTICAL Please refer to the user manual of your TV to change the functionality of your headphone socket to a line out if possible 3 5 mm to 3 5 mm Stereo Audio Cable included AUDIO OUT HEADPHONE Socket Set t...

Page 14: ...rom the mains sockets Ensure all audio connections of the unit are connected before connecting to the mains power socket AC SERVICE ONLY AUX COAXIAL OPTICAL AC SERVICE ONLY AUX COAXIAL OPTICAL Method 3 Connecting to an external device Use the 3 5 mm to RCA stereo audio cable not included to connect the AUDIO OUT sockets L R of an external device to the unit s AUX socket 1 Press button on the unit ...

Page 15: ... to adjust the volume If you wish to turn the sound off press the MUTE button on the remote control Press the MUTE button again or press the VOL button to resume normal listening While adjusting the volume the status indicator flashes quickly While the volume level reaches its maximum level if you press the VOL button again the status indicator flashes once While the volume level reaches its minim...

Page 16: ...t L32SBIN16 and enter 0000 for password if necessary 4 On successful pairing you will hear Paired from the unit and the Bluetooth indicator will light up steadily To disconnect the Bluetooth function switch to another function on the unit or disable the function from your Bluetooth device or press the PAIR button on the remote control After the Bluetooth device is disconnected from the soundbar yo...

Page 17: ...again Listen to Music from Bluetooth Device If the connected Bluetooth device supports Advanced Audio Distribution Profile A2DP you can listen to the music stored on the device through the player If the device also supports Audio Video Remote Control Profile AVRCP you can use the player s remote control to play music stored on the device 1 Pair your device with the player 2 Play music via your dev...

Page 18: ...OL Button to resume normal listening Ensure the audio setting of the input source e g TV game console DVD player etc is set to PCM mode while using optical or coaxial connection The sound output effect sounds unfamiliar Press the EQ Button on the unit repeatedly or press CUSTOM MOVIE MUSIC button on the remote control for the optimal sound output effect I cannot find L32SBIN16 on my Bluetooth devi...

Page 19: ...W Network Standby Power Consumption 2 0 W Time interval for power management function switches the unit automatically into Another Condition Sound bar was connected to AC mains via detachable power cordset and without status display and the USB port with 5V output and all network ports are deactivated Switch to another condition within 15 minutes after intended use Power consumption in network sta...

Page 20: ...s with normal household waste For more information please contact the local authority or your retailer where you purchased the product In the unlikely event of a problem developing please contact the store where you purchased your equipment We continually strive to improve our products specifications may change without prior notice For advice on where to purchase accessories please contact the sto...

Reviews: