background image

GB-8

Prepar
ation

Connec

tions

Initial 

Setup

U

sing 

the 
Fea

tur

es

U

sing 

the 
DVD 

Fea

tur

es

H

in

ts 

and 
Tips

, Specifica

tion 


and 

Saf

et

W

ar

nings

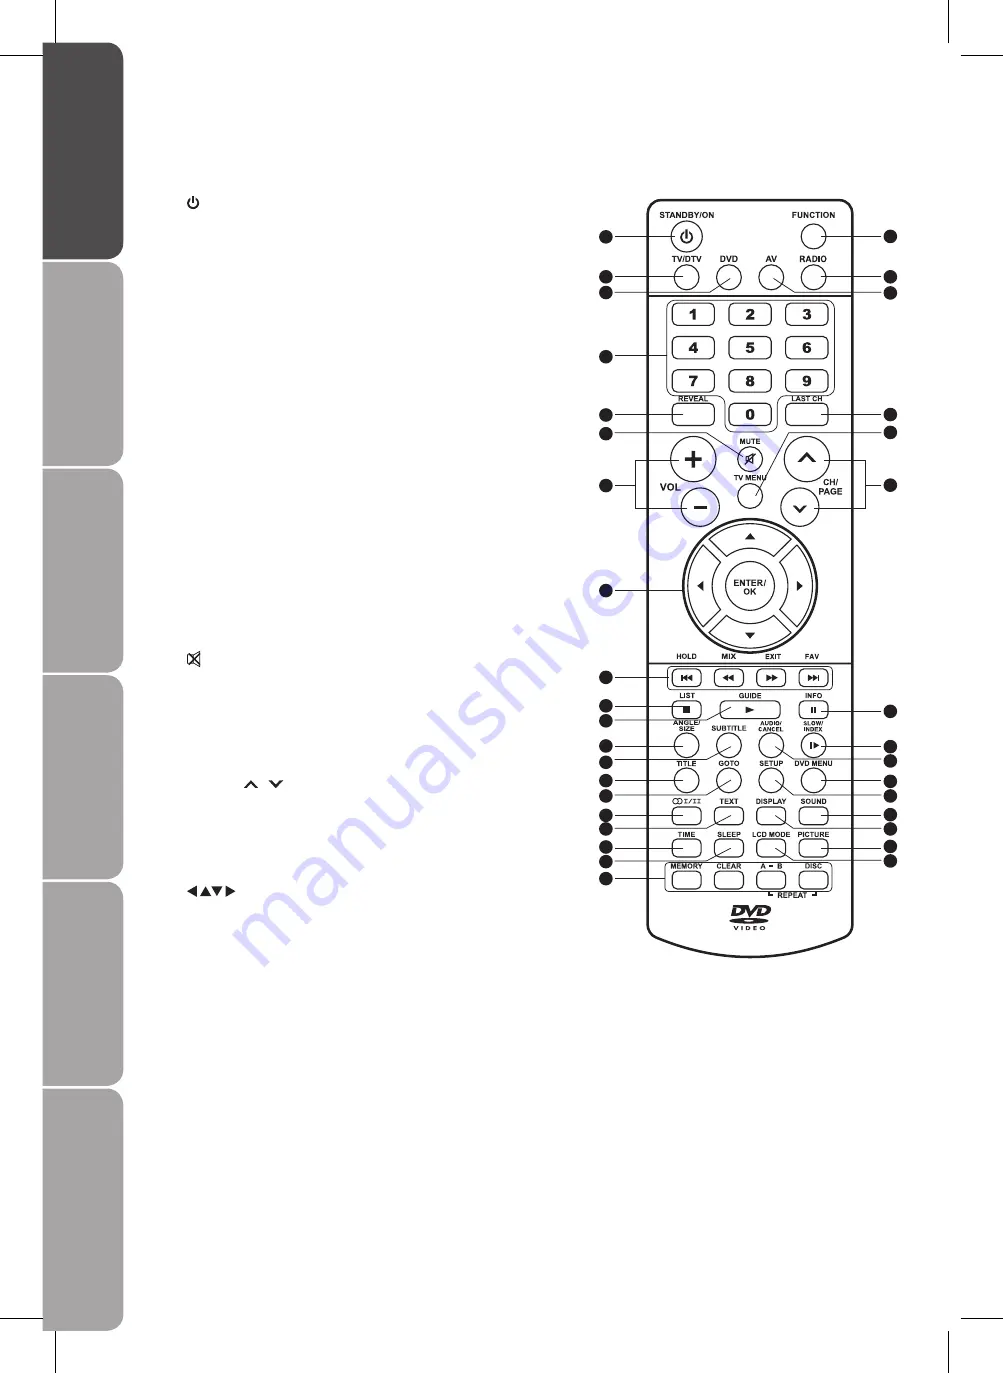
 STANDBY/ON


Switch the TV between on and standby mode.

2  FUNCTION


Select among the different input sources: DTV, TV, AV1, 
AV2/SCART, YUV/SCART, DVD or HDMI.

3  TV/DTV


A short-cut to switch the input source between TV and 
DTV.

4  DVD


A short-cut to switch the input source to DVD directly.

5


RADIO


A short-cut to switch to digital radio channels directly.

6


AV


A short-cut to switch the input source among AV1, AV2/
SCART, YUV/SCART or HDMI.

7  0-9 Number Button


Select a programme.


Select numbered items in a menu.

8


REVEAL


Reveal hidden information such as the answer to a quiz 
in Teletext. (TV mode) 

9  LAST CH


Return to previously viewed channel.

10


Mute and restore your TV sound.

11  VOL. +/-


Adjust the volume. 

12  TV MENU


Display the OSD (on screen display) menu.

13  CH/PAGE   / 


Select a channel.


Press to go forward or backward the page of Teletext 
screen. (TV mode)


Press to go forward or backward the page of 
Programme Edit & Favourite. (TV / DTV mode)

14


Allows you to navigate the OSD menus and adjust the 
system settings to your preference.


ENTER / OK


Confirm the selection in the OSD menus.

Remote Control

1

3
4

7

8

11

15

14

16

10

17

19
20
23
24
27

28
31

32
35

2

5
6

9

12

13

18

21

22
25

26
29

30
33

34

Summary of Contents for L19LDVB19

Page 1: ...corporates the latest technology to enhance your viewing experience We recommend that you spend some time reading this instruction manual in order that you fully understand these features You will also find some hints and tips to help you resolve any issues Read all the safety instructions carefully before use and keep this instruction manual for future reference ...

Page 2: ...rst Time 14 Selecting the Input Source 15 Channel Selection 15 Volume Adjustment 15 Using the Features 16 Customising the TV Setting Analogue TV DTV or Radio Mode 16 Auto Tuning 16 DTV Manual Tuning 16 ATV Manual Tuning 17 Programme Edit 18 CI Common Interface DTV Mode 19 Customising the PICTURE Setting 20 Customising the SOUND Setting 21 Audio Language for DTV 21 Customising the TIME Setting 22 C...

Page 3: ...ion DVD 31 Angle Selection DVD 31 Special Functions 32 Display DVD 32 Locating a Specific Title DVD 32 Locating a Specific Chapter Track 32 Locating a Specific Time 32 Repeat Playback 33 Repeating a Specific Section DVD CD 33 To resume normal playback 33 DVD Programmable Playback 34 Programmable Memory 34 Customising the DVD Function Settings 35 Language Setup 35 Video Setup 35 TV Type 36 System S...

Page 4: ...tain the packaging If you dispose it please do so according to local regulations The following items are included TV TV Base Remote Control AAA Batteries x 2 P N 043 A55656W170 Instruction Manual P N 811 818191W021 Quick Start Guide P N 810 818195W011 If items are missing or damaged please contact Partmaster UK only Tel 0870 6001 338 for assistance YUV SCART adapter P N 138 RGB040W001 ...

Page 5: ...lling Removing the Base Stand The LCD display is very fragile and must be protected at all times when removing the base stand Be sure that no hard or sharp object or anything that could scratch or damage the LCD display comes into contact with it DO NOT exert pressure on the front of the TV at any time because the screen could crack Disconnect all cables connected to the TV 1 Lay the TV down on a ...

Page 6: ...he sensor as its function may be affected 2 VOL Adjust the volume 3 CH Select a channel Select sub menu of OSD menu Press to skip to the beginning of the previous next chapter or track DVD mode 4 FUNCTION Select among the different input signal sources DTV TV AV1 AV2 SCART YUV SCART DVD or HDMI 5 MENU Displays the OSD on screen display menu 6 Press to start playback DVD mode 7 I Switch the TV on f...

Page 7: ... and any HDMI device such as a set top box Blu ray player and A V receiver 3 SCART Input Connect to VCR DVD Player or other AV devices with SCART output jacks 4 Connect earphones for private listening 5 MAINS CABLE Connecting to the mains socket 6 VIDEO AUDIO L R Connect to the Composite VIDEO and AUDIO L R output jacks on external video devices 7 Disc Tray Place the disc in with the label side fa...

Page 8: ...CART or HDMI 7 0 9 Number Button Select a programme Select numbered items in a menu 8 REVEAL Reveal hidden information such as the answer to a quiz in Teletext TV mode 9 LAST CH Return to previously viewed channel 10 Mute and restore your TV sound 11 VOL Adjust the volume 12 TV MENU Display the OSD on screen display menu 13 CH PAGE Select a channel Press to go forward or backward the page of Telet...

Page 9: ...r programmed playback DVD mode CLEAR green Press to clear input selections and cancel certain playback functions DVD mode REPEAT A B yellow Repeat a segment between A and B DVD mode REPEAT DISC blue Repeat a title chapter track or whole disc DVD mode 15 Press to skip to the beginning of the previous next chapter or track DVD mode Use to advance or reverse playback rapidly DVD mode HOLD Freeze a mu...

Page 10: ...to property Use only the types of the batteries which are indicated in this manual When the batteries are exhausted the remote will not function Replace both batteries at the same time with new ones Do not install new batteries with used ones and do not mix different types of batteries Do not dispose of used batteries as domestic waste Dispose of them in accordance with local regulations Handling ...

Page 11: ...te control to select AV1 mode and then press the ENTER OK button Or you may just press the AV button on the remote control to select AV1 mode directly Not all A V devices have the ability to connect to a TV Please check your A V devices user guides for compatibility Satellite Receiver Side View of TV TV AERIAL AV Cable not included Video Camera VCR DVD Player Recorder Set top Box Game Console L R ...

Page 12: ...emote control to display the Source List Use the buttons to select YUV SCART mode and then press the ENTER OK button Or you may just press the AV button on the remote control to select YUV SCART mode directly Connecting an A V Device with SCART Cable Use a SCART cable to connect the external A V 1 device s SCART socket to the TV s SCART IN jack Plug the connected devices into the mains socket 2 be...

Page 13: ...on on the top panel of the TV or on the remote control to display the Source List Use the buttons to select HDMI mode and then press the ENTER OK button Or you may just press the AV button on the remote control to select HDMI mode directly The HDMI connector provides both video and audio signals it s not necessary to connect the audio cable Using Earphones Turn down the volume before connecting ea...

Page 14: ... TV enters standby mode and the power LED on the front panel of the TV will illuminate In standby mode press the 2 I button on the top panel of the TV or the button on the remote control to turn the TV on The power LED will go off Always disconnect the TV from the mains socket when not in use for a long period of time The I button on the top panel of the TV or the button on the remote control is o...

Page 15: ...tion Press the CH CH buttons on the top panel of the TV or the CH PAGE buttons repeatedly or 0 9 buttons on the remote control to select the channel Alternative Press the LIST button to enter the Channel List Then use the buttons to highlight and select the channel Press the ENTER OK button to confirm the setting Press the LAST CH button on the remote control to return to the previously viewed cha...

Page 16: ...art on the screen then the ENTER OK button on the remote control to start the Auto Tuning Press the 5 TV MENU button to return back to the previous menu Press the 6 EXIT button to exit the menu Customising the TV Setting Analogue TV DTV or Radio Mode Auto Tuning Use this to automatically find and store all available channels Press the 1 TV MENU button and then use the buttons to select the TV SETT...

Page 17: ...eturn back to the previous menu Press the 6 EXIT button to exit the menu ATV Manual Tuning Allows you to make manual fine tuning adjustments if the channel reception is poor under analogue TV mode Press the 1 TV MENU button and then use the buttons to select the TV SETTING menu Press the 2 buttons and then the ENTER OK button or the button to select ATV Manual Tuning The DTV Manual Tuning screen w...

Page 18: ...ENU button to confirm the new name MOVE c ATV mode Press the YELLOW button and use the buttons to move to the selected channel then press the TV MENU button to confirm SKIP d Press the BLUE button to skip or not skip the selected channel Press the BLUE button again to undo it FAV e Favourite Press the FAV button to set or cancel the selected channel as one of the favourite programmes Press the 5 T...

Page 19: ...ries To insert the Common Access Module Before you insert the Common Access Module ensure that the 1 TV is switched off and the viewing card is inserted in accordance with the Service Provider s instructions Insert the Common Access Module into the slot Flip the 2 Common Access Module to another side and try again if you feel resistance Switch the TV on 3 To remove the Common Access Module Before ...

Page 20: ...y Contrast Adjusts the difference between light and dark levels in the picture for Personal mode Brightness Increase or decrease the amount of white in the picture for Personal mode Sharpness Adjusts the level of crispness in the edges between light and dark areas of the picture Colour Controls the colour intensity for Personal mode Tint For NTSC format Adjusts the balance between red and green le...

Page 21: ...intensity of higher pitched sounds Bass Controls the relative intensity of lower pitched sounds Balance Adjusts the relative volume of the speakers in a multiple speaker system Press the 3 TV MENU button to return to the previous menu Press the 4 EXIT button to exit the menu Audio Language for DTV While watching a DTV programme you can press the button to display the Audio Language menu and select...

Page 22: ...receiving a digital signal Time must be set before using Sleep Timer function Press the buttons to select a period of time after which the TV automatically switches to standby mode Off 5 90 120 min The timer begins to count down from the number of minutes selected If you turn the TV off after setting the sleep timer the sleep timer setting will be erased Alternative You may press the 1 SLEEP butto...

Page 23: ...o the previous menu Press the 4 EXIT button to exit the menu Video Size Aspect Ratio Allows you to watch the screen in various picture formats 16 9 4 3 Auto Expand Zoom LCD Off Press the LCD mode button repeatedly to select the desired format 16 9 The following selection will allow you to adjust the picture horizontally in linear proportion to fill the entire screen 4 3 The following selection wil...

Page 24: ...function to operate If the Lock System is set to On a valid password must be entered when you access the Auto Tuning Manual Tuning Program Edit New Installation Block Programme Parental Guidance Press the 1 TV MENU button and then use the buttons to select the LOCK menu Press the 2 buttons to select Lock System and then the buttons to select ON Press the 3 TV MENU button to return to the previous ...

Page 25: ... buttons to select the LOCK menu Press the 2 buttons to select Parental Guidance then press the buttons to select different rating Off 4 18 Press the 3 TV MENU button to return to the previous menu Press the 4 EXIT button to exit the menu A Block programme screen will pop up Press the 3 buttons to select a channel Press the GREEN button on the remote control to block or unblock the programme Press...

Page 26: ...d over the TV programme Press the MIX button again to return to the text page Page search while watching TV Press the CANCEL button while watching TV with teletext enter the page number you want by using the 0 9 buttons The top line of the text page will appear while the text searches for your page When the page is found the number will remain in the top left hand corner of the screen Double heigh...

Page 27: ...kfast Breakfast No Info Arth Mio Old No In Arthur No Information No Information Casual Co QVC Outlet Closedown No Information This is BBC THREE Best of Friends Animal 24 7 Homes Under the current date and time current channel number and name current programme and time programme date programme time programme information channel no channel name EPG Electronic Programme Guide DTV Mode This system has...

Page 28: ...red programme and then press the ENTER OK button to confirm Button Functions in a 7 Days Guide Remote Control Button Function YELLOW Press the buttons to view schedule of the previous next day then press the YELLOW button again to confirm INFO To display detailed informations of the selected programme if available or To select a channel or To select a programme ENTER OK To confirm and view the sel...

Page 29: ...rmat or JPEG files AUDIO VIDEO JPEG AUDIO CD Compact Disc Digital Audio AUDIO Supported Formats JPEG The file extensions has to be jpg and not jpeg Pictures encoding must comply with ISO format Some recorded files may not be able to be played due to the type and format of disc or condition of the recording Region Code Both the DVD player and the discs are coded by region These regional codes must ...

Page 30: ...ck number Fast Forward Fast Reverse Press the 1 buttons when a disc is playing The disc begins a fast scan at two times normal x2 speed Each time the buttons is pressed the speed of the fast scan changes x 2 x 4 x 8 x 16 x 32 x 2 x 4 x 8 x 16 x 32 Press the 2 button when you have reached the desired point to resume playback at normal speed Slow Motion Play DVD In Play mode press the 1 SLOW button ...

Page 31: ...ultiple languages On some DVDs subtitles are activated from the main menu of the DVD Press the DVD MENU button to activate the main menu Angle Selection DVD Some DVDs contain scenes which have been shot from a number of different angles For these discs the same scene can be viewed from each of these different angles While you are playing a DVD with different angles recorded press the 1 ANGLE SIZE ...

Page 32: ... play you can locate a specific chapter track by directly selecting a chapter track number Press the 1 GOTO button to search for your desired chapter track Press the 2 buttons to highlight a chapter track then press the 0 9 button s for the chapter track you want Press the 3 ENTER OK button to confirm Playback starts from the selected chapter track Locating a Specific Time You can move to a specif...

Page 33: ...e track repeatedly While the disc is playing press the REPEAT DISC button blue button until the indicator displays on the screen The current track is played repeatedly 2 Repeating an entire disc While the disc is playing press the REPEAT DISC button blue button until the indicator displays on the screen The entire disc is played repeatedly 3 To resume normal playback Press the REPEAT DISC button b...

Page 34: ... A screen will be shown as right Press the 2 button to highlight the Title Press the buttons to choose the desired title Press the button again to highlight the Chapter Press the buttons to choose the desired Chapter Press the ENTER OK button to confirm The highlight bar will move to the next item automatically Repeat step 2 to add additional titles and chapters 3 Press the 4 button to start the p...

Page 35: ...en highlight the Exit Setup Mode and then press the ENTER OK button Some DVDs may not play in the audio language you selected A prior language may be programmed on the disc Some DVDs may be set to display subtitles in a language other than the one you selected A prior subtitle language may be programmed on the disc Some DVD s only allow subtitle selection changes via the DVD s menu If this is the ...

Page 36: ...s to highlight the option Parental Ctrl Password or Default then press the button to enter Use the 4 buttons to select the desired setup option To exit the 5 SETUP MENU and return to the normal screen highlight the Exit Setup Mode and press the ENTER OK button TV Type Pan Scan When a wide screen video is played this mode clips the right and left sides of the image so that it can be viewed on a con...

Page 37: ...ould lock out playback of the disc altogether You cannot play password function equipped DVDs rated higher than the level you selected unless you cancel the parental lock function The parental lock levels are equivalent to the following ratings Level 1 Kid Safe Level 5 Pg r Level 2 G Level 6 R Level 3 Pg Level 7 Nc 17 Level 4 Pg 13 Level 8 Adult Password Use the buttons to shift and select PASSWOR...

Page 38: ...r other chemicals Do not use compressed air to remove dust Handling Discs Do not touch the playback side of the disc Do not attach paper or tape to disc Cleaning Discs Fingerprints and dust on the disc cause picture and sound deterioration Wipe the disc from the centre outwards with a soft cloth Always keep the disc clean If you cannot wipe off the dust with a soft cloth wipe the disc lightly with...

Page 39: ...ence such as an electrical appliance or power tool Poor reception on some channels Station or cable channel may be experiencing problems tune to another station Station signal is weak reposition the aerial for better reception Check for sources of possible interference Lines or streaks in pictures Check aerial Change the position of the antenna No pictures when connecting HDMI Check if the input s...

Page 40: ...our retailer or contact your local aerial installer Can I watch Freeview using a portable set top aerial Some but only a few homes may be able to use a set top aerial However for a much better reception we strongly recommend you use a rooftop aerial If you do not have access to a rooftop aerial for example if you rent a flat and the aerial is the responsibility of your landlord or if you re using ...

Page 41: ...576 AUTO Fullscreen 4 3 720P 1280 x 720 50 AUTO Fullscreen 4 3 60 1080I 1920 x 1080 50 AUTO Fullscreen 4 3 60 AUTO Fullscreen 4 3 HDMI Mode Resolution Vertical Frequency Hz Aspect Ratio 576P 720 x 576 50 AUTO Fullscreen 4 3 576I 720 x 576 50 AUTO Fullscreen 4 3 720P 1280 x 720 50 AUTO Fullscreen 4 3 60 1080I 1920 x 1080 50 AUTO Fullscreen 4 3 60 Specification Model L19LDVB19 Panel System 18 5 inch...

Page 42: ...ins supply before connecting disconnecting other devices or moving the unit Unplug the unit from the mains socket during a lightning storm Mains Cable Make sure the unit or unit stand is not resting on top of the mains cable as the weight of the unit may damage the mains cable and create a safety hazard If the mains cable is damaged it must be replaced by the manufacturer its service agent or simi...

Page 43: ...children push anything into the holes slots or any other openings in the case this could result in a fatal electric shock DVD Class 1 Laser Product This unit utilises a laser Use of controls adjustments or performance of procedures other than those specified herein may result in hazardous radiation exposure Before moving the unit ensure the disc tray is empty Always remove the disc when the unit i...

Page 44: ...nterface are trademarks or registered trademarks of HDMI Licensing LLC The FREEVIEW word and logo are trademarks of DTV services Ltd and are used under licence DTV Services Ltd 2002 The HD Ready Logo is a trademark of EICTA All trademarks are the property of their respective owners and all rights are acknowledged DGS Retail Ltd Maylands Avenue Hemel Hempstead Herfordshire HP2 7TG England If you re...

Reviews: