background image

26

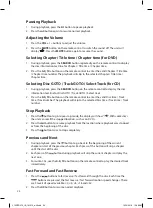
INFO

You can view the disc information (such as current title / chapter / track number, total 

playing time or remaining time on the disc) without interrupting the disc playback.
During playback, press the DISPLAY button on the remote control to display the available 

disc information.

Programmable Memory

DVD, CD

•  Press the PROGRAM button on the remote control to display the 

program menu. Press the 0-910+ buttons on the remote control 

to input the title/chapter/track number and then press the 


buttons to select START.

•  To resume normal playback, press the PROGRAM button and 

press the 

 buttons on the unit or remote control to select 

CLEAR, and then press ENTER button to confirm.

JPEG

Press the PROGRAM button on the remote control repeatedly to 

select the slide show mode. There are 16 types of slide shows.

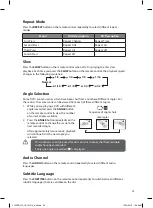
Zoom Selection

This function allows you to enlarge or shrink the video image or picture on the screen.

For DVD

1. During playback, press the ZOOM button on the remote control.

2. Press the ZOOM button repeatedly to display the picture in different 

scales. (2× size, 3× size, 4× size, 1/2 size, 1/3 size, 1/4 size, Normal size)

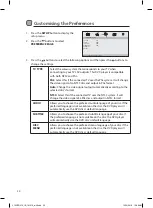
TITLE

Press the TITLE button on the remote control to return to the DVD title menu.

MENU

Press the MENU button on the remote control to return to the DVD main menu.

L10SPDV13_IB_161013_will.indd   26

13/10/2016   10:09 AM

Summary of Contents for L10SPDV13

Page 1: ...Instruction Manual 10 Portable DVD Player L10SPDV13 L10SPDV13_IB_161013_will indd 1 13 10 2016 10 09 AM...

Page 2: ...L10SPDV13_IB_161013_will indd 2 13 10 2016 10 09 AM...

Page 3: ...8 Connections 19 Connecting to a TV 19 Connecting to a Multi channel Audio Receiver 19 Using Earphones 20 UsingaUSBDeviceor andSD MMCCard 20 Compatible Disc Types 22 Supported Formats 22 Region Code 2...

Page 4: ...Settings 28 Customising the Video Settings 29 Customising the Preferences 30 Customising the Password Settings 32 Maintenance 33 Cleaning the Unit 33 Handling Discs 33 Cleaning Discs 33 Storing Discs...

Page 5: ...ains immediately Withdraw the mains adapter and consult your dealer Ventilation To prevent the risk of electric shock or fire hazard due to overheating ensure that curtains and other materials do not...

Page 6: ...than those specified herein may result in hazardous radiation exposure Before moving the unit ensure the disc tray is empty Always remove the disc when the unit is not in use Failure to do so will ris...

Page 7: ...NTER MODE SETUP VOL VOL REPEAT SLOW PROGRAM ZOOM If items are missing or damaged please contact Partmaster UK only Tel 0344 800 3456 for assistance Instruction Manual Quick Start Guide Thank youfor pu...

Page 8: ...screen Skip forwards to the next track 7 Button Navigate up to select an item on a menu screen Skip backwards to the beginning of the track or to the previous track 8 VOL Buttons Adjust the volume 9 S...

Page 9: ...en when the unit is on 1 SD MMC Memory Card Slot 2 USB Slot 3 AV OUT Socket 4 Earphones Socket Front View Right Side View 3 Battery Indicator Indicator flashes green when charging Indicator lights up...

Page 10: ...when the DVD you are playing has been programmed with multiple camera angles 6 TITLE Button Returns to DVD Title Menu 7 Cursor Buttons Navigate between selections on a menu screen and adjust certain s...

Page 11: ...disc 19 STOP Button Stop playback of a disc 20 MODE Button Adjust Brightness Contrast Hue and Colour of the LCD display 21 VOL Buttons Adjust the volume 22 Buttons Skip backwards to the beginning of t...

Page 12: ...ay cause corrosion or battery leakage which could cause fire personal injury or damage to property Install the battery correctly by following the polarity and indications in the battery compartment Wh...

Page 13: ...in use for a long period of time as it could cause corrosion or battery leakage and may result in physical injury and or property damage including fire Remote Control Operation Range Point the remote...

Page 14: ...and then fold it down with the display facing out 180 1 Align the angled support s bolt to the screw hole at the back of the DVD unit Turn the bolt clockwise and secure the support Mounting the DVD in...

Page 15: ...ng method to secure the car mount Unscrew the bolts holding the horizontal support bar together Slip both halves of the support bar around the headrests leg supports Screw in the bolts loosely Ensure...

Page 16: ...the headrests leg supports or held safely and does not obstruct any safety device including air bags or seat belts or it may cause injury in case of accidents Ensure all rear passengers are correctly...

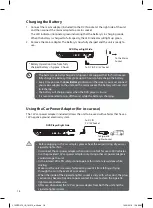
Page 17: ...om the mains socket SD MMC AV OUT COAXIAL DC IN 9 12V ON OFF DVD Player Right Side To DC IN 9V 12V Socket To the Mains Socket Turn off the unit before unplugging the mains adapter from the unit to avo...

Page 18: ...securely fastened to prevent it from falling or flying through the air in the event of an accident When the inside of the cigarette lighter socket is dirty with ash or dust the plug section may becom...

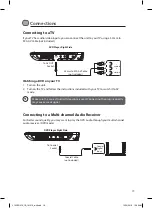
Page 19: ...he unit 2 Turn on the TV and follow the instructions included with your TV to switch it to AV mode Make sure the correct Audio Video cable is used Connecting the plug incorrectly may cause a weak sign...

Page 20: ...ure files JPEG or music files MP3 from a USB device or SD MMC card General Operation Step Action DVD Unit Remote Control 1 Connect the USB device to the USB slot or SD MMC card to the SD MMC slot SD M...

Page 21: ...2V ON OFF 7 To stop USB device or SD MMC card playback press STEP SEARCH MUTE SOURCE 1 2 3 4 5 6 7 8 9 0 10 DISPLAY SUBTITLE ANGLE AUDIO MENU TITLE ENTER MODE SETUP VOL VOL REPEAT SLOW PROGRAM ZOOM SD...

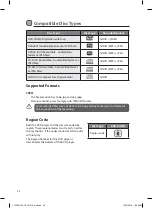
Page 22: ...ct Disc Digital Audio AUDIO Supported Formats JPEG The file extension has to be jpg and not jpeg Pictures encoding must comply with JPEG ISO format Some recorded files may not be able to be played due...

Page 23: ...disc down until you hear a click sound 4 Close the disc cover The unit will start playback if the disc does not have any menus recorded on it If the disc has one or more titles recorded on it a menu...

Page 24: ...he valid Disc time Track time Track number The playback will skip to the selected Disc time Track time Track number Stop Playback 1 Press the button to go to pre stop mode the display will show With s...

Page 25: ...each of these different angles 1 While you are playing a DVD with different angles recorded press the ANGLE button on the remote control to view the number of current angles available 2 Press the ANGL...

Page 26: ...and press the buttons on the unit or remote control to select CLEAR and then press ENTER button to confirm JPEG Press the PROGRAM button on the remote control repeatedly to select the slide show mode...

Page 27: ...TV A wide picture with black bands on the upper and lower portions of the TV screen will be displayed 16 9 Wide screen display WIDE SQUEEZE Sets the screen mode to 4 3 A wide picture will be squeezed...

Page 28: ...gue output of your DVD player LT RT Select this option if your DVD player is connected to a Dolby decoder STEREO Select this option to change channel output to stereo which delivers sound from only th...

Page 29: ...setup menu 2 Press the buttons to select VIDEO SETUP PAGE 3 Press the buttons to select the following options and then press the buttons to change the setting BRIGHTNESS Set the brightness level of v...

Page 30: ...TV uses the PAL system It will change the video signal of an NTSC disc and output in PAL format Auto Change the video signal output automatically according to the selected disc s format NTSC Select t...

Page 31: ...ord the master password is 1369 To disable the parental control and allow the DVD player to play all discs select ADULT Use the 0 9 buttons to enter the 4 digit password again DVD discs that are rated...

Page 32: ...ll be required to play a prohibited disc If the disc is locked and the system prompts you to enter the password 1 Use the 0 9 buttons to input the current password in the OLD PASSWORD box if the passw...

Page 33: ...outwards with a soft cloth Always keep the disc clean If you cannot wipe off the dust with a soft cloth wipe the disc lightly with a slightly moistened soft cloth and finish with a dry cloth Do not u...

Page 34: ...used Press the button Make sure the unit is not in fast forward or fast reverse mode Press the button Make sure the AUDIO VIDEO input output connections are correct The DTS DVD cannot be decoded to ha...

Page 35: ...not support Check the file format This product does not support NTFS file system The unit does not respond when pressing any button Turn the unit off and then back to on Alternatively turn off the uni...

Page 36: ...Lighter Adapter Input DC 12 V 2 A Output DC 12 V 2 A Ecodesign Information Information on Power Consumption Power Consumption of Standby Mode 0 5 W max Network Standby Power Consumption N A Not a netw...

Page 37: ...L10SPDV13_IB_161013_will indd 37 13 10 2016 10 09 AM...

Page 38: ...L10SPDV13_IB_161013_will indd 38 13 10 2016 10 09 AM...

Page 39: ...L10SPDV13_IB_161013_will indd 39 13 10 2016 10 09 AM...

Page 40: ...very next day Visit www partmaster co uk or call 0344 800 3456 UK customers only Calls charged at National Rate Rovi Proprietary Rights This item incorporates copy protection technology that is prote...

Reviews: