background image


SETUP AND INSTALLATION


SETUP


Installation Manual 


Page 

10


© Logic Energy Ltd. Registered in Scotland 


Connect GND and Shield cable first, and disconnect them last. 

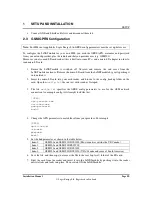
2.3  GSM/GPRS Configuration 


Note:

  For SIMs not supplied by Logic Energy Ltd, GPRS config parameters must be set up before use. 

 
To  configure  the  LeNETmobile  for  your  own  SIM,  you  need  the  GPRS  APN,  username  and  password 
from your network provider, plus the radio band that you provider uses (e.g. GSM900).  
Moreover you also need SD card reader (this is built into some PCs) and a micro-SD adapter in order to 
read micro-SD card. 
 

1.


Ensure  the  LeNETmobile  is  switched  off.  Unscrew  and  remove  the  end  cover  from  the 
LeNETmobile enclosure. Remove the micro-SD card from the LeNETmobile by gently pushing it 
in to unlatch it. 

2.


Insert  the  micro-SD  card  into  your  card  reader,  and  browse  to  the  config_backup  folder  on  the 
card. Open the 

config.txt

 file in a text editor such as Notepad. 


3.


The  file 

config.txt

  specifies  the  GPRS  config  parameters  to  use  for  the  GSM  network 

connection. An example config.txt file might look like this: 
 

[GPRS] 
apn=yourapn.com 
usr=username 
pwd=password 
bnd=0 


4.


Change the APN parameters to match those from your provider. For example: 
 

[GPRS] 
apn=internet 
usr=web 
pwd=web 
bnd=0


5.


Set the bnd parameter, as shown in the table below 

bnd=0 

GSM900 and GSM1800/DCS1800 (Most countries outside the US/Canada) 

bnd=1 

GSM900 and GSM1900/PSC1900 

bnd=2 

GSM850 and GSM1800/DCS1800 

bnd=3 

GSM850 and GSM1900/DCS1900 (USA/Canada and some of South America) 

6.


Save the file, and then copy (not move) the file to the root (top level) folder of the SD card. 

7.


Eject the card from the reader and insert it into the LeNETmobile by  pushing it into the socket 
until it clicks and locks into place. Then switch ON the LeNETmobile. 


Summary of Contents for LeNETmobile

Page 1: ...LeNETmobile Installation and User Guide LeNETmobile July 2012 TM...

Page 2: ...is intended for instructional purposes only This document is subject to change without notice and does not represent a commitment on the part of the manufacturer Every effort has been made to make thi...

Page 3: ...sure it has the security PIN disabled 3 Test the system and sensors before going on site for installation it s much easier to sort out any problems in your office or workshop 4 Keep any calibration c...

Page 4: ...11 2 5 Installation Checklist 12 2 6 LEDs Status 12 3 LESENSE MONITROING AND DATA ACCESS 13 3 1 Access to LeNETmobile Device 13 3 2 General Attributes of LeNETmobile Device 14 3 3 Data Ports of LeNETm...

Page 5: ...obile in a location where there is risk of water damage Use a waterproof enclosure if necessary Do not mount the LeNETmobile in a location where there is significant heat buildup The cover of the LeNE...

Page 6: ...ts information from the connected sensors and automatically sends data updates to LeSENSE web server regularly via the GSM GPRS network Some key features of LeNETmobile are 8 x Digital Input ports 6 x...

Page 7: ...rs reed switch sensors Rain collectors etc 24 VDC pulse 24 VDC mode for industrial applications Analog u D5 D10 0 3 3 VDC Analogue sensors with DC output voltage or current loop wind vanes temperature...

Page 8: ...dated on 1 LeSENSE web portal where data is stored on secure and reliable SAS70 Type 11 certified data centre technology system Data can be accessed managed analyzed and manipulated in a variety of us...

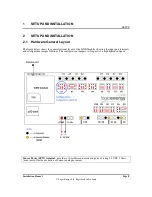
Page 9: ...e figure below shows the general internal layout of the LeNETmobile showing the input port terminals and configuration jumper locations The configuration jumpers set for port A1 is highlighted in figu...

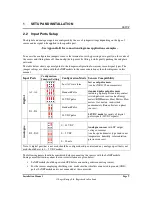
Page 10: ...sensors such as NRG C3 anemometers standard pulse output sensors including optical pulse and dry contact switch pulse sensors such as Energy meters KWH meters Heat Meters Flow meters Gas meters reed...

Page 11: ...micro SD card into your card reader and browse to the config_backup folder on the card Open the config txt file in a text editor such as Notepad 3 The file config txt specifies the GPRS config parame...

Page 12: ...allation Manual Page 11 Logic Energy Ltd Registered in Scotland Once the LeNETmobile is powered up and reads the new configuration file it automatically deletes the file Ensure you keep the backup fil...

Page 13: ...facing south in the Northern Hemisphere and facing north in the Southern Hemisphere for maximum sun exposure The vertical angle depends on latitude usually about 30 angle Mount the enclosure and pane...

Page 14: ...securely mounted and not obstructed by metal enclosures or masts and preferable vertical position 4 If you are using your own SIM then make sure that micro SD card contains the correct GPRS settings i...

Page 15: ...describes quick guide on LeSENSE web portal in order to check the LeNETmobile device for its different attributes and data 3 1 Access to LeNETmobile Device Logic Energy s online web portal LeSENSE can...

Page 16: ...ts in LeSENSE are a logical way of presenting the data that the physical inputs on the LeNETmobile capture Each logical port is associated with one physical input port and one sensor that defines the...

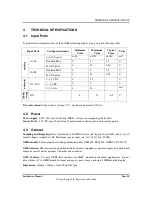
Page 17: ...100uA 4 2 Power Power supply 6 12V DC max 2A during GPRS average consumption typically 5mA Sensor Power 3 3V DC max 20mA total 10 millisecond excitation pulse each sample period 4 3 General Sampling a...

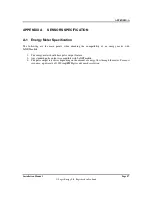
Page 18: ...e the main points when checking the compatibility of an energy meter with LeNETmobile 1 The energy meter should have pulse output feature 2 Any standard pulse output is compatible with LeNETmobile 3 T...

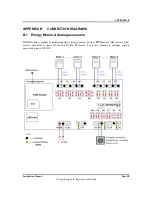
Page 19: ...d APPENDIX B CONNECTION DIAGRAMS B 1 Energy Meters Analogue sensors LeNETmobile is capable of monitoring upto 8 Energy meters such as KWH meters Heat meters Flow meters connected to ports A1 A4 and D1...

Page 20: ...onfigured to provide a pulse output dry contact KYZ or open collector of typically 1000 pulses per kWh depending on system size Sensors Port D1 Pulse output from generation energy meter dry contact or...

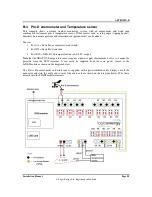
Page 21: ...gs Sensors Port A1 Primary top anemometer NRG 40C Port A2 Secondary lower anemometer NRG 40C Port D5 Primary wind vane NRG 200P Shielded cables must be used for the anemometer and wind vane connection...

Page 22: ...Port A1 Davis Pro anemometer reed switch Port D5 Davis Pro wind vane Port D10 NRG 110S temperature sensor 0 2 5V output Note that the NRG 110S temperature sensor requires a power supply of minimum 4 v...

Page 23: ...E PRODUCT IF IT HAS BEEN DAMAGED BY MISUSE ALTERATION ACCIDENT IMPROPER HANDLING OR OPERATION OR IF UNAUTHORISED REPAIRS ARE ATTEMPTED OR MADE SOME EXAMPLES OF DAMAGES NOT COVERED BY WARRANTY INCLUDE...

Reviews: