5
protrude enough from the underside of your layout then it will be necessary to extend the leads; soldering wires to them is the
most common method; make sure you insulate any connections you make to the photocell leads so that they don't short out.
Once you have wired the photocells to the
Block Animator/2
and verified their operation you may wish to put a dab of white
glue under the photocell to hold it in place; make sure you don't get glue on the top surface of the photocell as this may
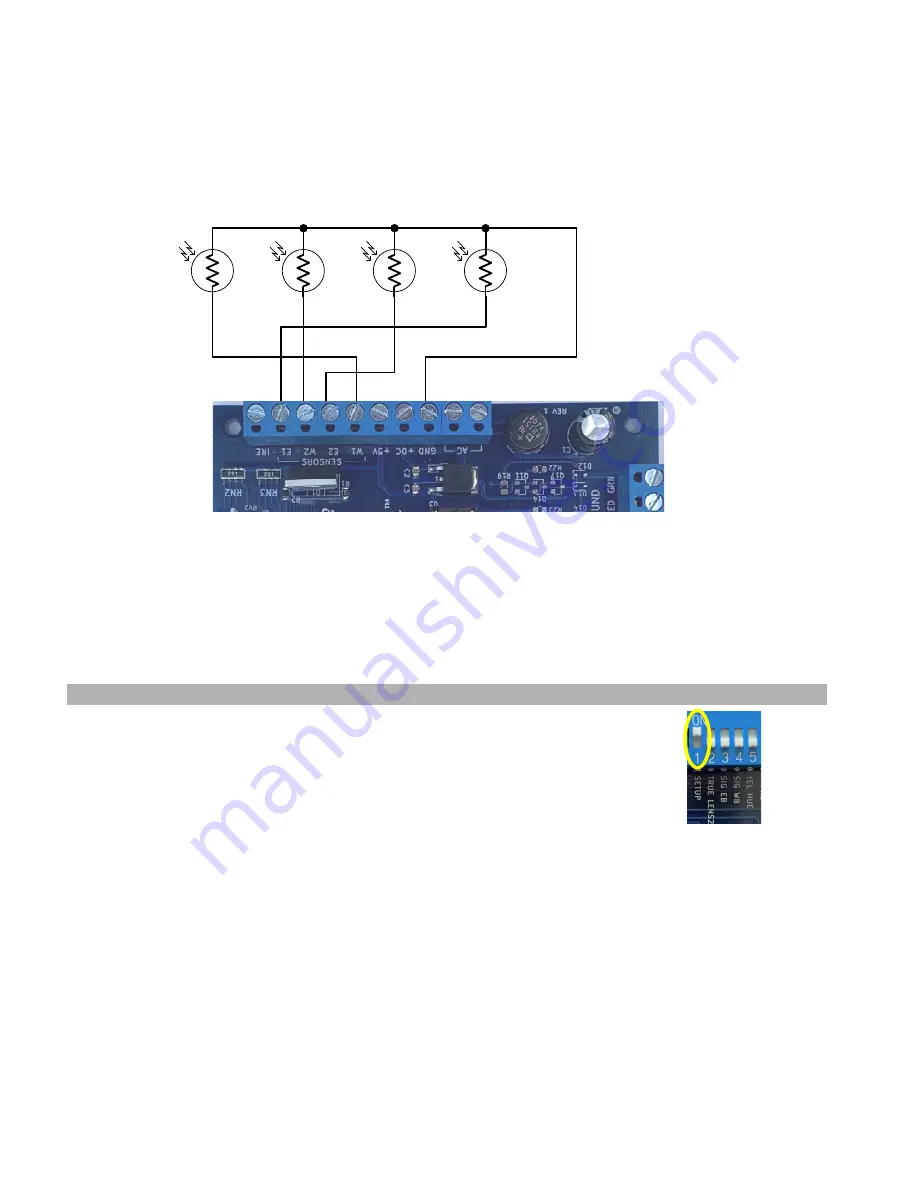
prevent it from operating properly. Figure 7 illustrates the photocell wiring; make sure you have the photocells in the correct
order as shown at the top of page 1. Photocells do not have any polarity so you can connect either lead to the GND terminal
and connect the remaining lead to the appropriate photocell input. The spacing between the outer photocells (W1 and E1) and
inner photocells (E2 and W2) depends upon how long of a signal “block” you wish to define for each signal. However, keep
in mind that there is a 35 second timeout that the
Block Animator/2
uses. This means that if it takes more than 35 seconds for
a train to cover the nearest inner photocell after uncovering an outer photocell then the
Block Animator/2
will think the train
has actually backed up and exited the block!
W2
W1
E2
E1
Figure 7 – Photocell wiring
Photocells require a light source above them to function properly. On most layouts the room lighting should be sufficient.
However, if the photocells are located in an area that doesn't get much overhead lighting or if you have simulated "nighttime"
operations then it will be necessary to locate light sources on the layout near the photocells. Street lights and yard lights are
common light sources. Locate the light sources slightly to the left or right of the photocells and not directly over them; this
will allow the
Block Animator/2
to still properly detect a train that has stopped over any photocell with the gap between cars
over a photocell.
Photocell sensitivity setup
You can adjust the sensitivity of each photocell on the circuit board using a small slotted
head screwdriver. Along one each of the board are four potentiometers (or “pots”) that are
labeled "W1", “E2”, “W2” or “E1”. The
Block Animator/2
supports a SETUP mode to
make this adjustment process easier. To enable this mode, you must have the switch
labeled SETUP in the ON/CLOSED position as shown in Figure 8. In this mode the
signals will not change colors. The
Block Animator/2
circuit board contains four sensor
status LEDs; one near each of the four adjustment pots. These LEDs will assist you in
setting the photocell sensitivity. Now follow these steps:
Figure 8 - SETUP mode
1.
Remove all obstacles that may be covering the photocells or blocking overhead light to them.
2.
Insert the blade of the screwdriver (from the edge of the circuit board, not from the center of the board) into the
adjustment pots, one at a time. Turn the screwdriver completely counter-clockwise (left) in all FOUR of the pots.
3.
For the adjustment pot labeled W1 turn the screwdriver clockwise (right) until the red LED near the pot just lights
up. Then turn the screwdriver back counter-clockwise until that LED goes out.
4.
Repeat step 3 for the three remaining pots with corresponding LEDs.
5.
Exit SETUP mode by putting the SETUP switch in the OFF/OPEN position (“operational” mode). The signals
should now operate properly. It may be necessary to repeat this procedure if layout lighting conditions change
significantly.
Note that the
Block Animator/2
will activate the sensor status LEDs when the associated sensor detects
a train in “operational” mode; this is different from the previous generation
Block Animator
!
Turning the pots clockwise adjusts for brighter overhead lighting conditions while turning the pots counter-clockwise adjusts
for dimmer overhead lighting.


