


34
35
The display console of the Logia 7-in-1 Wireless 6-Day Forecast Weather Station with Wi-fi
®
,
Everlasting Solar Cell, and Ultra-Wide Display can be paired with other add-on sensors like the indoor
hygro-thermo, soil moisture & temperature, and lightning add-on sensor.
Visit
www.logiaweatherstations.com
for the most updated list of compatible Logia add-on sensors.
FACTORY RESET
• To reset the console and start again, press the RESET button once or remove the backup battery
and then unplug the adapter.
• To revert back to factory settings and remove all data, press and hold the RESET button for six
(6) seconds.
30
8.4
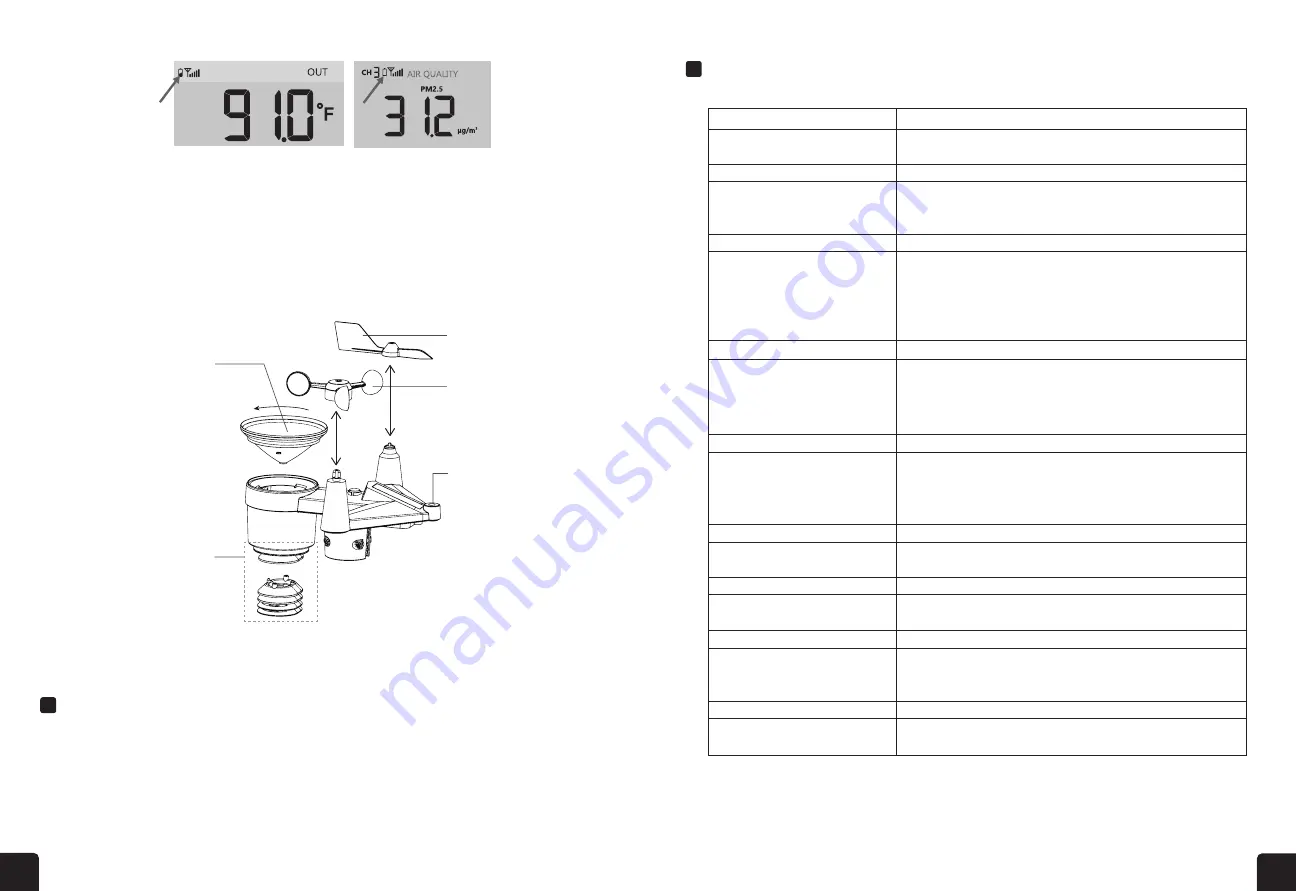
WIRELESS 7-IN-1 SENSOR ARRAY MAINTENANCE
REPLACE THE WIND VANE
Unscrew and remove the wind
vane for replacement
REPLACE THE WIND CUP
1.
Unscrew and remove the
top cap
2.
Remove the wind cup for
replacement
CLEANING THE RAIN COLLECTOR
1. Rotate the rain collector by turning
it 30°anti-clockwise.
2.
Gently remove the rain collector
.
3.Clean and remove any debris or
insects.
4.Install the collector when it is clean
and fully dried.
CLEANING THE UV SENSOR AND
CALIBRATION
• For precision UV measurement,
gentle clean the UV sensor cover
•
Over time, the UV sensor will
naturally degrade. The UV sensor
can be calibrated with a utility
grade UV meter, please refer to
Calibration section in previous
page for about the UV sensor
cablibration.
CLEANING HYGRO-THERMO
SENSOR
1.
Remove the 2 screws at the
bottom of the radiation shield.
2. Gently pull out the shield.
3.
Carefully remove any dirt or
insects on the sensor and
ventilation fan (do not let the
sensors inside get wet).
4.Clean the shield with water to
remove any dirt or insects.
5.Install all the parts back when
they are clean and fully dried.
9.
TROUBLESHOOT
Problems
Solution
7-in-1 wireless sensor
is intermittent or no
connection
1. Make sure the sensor is within the transmission range
2. If it still does not work, reset the sensor and resynchronize with console
Additional wireless
sensor(s) is/are
intermittent or no
connection
1. Make sure the sensor(s) is/are within the transmission range
2. Make sure the channel displayed match to the channel selection on sensor
3. If it still does not work, reset the sensor and resynchronize with console
No WI-FI connection
1.
Check the WI-FI icon on the display, it should be on if connectivity is
successful
2. In the console SETUP page, make sure the WI-FI settings (router's name,
security type, password) are correct
3. Make sure you connect to 2.4G band of the WI-FI router (5G not
supported)
Data not reporting to
ProWeatherLive
1. In the console SETUP page, ensure your Station ID and Station Key are
correct
2.
In the "Edit Devices" of the console on PWL, ensure the Device Mac
address is entered correctly
Multi-day forecast, cloud
cover, visibility, sunrise/
sunset, moon rise/
moon set times are not
accurate
1. Ensure your console is connected to PWL
2.
Ensure latitude, longitude & time zone in "Edit Devices" of the console on
PWL are correct
3. Press the
[
REFRESH ]
key to update the data instantly
Sunrise/sunset, moon
rise/moon set times are
different to that of PWL
1. Ensure your console is connected to PWL
2. Ensure the console Time Sync is set to
ON
Rainfall is not correct
1. Make sure the rain collector is clean for the tiping bucket to tip smoothly
2.
Make sure the sensor has stable and level mounting to ensure correct
tipping
Replacing the Wind Cup
1. Remove the rubber cup and
unscrew the wind cups.
2. Remove the wind cups for
the new replacement.
Cleaning the UV Sensor and
Calibration
• For precision UV measurement,
gently clean the UV sensor cover
lens with damp micro-fiber cloth.
• Over time, the UV sensor will
naturally degrade. The UV sensor
can be calibrated with a utility
grade UV meter.
Cleaning the Rain Funnel
1. Unscrew the rain funnel by turning
the rain funnel counterclockwise.
2. Gently remove the rain funnel.
3. Clean and remove any debris or
insects from the rain funnel.
4. Install the rain funnel when it is
clean and fully dried.
Cleaning the Hygro-thermo
Sensor
1. Remove the two (2) screws at
the bottom of the radiation shield.
2. Gently remove the shield.
3. Carefully remove any dirt or
insects on the sensor (do not let
the sensors inside get wet).
4. Clean the shield with water to
remove any dirt or insects.
5. Install all the parts back when
they are clean and fully dried.
Replacing the Wind Vane
1. Unscrew and remove the wind
vane for the new replacement.
COMPATIBLE DEVICES
TROUBLESHOOTING
7-in-1 wireless sensor is not connecting.
Additional wireless sensor(s) are
not connecting.
1. Make sure the sensor(s) is/are within the transmission range.
2. Make sure the channel displayed matches the channel selection on sensor.
3. If it still does not work, reset the sensor and resynchronize with console.
No Wi-fi connection
1. Check the WI-FI icon on the display, it should be on if connectivity is
successful.
2. In the console SETUP page, make sure the WI-FI settings (router's name,
security type, and password) are correct.
3. Make sure you connect to 2.4G band of the WI-FI router (5G not supported).
Temperature is too high in the daytime.
1. Place the sensor in open area and at least 4.9’ (1.5 m) off the ground.
2. Ensure that the sensor is placed away from heat generating sources or
structures, such as buildings, pavement, walls, or air conditioning units.
Some condensation beneath the UV
sensor may occur overnight.
This will disappear when temperature rises up under the sun and will not
affect the performance of the unit.
Data isn’t transferring to
ProWeatherLive.
1. In the console SETUP page, ensure your Station ID and Station Key are
correct.
2. In the "Edit Devices" of the console on PWL, ensure the device’s Mac
address is entered correctly.
Multi-day forecast, cloud cover,
visibility, sunrise/sunset, moon rise/
moon set times are not accurate.
1. Ensure your console is connected to PWL.
2. Ensure latitude, longitude & time zone in "Edit Devices" of the console on
PWL are correct.
3. Press the REFRESH button to update the data instantly.
Sunrise/sunset, moon rise/moon set
times are different to that of PWL.
1. Ensure your console is connected to PWL.
2. Ensure the console Time Sync is set to ON.
Rainfall data is not correct.
1. Make sure the rain collector is clean for the tipping bucket to tip smoothly.
2. Make sure the sensor has stable and level to ensure correct tipping.
PROBLEM
SOLUTION
1. Make sure the sensor is within the transmission range.
2. If it still does not work, reset the sensor, and resynchronize with console.
32
8.1.1 FIRMWARE UPDATE STEP
1.
Download the latest version firmware to your PC/Mac.
2. Set the console into AP (access point) mode then connect the PC/Mac to the console (refer
to
section 6.1
and
6.2
).
3.
From the SETUP page, press ADVANCED to enter advance setting
4.
Under the firmware upload section, press
Browse
to locate the firmware file saved on
your PC/Mac.
5. Press
Upload
to start firmware update.
The update time is around 5 ~ 10 minutes. While updating, the
progress will be displayed (i.e. 100 is completion).
6. The console will restart once the update is completed.
7. The console will stay in
AP mode
for you to check the firmware version and all the current
setting. Simply press and hold
[ SENSOR / WI-FI ]
key for 6 seconds to exit AP mode.
IMPORTANT NOTE:
-
Please keep connecting the power during the firmware update process.
-Please make sure your PC/Mac's WI-FI connection is stable.
-
When the update process start, do not operate the PC/Mac and console until the update finished.
-
During firmware update the console will stop upload data to the cloud server. It will reconnect to your WI-FI
router and upload the data again once the firmware update succeed. If the console cannot connect to your
router, please enter the SETUP page to setup again.
-
After the firmware update, If the setup informations are missing, please input the setup information again.
-
Firmware update process have potential risk, which cannot guarantee 100% success. If the update fail,
please redo the above step to update again.
8.2
BATTERY REPLACEMENT
When low battery indicator or is
displayed near the antenna icon of
the sensor(s), it indicates that the
outdoor 7-IN-1 sensor and/or current
channel sensor(s) battery power is low
respectively. Please replace with new
batteries.
8.2.1 RE-PAIRING THE SENSOR(S) MANUALLY
Whenever you changed the batteries of the 7-in-1 weather sensor array or other additional
sensors, re-synchronization must be done manually.
1. Change all the batteries to new ones in the low battery sensor(s).
2. Press
[ SENSOR / WI-FI ]
key on the console to enter sensor synchronization mode (as
indicated by the flashing antenna
).
8.3
RESET AND FACTORY RESET
To reset the console and start again, press the
[ RESET ]
key
once or remove the backup battery
and then unplug the adapter.
To resume factory settings and remove all data, press and hold the
[ RESET ]
key for 6 seconds.


