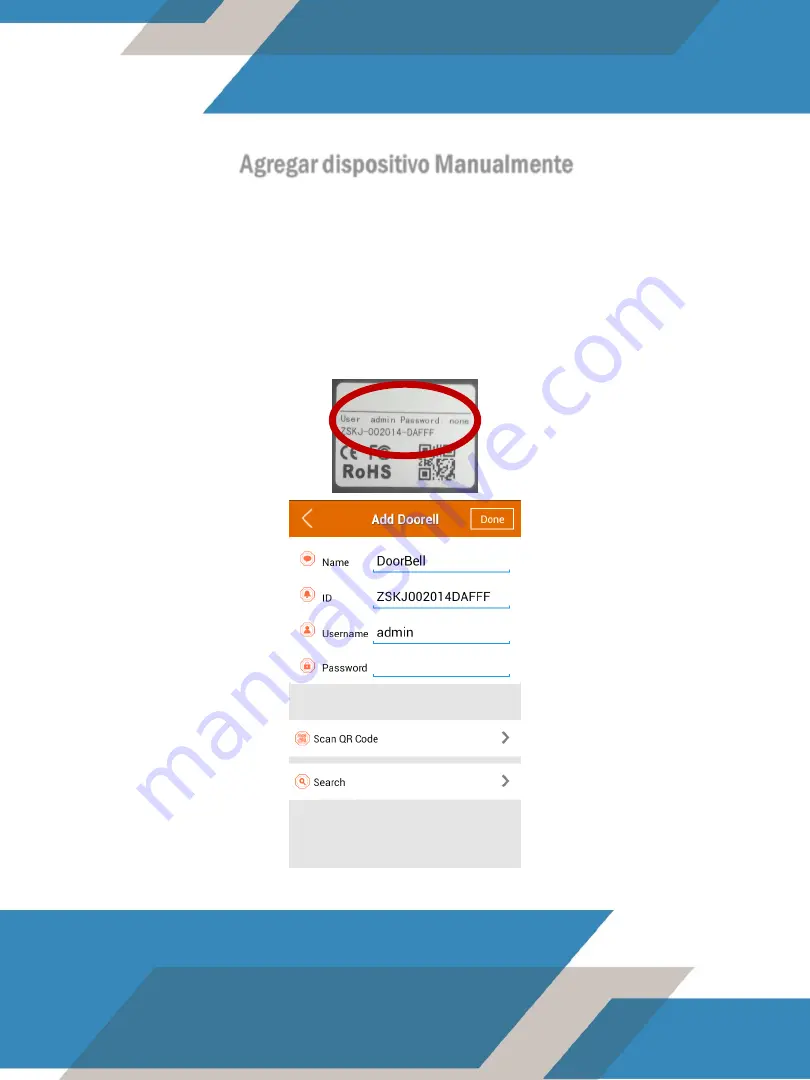
Para ello se deben tomar los datos ubicados en la parte posterior de su
timbre inteligente e incluirlos como parámetros del equipo.
A continuación se muestran los pasos a seguir.
Agregar dispositivo Manualmente
IMÁGENES DE REFERENCIA
Page 1: ...Modelo L SB01 ...
Page 2: ......
Page 3: ...al de su router para su correcto funcionamiento Si esto no es posible debe conectar un repetidor inalámbrico para aumentar el rango de señal Para una operación adecuada y satisfactoria de su timbre inteligente debe ubicar su equipo a una altura mínima de 1 50 metros Si es posible conecte la alimentación de corriente lo más cerca posible al equipo para evitar mal funcionamiento del mismo ICALLBELL ...
Page 4: ...en su teléfono inteligente debe ejecutar la App para agregar su timbre inteligente Debe seleccionar la opción Agregue Timbre Add doorbell Debe elegir uno de los modos en que desea incluir los datos ya sea manual o en forma automática por Código QR o por búsqueda de dispositivos Search IMÁGENES DE REFERENCIA ...
Page 5: ...ben tomar los datos ubicados en la parte posterior de su timbre inteligente e incluirlos como parámetros del equipo A continuación se muestran los pasos a seguir Agregar dispositivo Manualmente IMÁGENES DE REFERENCIA ...
Page 6: ...ión se iniciará la cámara escáner la cual debe acercar al código QR ubicado en la parte posterior de su timbre inteligente A continuación se muestran los pasos a seguir Agregar dispositivo por Código QR IMÁGENES DE REFERENCIA ...
Page 7: ...ivos conectados a su red local Para ello debe conectar un cable de red a su timbre inteligente que a la vez debe estar conectado a uno de los puertos del router A continuación se muestran los pasos a seguir Agregar dispositivo por Búsqueda SEARCH IMÁGENES DE REFERENCIA ...
Page 8: ... que el estado de su dispositivo cambie de Conectando Connecting a En Linea Online tomando en cuenta que debe mantenerse conectado a la red local en la que desea que su equipo trabaje En este punto debemos configurar el equipo para que se conecte de manera inalámbrica presionando el ícono IMÁGENES DE REFERENCIA ...
Page 9: ...ebe dirigirse al Administrador de Redes Inalámbricas WLAN el cual procederá a realizar una búsqueda de las redes inalámbricas que se encuentren en el área Debe escoger la red inalámbrica de su router e ingresar la contraseña de su red Presione Listo DONE CONFIGURACION PARA CONEXIÓN INALAMBRICA IMÁGENES DE REFERENCIA ...
Page 10: ...Conectando Connecting a En Linea Online Ya su dispositivo se encuentra listo para ser usado lo cual lo puede verificar presionando el botón de la aplicación Se podrá visualizar la cámara lo que le permitirá ubicar su timbre inteligente en el mejor ángulo posible IMÁGEN DE REFERENCIA ...
Page 11: ... el ícono verde y comenzar a hablar dejando presionado el ícono IMÁGEN DE REFERENCIA Cuando un visitante haga uso del timbre se le notificará a través de una alerta en su teléfono Android de la siguiente manera IMÁGEN DE REFERENCIA ...
Page 12: ...ed Alimentación 12V 1A Botón Reinicio De Fábrica Interfaz de Cerradura DIAGRAMA DE CONEXIÓN PARA EL TIMBRE Cableado para el control de Cerradura Alimentación para Cerradura Alimentación para desbloquear Cerradura ...
Page 13: ...Cualquier otra consulta se puede comunicar al departamento de soporte técnico por medio del correo support logan cam com http www logan cam com ...
Page 14: ...Model L SB01 ...
Page 15: ......
Page 16: ...signal range of your router for correct operation If this is not possible you must connect a wireless repeater to increase the signal range For proper and satisfactory operation of your Smart Bell you must locate the equipment at a minimum height of 1 50 meters If possible connect the power supply as close as possible to the equipment to avoid malfunctions ICALLBELL ...
Page 17: ...stalled in your smartphone you must run the app to add your Smart Bell You must select the Add Doorbell option Then you have to select one of the modes that you want to include the data it can be manual or automatic by the QR code or search the device REFERENCE PICTURES ...
Page 18: ...For this you have to take the data located in the back of your Smart Bell and include as the device parameters Here are the steps to follow ADD DEVICE MANUALLY REFERENCE PICTURES ...
Page 19: ...y selecting this option the camera will start the scanner which should be near to the QR code located on the back of your Smart Ring Here are the steps to follow ADD DEVICE BY QR CODE REFERENCE PICTURES ...
Page 20: ...es connected to your local network will start To do this you must connect a ethernet cable to your Smart Bell which in turn must be connected to one of the ports on the router Here are the steps to follow ADD DEVICE BY SEARCH REFERENCE PICTURES ...
Page 21: ...on and wait until the status of your device change from Connecting to Online notice that it has to stay connected to the local network where you want that your device work At this point we must configure the device to connect wirelessly by pressing the icon REFERENCE PICTURES ...
Page 22: ...tings and you should go to the Wireless Network Manager WLAN which proceed to search in the local wireless network You must select your router wireless network and put the network password Press DONE CONFIGURATION FOR WIRELESS CONNECTION REFERENCE PICTURES ...
Page 23: ...e to change the status of Connecting Connecting to online Online Your device is ready for use which you can check by pressing the application button The camera can be visualized which allows you locate your Smart Bell at the best possible angle REFERENCE PICTURES ...
Page 24: ...r you must press the green icon and start to talk pressing the icon When a visitor rings the bell you will be notified through an alert on your smartphone as the next image REFERENCE PICTURES REFERENCE PICTURES ...
Page 25: ...Ethernet Port Power Supply 12V 1A Factory Reset Button Lock Connection CONNECTION DIAGRAM FOR THE SMART BELL Wiring for control lock Power supply to lock Power supply to unlock keys ...
Page 26: ...Any other questions you can contact our Technical Support Department at support logan cam com http www logan cam com ...